Quit all Adobe applications currently running on your desktop.
If you are logged in as a Guest or Standard User, Windows will not permit you to install the driver. Some organizations do not allow users to regulate what they install and how they can manipulate the system and application settings. You may need to contact your system admin for assistance with installing the driver in that situation.
Before you start
Create a backup of your boot volume. For more information, see How to: Create a system image in Windows 10.
Install Intel Graphics driver
-
-
Click here to download the driver version: 27.20.100.8476 qualified by Adobe as a baseline driver.
NoteAdobe recommends that the driver version should be 27.20.100.8476 or above.
-
For most users, a manual installation process is required. This involves uninstalling the drivers provided by your PC manufacturer before installing the drivers provided here. Adobe strongly recommends that you back up your system first. You can find Intel's instructions on installing the drivers manually here.
If you already have the generic Intel driver installed, continue following the directions below to update the generic driver.
-
Unzip the downloaded zip file.
-
Double click the unzipped driver file (file name: igxpin.exe).
-
Click Yes when prompted for permission from User Account Control.
-
Follow the instructions in the installation screen.
-
After the drivers are installed, click OK, and then click Next to restart your computer.
-
Reboot your machine even if the setup does not prompt you to do so.
Verify driver installation
To verify your driver installation was successful:
-
Open Device Manager. For Windows 10, right-click the Windows Start icon or open Start menu and search for Device Manager. Go to Display Adapters section.
-
Double-click the installed Display Adapter in Device Manager.
-
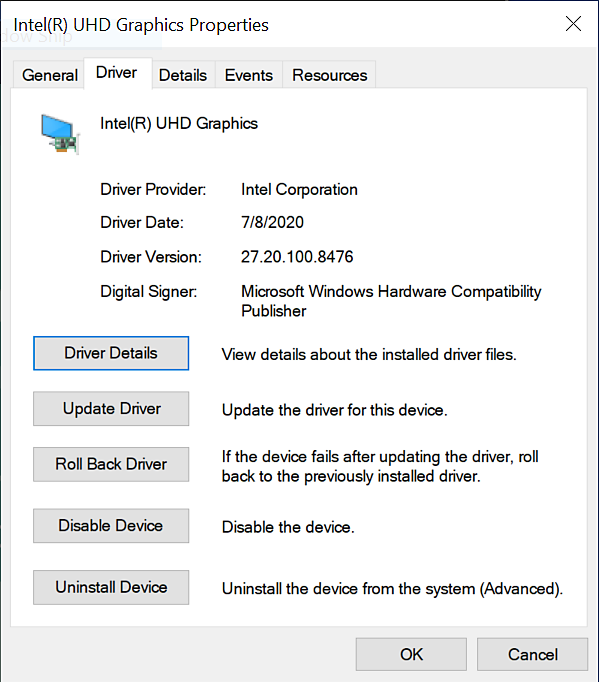
Click the Driver tab.
-
Verify the Driver Version and Driver Date fields are correct.
Verifying the driver version and driver date (screenshot to be updated) Verifying the driver version and driver date (screenshot to be updated)
Troubleshoot driver installation
You may sometimes see the following error messages while installing this driver.
Error: The driver being installed is not validated for this computer. Obtain the appropriate driver from the computer's manufacturer. Setup will exit.
Or
Error: This driver could not be installed on this computer. Contact the computer's manufacturer for further information.
Your computer manufacturer customizes drivers that run Intel® components on your machine. In this case the OEM’s have a specific customized driver version and they should only be installed if you need something specific for your system. Windows update might be a good idea, but Windows has a feature called device installation settings, which will automatically download manufacturers’ apps and custom icons for our devices, this feature depends on Windows Update feature, it’s enabled by default. So, when we update system, devices’ drivers will be updated at the same time, the effect is equal to install driver from manufacturer website. Although it can take some time until manufacturers publish their latest driver updates in Windows Update.
There might be a scenario where Windows Update restores an older OEM driver version over the newly installed driver. If you want a specific driver(s), disable Automatic Driver Downloads on Windows 10 using the following steps:
Disabling Automatic Driver Downloads immediately stops all OEM updates to download and install automatically as part of Windows Update. This can affect performance, stability and security outside of the Adobe application, in other ways.
How to Change Device Installation Settings in Windows 10
-
Click on the Start button and search for Control Panel.
-
In Control panel go to All Control Panel Items or System.
-
Click Advanced system settings situated on the left under Control Panel Home.
-
Open Hardware tab and click Device Installation Settings.
-
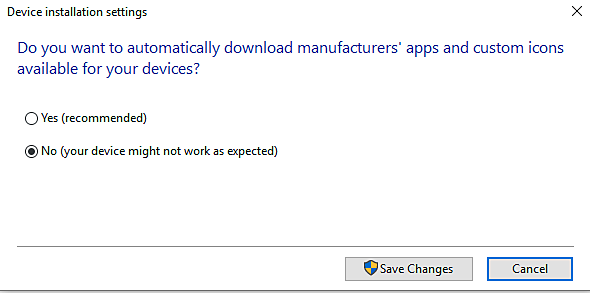
Select No (Your device might not work as expected) and click on Save Changes.
Changing your device installation settings Changing your device installation settings

