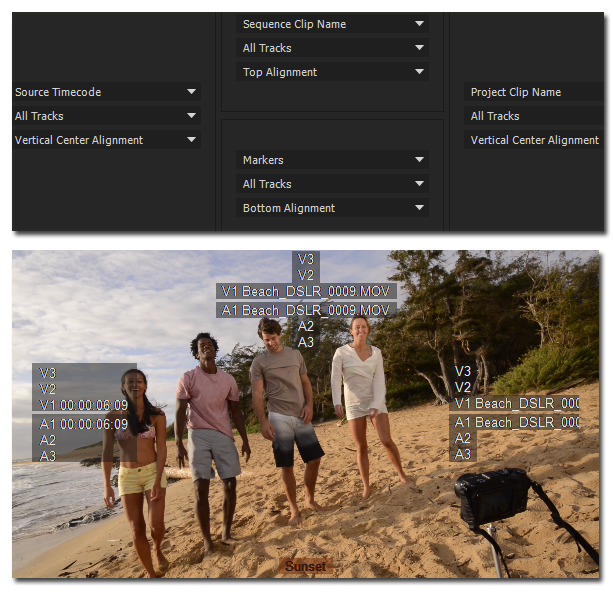
Monitor overlays display important metadata information superimposed on the Source Monitor and Program Monitor. You can view information like source timecode information, marker comments, and edit point indicators on the monitor in context with the clip or sequence.
Monitor overlays are easily customizable letting you select and control which metadata is displayed and where. You can also create overlay presets to quickly switch to different layouts or metadata content.
Display metadata as overlays
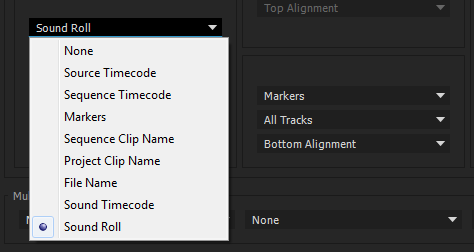
You can display the following metadata as overlays:
- Source Timecode
- Sequence Timecode
- Marker comments
- Sequence Clip Name
- Project Clip Name
- File Name
- Edit Point Indicators
- End Of Media/Sequence Indicators
- Multi-Camera Sources
- Sound Timecode
- Sound Roll
Overlays are not turned on by default. You can turn overlays on or off by clicking the Wrench icon ![]() in the Program Monitor or Source Monitor, and then select Overlays.
in the Program Monitor or Source Monitor, and then select Overlays.
When you turn overlays on, source clip timecodes and marker comments are displayed by default. When you scrub the clip or pause playback, the overlays show the relative metadata for whatever frame the playhead is on. Markers and Indicators are displayed depending on where the playhead is placed.
Overlays are displayed only when the monitor is in Composite Video display mode.
Specify overlay settings
Use the Overlay Settings dialog to control which overlays are displayed on the Program and Source Monitors.
Select Overlay Settings > Settings from the Program Monitor pop-up menu to open the Overlay Settings dialog. The list of available presets is also displayed as a submenu when you select Overlay Settings > Settings from the Program Monitor pop-up menu.
The Overlay Settings dialog displays the metadata fields in the same way as they align on the monitor. So you can intuitively know the placement of the overlays on the monitor.
The overlays are displayed in the following four quadrants on the monitors: Left, Right, Top Middle and Bottom Middle. The quadrants scale with the sizing of the monitor. While the quadrants can change in absolute size, their placement and relative size is constant.
In the default layout preset, the overlays are displayed to visually match the correct clip in a stack of clips in the sequence. For example, Source Timecodes overlays for clips in the sequence are displayed in a persistent vertical stack, matching the clips displayed in the video and audio tracks in the Timeline.


Source Timecode
Displays the Timecode value for the original source clip irrespective of where the playhead is located in the sequence.
Video tracks are denoted as V1, V2, V3, and audio tracks are denoted as A1, A2, A3. This information matches what is shown in the Info panel. By default, this information is displayed in the left side of the Source and Program monitors.
Sound Timecode Updates with each frame, like a normal timecode.
Sound Roll Sound roll is a static value and does not update.


Marker comments
When you add a marker to your clip or sequence, you can display the clip marker and sequence marker comments as overlays. The overlay displays the comments concatenated to the marker name.
The clip marker overlay shows the different tracks in the clip. The Sequence Marker overlay does not show all the individual tracks in the sequence but shows it as a single marker overlay.
Action and Title Safe Area
Action safe area determines the part of the video image that will be displayed on a television screen when a sequence is played back. Any part of the video outside the safe area won’t be displayed on the television screen. To ensure that titles are not hidden or clipped on the television screen, it is recommended to restrict any titles or text to the title safe area.
Safe Margin overlays in Premiere Pro provides visual indicators or boundaries within which you can restrict your video image and text to the safe area.
To enable or disable Safe Margins, click the Wrench icon in the Program Monitor, and select Safe Margins. You can then specify the Safe Margin settings in the Overlay Settings dialog.
You can select Include 4:3 Safe Margin or specify the horizontal and vertical control settings for the Safe Margin.
End Of Media/Sequence Indicators
Selecting this option turns on both End Of Sequence and End of Media indicators.
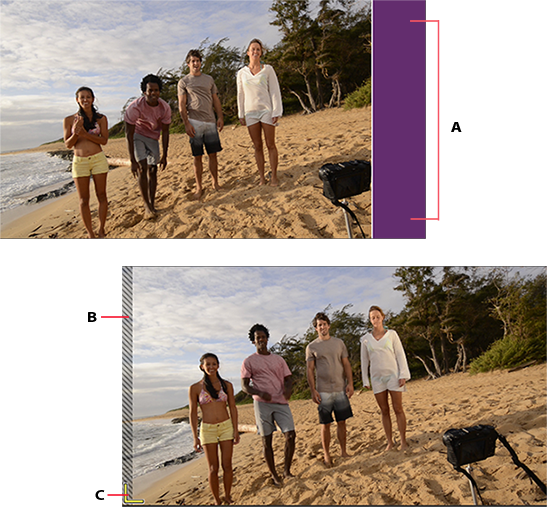
When the playhead goes past the last frame of media on the Timeline and there is no clip after that, a purple colored frame appears along the right edge of the last frame of a clip or sequence.
When the playhead is on the first or last frame of a clip in a sequence, a striped column appears along the left edge of the first frame or the right edge of the last frame. End Of Media indicators are useful when viewing multiple clips in a sequence in the Program Monitor.
Edit Point Indicators
Indicate the edit points for sequences, and are turned on by default.
When the playhead is on the In or Out point of a clip, a yellow-colored angular bracket appears at the bottom edge of the clip frame. If there is a gap between two clips in a sequence, Edit Point indicators appear on the left or right edge of the clip to indicate either In or Out points.

A. End of sequence indicator B. End of media indicator C. Edit point indicator

Enable overlays for Transmit
Select Enable Overlays For Transmit to send overlays for display to an external monitor.
Enable overlays during playback
Select Enable Overlays During Playback to display the overlays on the monitor while playing the footage.
Text Size
The Text Size setting determines how large the type appears in the overlay. If you select a large text size, and there is not enough space on the monitor to display the text, the text can get truncated.
Opacity
The Opacity setting determines the degree to which the overlay conceals or reveals the monitor display. A layer with 1% opacity is nearly transparent while a layer with 100% opacity is opaque.
Display overlays in Multi-Camera View
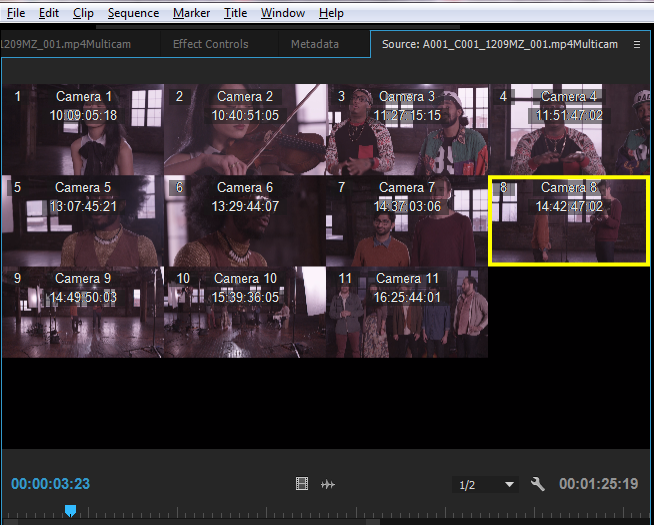
When creating a multi-camera source sequence, you can select the Camera Names option in the Create Multi-Camera Source Sequence dialog box. Depending on the Camera Names option that you select, the camera angles are displayed as track names, clip names, or camera numbers in the Source Monitor. For more information, see Multi-Camera workflow improvements.
In the Multi-Camera View mode, you can display up to two metadata properties selected in the Overlay Settings dialog. For example, in the Overlay Settings dialog, you can select Camera Name and Source Timecode to display as follows:


Import, export, and create overlay presets
You can save your customized overlay settings as overlay presets. Overlay presets let you quickly switch to different layouts or metadata content.
Create and save an overlay preset
In the Overlay Settings dialog, specify the settings that you want, and click the Save Preset icon ![]() . Enter a name to save and apply the preset.
. Enter a name to save and apply the preset.
Export, import, and delete presets
- To export a preset, select the preset from the Preset drop-down list and click the export icon
 . Enter a name for the preset, select the location to save the exported preset, and click Save. The preset is exported with a *.olp filename extension.
 - To import a preset, click the Import preset icon
 , and navigate to the Premiere Pro preset file (*.olp filename extension) that you want to import.
 - To delete a preset, select the preset from the Preset drop-down list, and click the Delete preset icon
 .
.