Use specialized tools and simple commands to change your artwork in Adobe Illustrator.


What you'll need
Download the sample file and follow along to learn a few ways to edit your artwork. Open Start.ai.
Cut paths and shapes
You can cut artwork in a few ways. Watch Cut and erase artwork to learn the basics. We’ll take it a bit further in this tutorial.
Choose View > Zoom In to magnify the artwork if necessary.
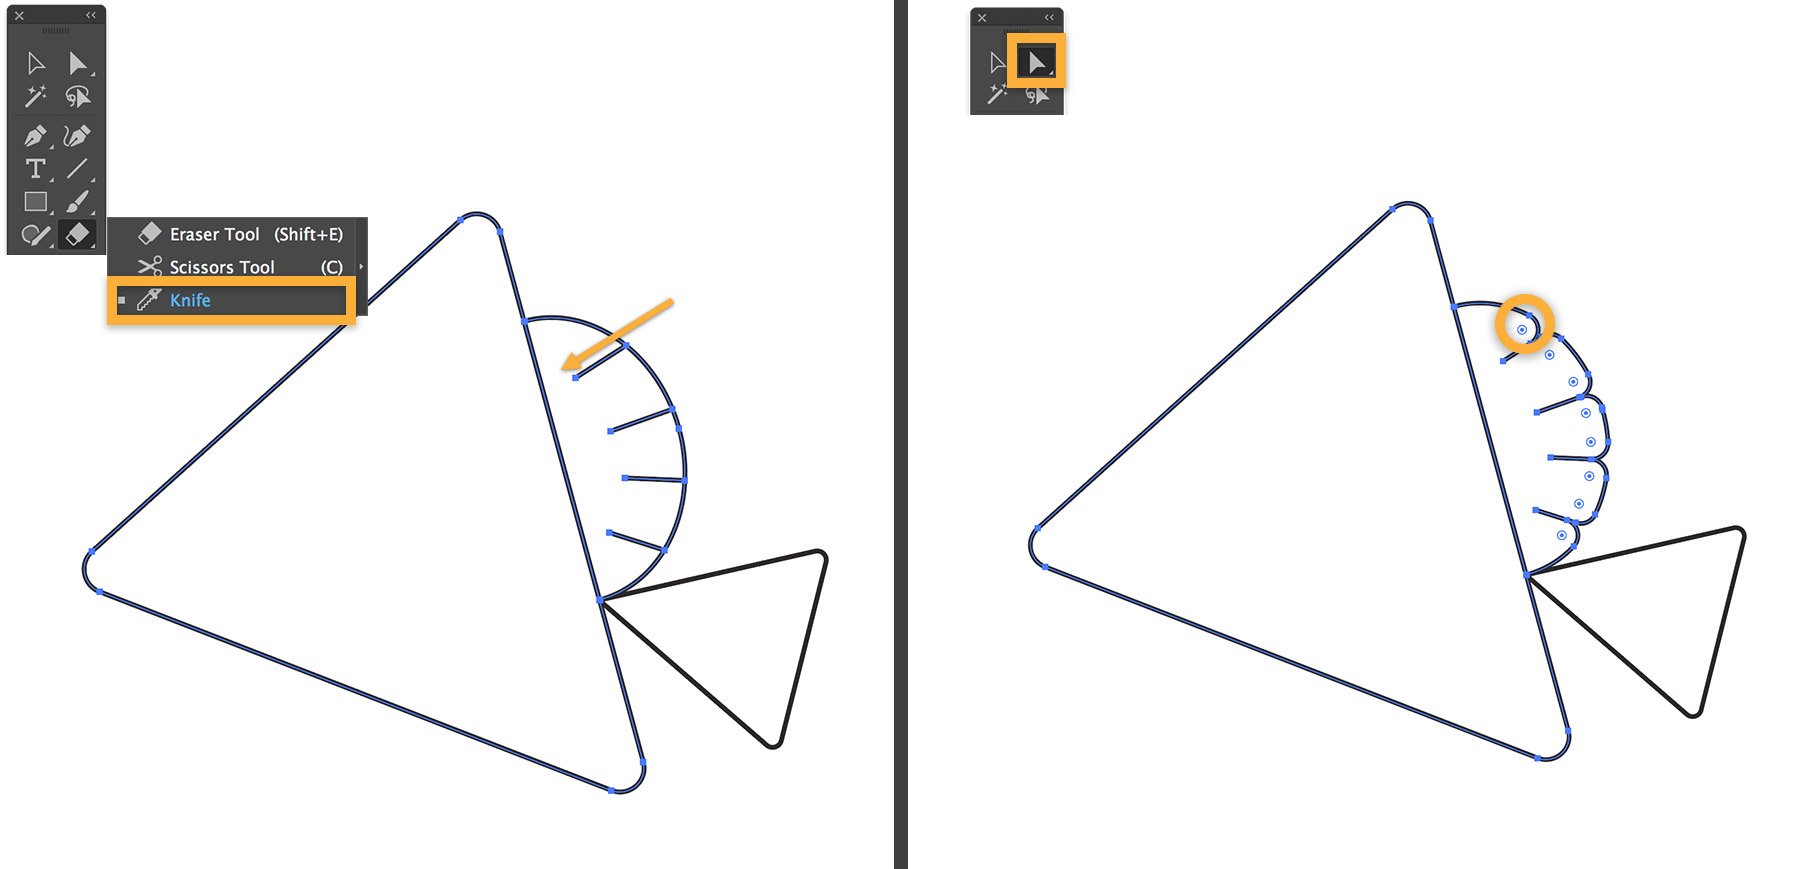
Let’s add some lines to the semicircular shape and turn it into a frilly fin. Click and hold the Eraser tool and select the Knife tool.
Press Alt (Windows) or Option (macOS) and drag a series of straight lines. Start outside the edge of the semicircle and release your mouse anywhere inside the semicircle to make a straight cut.
Tip: Press Alt+Shift (Windows) or Option+Shift (macOS) to constrain your cut to 90° or 45°.
Press A or select the Direct Selection tool in the Tools panel. Drag one of the live corners to curve all the live edges as shown.


We’ll add a small mouth by drawing with the Knife tool again. Draw a continuous, freeform line along the base of the larger triangle as shown. Select the Direct Selection tool in the Tools panel. Click away to deselect, and then click only the straight-line segment to select the small triangle. Press Delete to create an open mouth.


Cut, reshape, and combine with some other artwork
Now, you’ll add some stylized bubbles. Press L to select the Ellipse tool. Press Alt+Shift (Option+Shift) and drag out a medium-size circle. Set the stroke width to 5 pixels in the Properties panel.
Choose Edit > Copy, and then choose Edit > Paste in Place. This creates a duplicate in the same spot. Press Alt+Shift (Option+Shift) and drag a point to make a smaller, perfect circle.


Click and hold the Knife tool in the Tools panel and select the Scissors tool. Click in two places on the inner circle as shown. Select the cut segment with the Selection tool and press Delete to remove it. Repeat this step to cut and delete a small segment from the outer circle.
Next, you’ll round off the sharp edges on the circles. With the Selection tool, draw a selection rectangle around both circles. In the Properties panel, click Stroke to open the Stroke panel. Select the Round Cap option.


You can duplicate, scale, and rotate your bubble to create a stream of bubbles. Press Alt (Option) and drag a copy.
Tip: First release the mouse button, and then the Alt (Option) key after dragging.
Click Options (…) in the Transform section of the Properties panel and select Scale Strokes & Effects. Press Shift and drag a corner of the bounding box to resize it proportionally.
Move your cursor slightly away from a corner of the bounding box to access the curved arrow and drag it to freely rotate your bubble. Repeat to create more bubbles.
Tip: Alternatively, you can use the Properties panel to resize and rotate artwork. Type the values you want in the Transform section.


You’ll be using the two overlapping circles to create a large central fin. With the Selection tool, draw a selection rectangle around both circles. In the Properties panel, in the Pathfinder section, click the Minus Front icon (second icon from the left). This operation subtracts the circle in front, giving you exactly the shape you need. Drag the fin and place it on your fish as shown.
Tip: Use the arrow keys to nudge the shape into position.


Now practice this technique by creating a small notch in the tail fin.
Hint: Use the Ellipse tool to draw a circle overlapping the fish tail. Select both shapes, and click the Minus Front Pathfinder icon in the Properties panel.


Combine techniques to create the shape you want
Next, you’ll create the fish eye. Press V and drag a selection rectangle around the overlapping circles labeled EYE. In the Pathfinder section, click the Intersect button to create the eye shape.
Move the circle over the eye shape. Select both shapes, and then select the Shape Builder tool in the Tools panel. Press Alt (Option) and click in the circle to delete it from the combined shape. Select the eye and move it into place.


Use cookie cutter shapes
Select the black circle labeled BUBBLE on the artboard. Grab its center point, press Alt (Option), and drag upward to duplicate it. Use the magenta Smart Guide to stack it so they’re touching. Press Control+D (Windows) or Command+D (macOS) a few times to repeat the last action to create a tall column of circles.
Select the Line Segment tool in the Tools panel and click once to place a point directly above the circle column. Press Shift and drag a straight line down over the column. Align it with the center of the circles using the magenta guide as a reference.
Choose Object > Path > Divide Objects Below. This operation cuts the circles below the line into separate half circles. Press V to switch to the Selection tool and click outside the circles to deselect. Then click every other half circle and press Delete. Drag a selection rectangle around the seaweed, and then duplicate or reposition it in your design.


Now that you’ve experimented with cutting, trimming, and dividing shapes, try it on your own project. In no time, you’ll be instinctively reaching for different tools and techniques to use in your own stylish illustrations. View the Finish.ai file you downloaded to get inspired.

