Do any of the following:
Equitable Language: We are replacing non-inclusive language from InDesign 2022 (version 17.0) onwards, to reflect core Adobe values of inclusivity. Any reference to Master page is replaced by Parent page in our Help articles for the English, Danish, Hungarian, Spanish, Italian, Brazilian, Portuguese, and Japanese locales.
Layout grids appear only in the Japanese version of InDesign
Layout grid overview
For workflow, editorial designers for magazines tend to use paper-based workflows with layout sheets. InDesign’s layout grid functions in the same way as this type of paper-based layout. In addition, InDesign's Layout Grid differs from paper-based layout in that you can modify font size, stroke width, page count and other elements as necessary in order to create customized layouts.
You can set a character grid (character size) using the Layout Grid and also arrange the grid to fit horizontal text going from left to right, and vertical text starting from the top right hand corner.


With the Layout Grid you can snap an object into position in the same way as with a Document Grid or Baseline Grid.
When creating a new document, click Layout Grid in the New Document dialog box and you can specify layout settings in the New Layout Grid dialog box displayed. You can change the layout grid of an existing document or apply a layout grid to a document created using Margins and Columns.


Change layout grid settings
When changing layout grid settings, note the following:
To specify application default settings for a document with layout grid, choose Layout > Layout Grid without opening any documents, and modify the settings. These settings will be applied to new documents created thereafter. Altering the default settings on the layout grid will also cause the frame layout application default settings to change accordingly.
Changing settings in the Layout Grid dialog box can affect settings in the Margins and Columns dialog box. The opposite can also occur. For example, when you change the number of columns in the Layout Grid dialog box, the new column setting will be reflected in the Margins and Columns settings. However, if the values for Margins and Paragraphs is not divisible by the number of characters or lines designated in the Layout Grid, gaps may appear in the Layout Grid or Column Margin Guide. To show no spaces around the layout grid, open the Layout Grid dialog box, and click OK. The grid is adjusted as closely as possible to the character grid border.
The Layout Grid option displayed in the Grid Format panel will be affected by the grid attributes from the Layout Grid settings applied to the current page. If you apply several layout grids to one document, the contents of Layout Grid settings will change according to the settings of the Layout Grid of the selected page.
Change layout grid settings
-
To change the layout grid settings for one spread or page, move to the spread you want to change or, select the spread or page in the Page panel.
To change the layout grid settings for multiple pages, select the pages in the Page panel, or select the parent page that controls the pages you want to change.
Layout grid settings can be set on individual pages, thus one document may contain a number of different layout grids.
-
Choose Layout > Layout Grid, and change the settings.
-
Click OK.
Layout Grid options
The following options appear when you choose Layout Grid in the New Document dialog box or when you choose Layout > Layout Grid.
Direction
Select Horizontal for text to flow left to right horizontally, and Vertical for text to flow top to bottom vertically.
Font
Select font family and font style.The font selected will become the Frame Grid default setting. Furthermore, if the grid is set as ICF in the Character Grid in Preferences, the grid size varies depending on the ICF of the font selected. (See Customize layout and frame grids.)
Size
Specify the font size to be used as a base for the body text in the layout grid. This determines the size of individual grid cells within the layout grid.
Vertical and Horizontal
Specify the transformation ratio as a percentage for the font defined in the grid. The size of the grid will alter according to these settings.
Char Aki
Specify the letter spacing for the font defined in the grid. If a negative value is entered, the grids will appear overlapping. When a positive value is set, a gap will appear between the grids.
Line Aki
Specify the line gap for the font defined in the grid. The grid line gaps will change according to the value entered.
With the exception of Direction, the values set for Font, Size, Horizontal, Vertical, Char Aki, Line Aki in the Grid Attributes section will all become Frame Grid default settings. (See Create frame grids.)
Characters
Sets a Line Character (Grid) count.
Lines
Specifies the number of lines in 1 column.
Columns
Specifies the number of columns in 1 page.
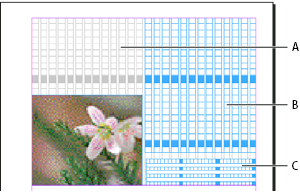
Gutter
Specifies the distance between columns.

A. Columns B. Gutters

Starting Point
Select the Starting Point option from the pop‑up menu, and select the Top, Bottom, Right (or Outside) and Left (or Inside) margins in each text box. The grid will be arranged from the selected position options according to the values set in Grid Attributes and Lines and Columns. Any space left on the other side of the Starting Point becomes the margin. For this reason, it is not possible to enter values into the text box outside the points forming the Grid Base starting points. The margin opposite the starting point can be modified by changing the Grid Attributes and Lines and Columns options values. When you select Center Completely and add a line or character, a layout grid with the number of characters or lines set will be created from the center.
Inside is specified as the inside of the facing page, but when no facing page is specified, Inside is the left hand side. Similarly, Outside is specified as the outside of the facing page, but when no facing page is designated, Outside is the right hand side.
If the values you specify for columns and gutters are such that the layout grid is larger than the page size, the values for characters, gutters, and columns will be adjusted so that it fits on the page. To change the settings, choose Layout > Layout Grid after creating a new document, and specify different values.

A. Top/Outside starting point (right page) B. Center Horizontally starting point C. Bottom/Outside starting point (right page) D. Center Completely starting point

Show or hide the layout grid
-
Choose View > Grids & Guides > Show Layout Grid or View > Grids & Guides > Hide Layout Grid.
If you hide the Layout Grid, the appearance will be the same as a document created in the Margins and Columns option. Each margin will be determined by values in the Starting Point settings.
Place an object in a layout grid
Place the text, graphic, or sample text after setting the layout grid. Keep the following guidelines in mind when you are designing pages for a layout grid:
You can place text frames, frame grids, and graphic frames in a document. You can also place text or graphics in placeholder frames. For more information, see About paths and frames and Create text frames.
You cannot enter text directly in a layout grid. Use the Horizontal Grid tool
 or
Vertical Grid tool
  to
create a frame grid and enter text. When Layout Grid is selected
in the grid format panel, frame grids created will use the character
and spacing attributes of the layout grid. See Create
frame grids.
When you drag an object in a layout grid, the object corner closest to the grid will snap to one of the four corners of the grid. See Snapping objects to grids.
Document windows with layout grids
Each document or spread has a Pasteboard
and Guide. This is displayed in Normal View mode. (To switch to
normal view, click Normal View Mode ![]() in
the Tools panel). When the document is displayed in any preview
mode, the Paste Board will be replaced by a gray background. You
can alter the color of the preview background and guide.
in
the Tools panel). When the document is displayed in any preview
mode, the Paste Board will be replaced by a gray background. You
can alter the color of the preview background and guide.
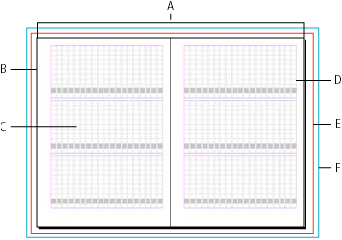
In a document window, structural areas of a page are marked by the following default colors:
Black lines describe the size of each page in a spread. A thin drop shadow helps distinguish a spread from its pasteboard. You can’t change the color of these lines.
Magenta lines are margin guides.
Violet lines are column guides.
The green box and lines are the layout grid.
The red line around the edge of the page shows the bleed area.
The blue line around the page shows the slug area.
Lines of different colors are the ruler guides. Ruler guides will be displayed in the color of the selected layer.
Column guides appear in front of margin guides. When a column guide is exactly in front of a margin guide, it hides the margin guide.
