Enhance your table layouts with images placed precisely in cells. Reorder your rows and columns to suit your design.


What you'll need
Prepare to add images to your table cells
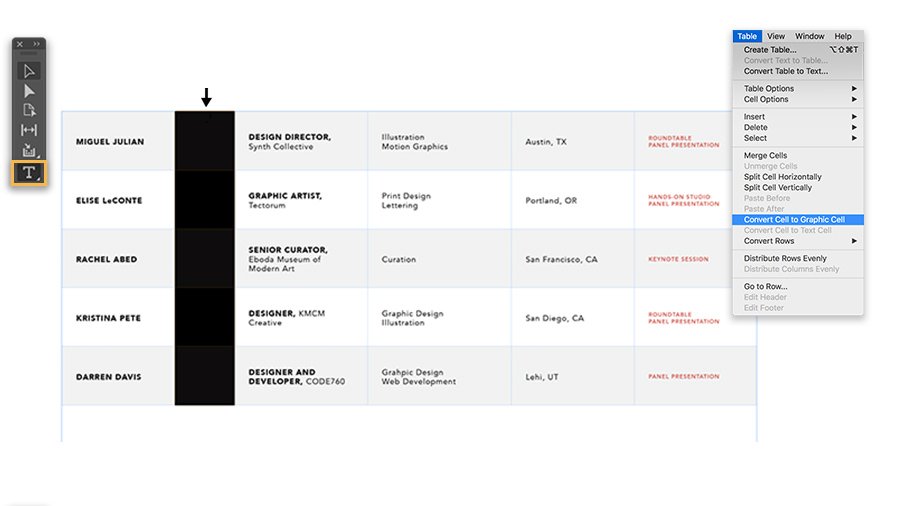
With the Type tool selected, hover your cursor at the top of the second column until your cursor changes to a downward-pointing arrow. Click the top of the column to select it, and then choose Table > Convert Cell To Graphic Cell.


Drag artwork into graphic cells
Now you can drag individual illustrations from the Table Art folder into the corresponding graphic cell in the table.
Note: Don’t worry if the images look inverted (negative colors). This look is because the cells are still selected.


Format the graphic cells
Now you’ll add a small border around the placed images. With the graphic cells still selected, change the Cell Insets values in the Properties panel.
Then try a Frame Fitting option, also in the Properties panel. We chose Content-Aware Fit, which automatically fits an image to its frame.


Move columns around
With the Type tool selected, click above the first column to select it, as you did in the first step. You can rearrange this column by simply dragging it to another location in the table. Position your cursor over one of the column cells until the cursor changes to an arrow with two horizontal lines. Now drag to the right and drop it when you see a blue vertical line appear to the right of the second column.
You’ll notice that columns retain their original widths when you rearrange them.


Rearrange rows
You can use a similar method to rearrange rows. With the Type tool selected, select a row by positioning your cursor along the left edge of the row you want to move. Your cursor will change to a right-facing arrow. Now drag it up or down and drop it when you see a blue horizontal line appear.
This table is set up with alternating fills. When you rearrange rows, InDesign maintains the alternating fill pattern.


Add a title to your table
First, you’ll add a row at the very top. Select the current first row with the Type tool, and then right-click and choose Insert Row. In the dialog box that opens, add 1 row above it.
Select the title text row you just added with the Type tool, and then click Merge Cells in the Cell Divisions section of the Properties panel.


Add a header for a finishing touch
- Select the title text row with the Type tool, and then click More Options (three dots) to expand the Table Dimensions section in the Properties panel.
- Type 1 in the Header Rows field. You can fill the header with color or drag in any image.
- Drag the table-header.ai file into the header row.
Tip: You can change the cell insets in the Properties panel to remove the frame.
Optionally, try adding a small drop shadow to your table header to make it stand out: Click fx in the Properties panel and select Drop Shadow.
To finish, with the Selection tool drag the text objects we provided, and position them on top of the header and title text rows. Alternatively, click in each row with the Type tool and type your own text.


Now you can add colorful artwork and make your table layouts more eye-catching.