Log in to your administrator in Adobe Sign.
Overview
Adobe Acrobat Sign for Workday Trial: Installation Guide is designed to help Workday customers learn how to activate a trial account with Adobe Sign and then integrate it into the Workday tenant. To use Adobe Sign within Workday, you must know how to create and modify Workday items such as:
- Business process framework
- Tenant set-up and configuration
- Reporting and Workday Studio integration
Note: If you have an existing Adobe Sign account, there is no must start a trial. You may contact your Client Success Manager to request Workday integration.
The high-level steps to complete integration are:
- Activate your trial account with Adobe Sign
- Generate an integration key in Adobe Sign
- Install the integration key into the Workday Tenant
Activate your Acrobat Sign trial account
To request a 30-day trial of Adobe Sign, you must fill out this registration form.
Note: We suggest that you use a valid functional email address to create the trial and not a temporary email. You must access this email to verify the account, so the address must be valid.


Within one business day, Acrobat Sign's onboarding specialist provisions your account (in Acrobat Sign) for Workday. Once complete, you receive a confirmation email as shown below.


To initialize your account and access your Adobe Sign Home page, follow the directions in the email.
Generate an integration key
For new installations, you must generate an integration key in Adobe Sign and then enter it into Workday. This key authenticates the Adobe Sign and Workday environments to trust each other and share content.
To generate an Integration Key in Adobe Sign:
Configure the Workday Tenant
Install the Integration Key
Installing the Integration Key into the Workday tenant establishes the trust relationship with Adobe Sign. Once that relationship is in place, any Business Process can have a Review Document Step added that enables the signature process.
Note: Adobe Sign is branded as “Adobe Document Cloud” throughout the Workday environment.
To install the Integration Key:
Log in to Workday as an account administrator.
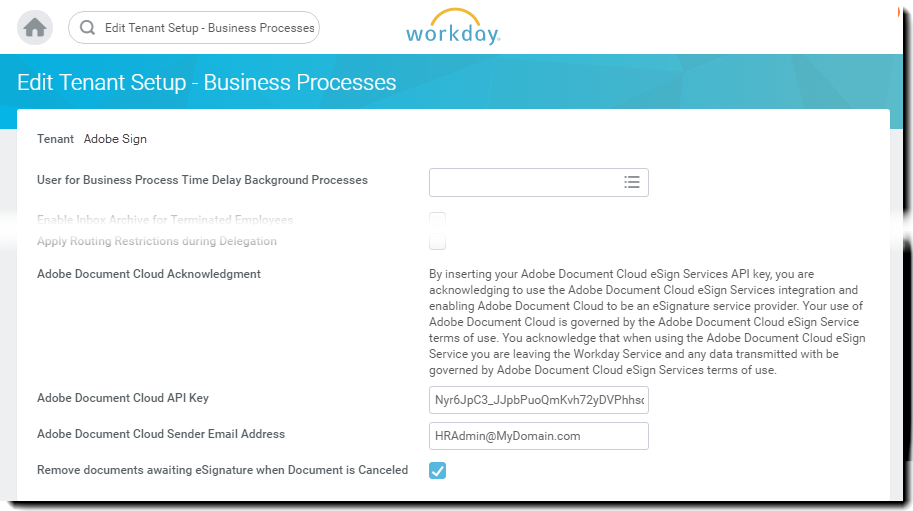
Search for and open the Edit Tenant Setup - Business Processes page.
Provide information for the following four fields:
Adobe Document Cloud Acknowledgment: A fixed text acknowledgment of the integration.
Adobe Document Cloud API Key: Where the Integration Key is installed
Adobe Document Cloud Sender Email Address: The email address of the group level administrator in Adobe Sign
Remove documents awaiting eSignature when Document is Cancelled: An optional configuration that removes documents from the signature cycle if a document is canceled in Workday.


4. Next, complete the installation:
- Paste your Integration key into the Adobe Sign API Integration Key field.
- Enter the email address of the Adobe Sign administrator into the Adobe Document Cloud Sender Email Address field.
- Select OK.


Adobe Sign functionality can now be added to any Business Process by adding a Review Document Step and configuring it to use eSign by Adobe as the eSignature type.
Configure the Review Document step
The document for the Review Document Step can be a static document; a document generated by a Generate Document step within the same business process; or, a formatted report created with the Workday Report Designer. All of these cases can be augmented with Adobe Text Tags to control the look and position of the Adobe Signing specific components. The document source must be specified within the business process definition. It is not possible to upload an ad hoc document while the business process is executing.
Unique to using Adobe Sign with a Review Document Step is the ability to have serialized Signer Groups. Signer groups allow you to specify role-based groups that sign in sequence. Adobe Sign does not support parallel signing groups.
For assistance configuring the Review Document Step, you may refer to the Quick Start Guide.
Support
Workday Support
Workday is the integration owner, and should be your first point of contact for questions about the scope of the integration, feature requests, or problems in day to day function of the integration.
The workday community has several good articles on how to troubleshoot the integration and generate documents:
Adobe Sign Support
Adobe Sign is the integration partner and should be contacted if the integration is failing to obtain signatures, or if notification of pending signatures fails.
Adobe Sign Customers should contact their Customer Success Manager (CSM) for support. Alternatively, Adobe Technical Support can be reached by phone at 1-866-318-4100, wait for the product list then enter 4 and then 2 (as prompted).


