Copy clips and repurpose sequences in Adobe Premiere Pro by opening more than one project at a time — and use the Shared Projects feature to create subprojects within a master project. Project locking prevents editors from overwriting one another’s work.


Open multiple projects simultaneously
Open more than one Premiere Pro project at a time to make it easier to edit, copy, or repurpose content across projects without having to repeatedly open and close individual project files. You can always tell which project you’re currently editing because its name will appear at the top of the Premiere Pro user interface.


Save all your open projects easily by choosing File > Save All from the main menu.
If you’re finished with a project, close it. Closing extra project files is a good way to reclaim system memory and maintain optimal performance.
You can close an active project by choosing File > Close Project — or close them all by choosing File > Close All Projects. You can also close a single project by clicking open the hamburger menu next to the project tab in the Project panel and choosing Close Project. Simply closing the Project panel will not actually close the project file.
Set a username for project locking
In order to prevent other editors from overwriting your work when you’re actively editing, you must enable the Project Locking feature. This setting applies to all new projects you create from now on.
First, close all active projects (choose File > Close All Projects) so you see only the Premiere Pro start screen. Next, choose Edit > Preferences > Collaboration (Windows) or Premiere Pro > Preferences > Collaboration (macOS). Check the Enable Project Locking option and enter a username. Click OK.


Note: This task is required only once for each workstation in your editing suite.
Create a shared project within a master project
Use the Shared Project feature to divide a show into episodes or manage a large-scale production by creating short, scene-based subprojects within a master project.
Click the New Item icon at the bottom of the Project panel and select Shared Project. Enter a name in the Name Shared Project dialog box and click OK. Save your master project to a shared storage network.


Work across a shared storage network
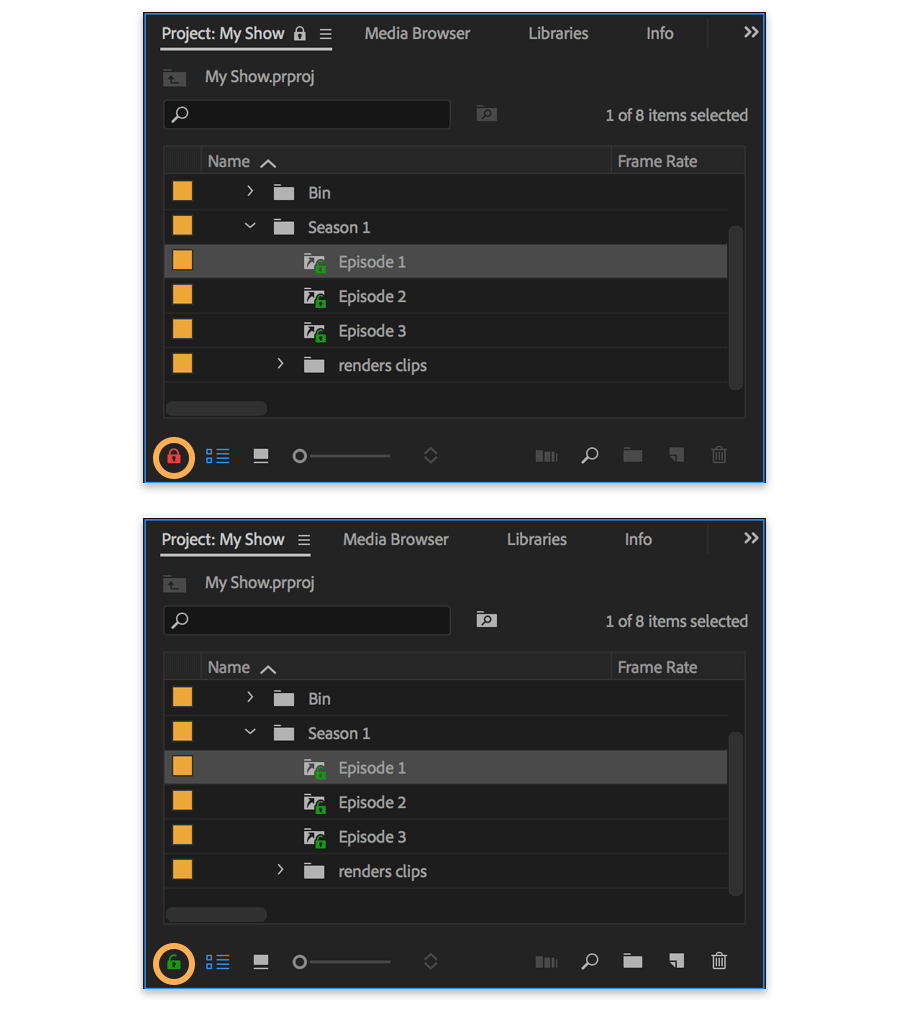
Once you enable project locking, working in a master or shared project will automatically lock it for other editors on your network. While the lock icon at the bottom of the Project panel appears green to you (project is writable), it appears red to others (project is read-only). Additionally, others will see your username appear in parentheses on the project tab in the Project panel. This is their indication that they cannot write to the file. However, they can freely copy media from it for use elsewhere.
Click the green lock to make the project available for other editors. Doing so turns the lock red for you and makes your username disappear from the project tab for others. Now everyone will see a small lock icon next to the project name on the tab.


As soon as someone else locks the project — making it read-only for everyone else — that username will appear on the project tab.
Note: If you try to open a project that’s already in use, the Project Locked dialog box will indicate who has writable access to it.