Blending textures, images, and type can make for a composition that is sure to get noticed. See how Tiago Araújo creates an eye-catching poster in Adobe Photoshop.
Tiago Araújo is a designer and art director who lives in Brazil. He blends photography and fine art to create mixed media projects for several Brazilian brands.
สิ่งที่คุณต้องมี
This sample file is an Adobe Stock asset you can use to practice what you learn in this tutorial. If you want to use the sample file beyond this tutorial, you can purchase a license on Adobe Stock. Check out the ReadMe file in the folder for the terms that apply to your use of this sample file.
Blend textures
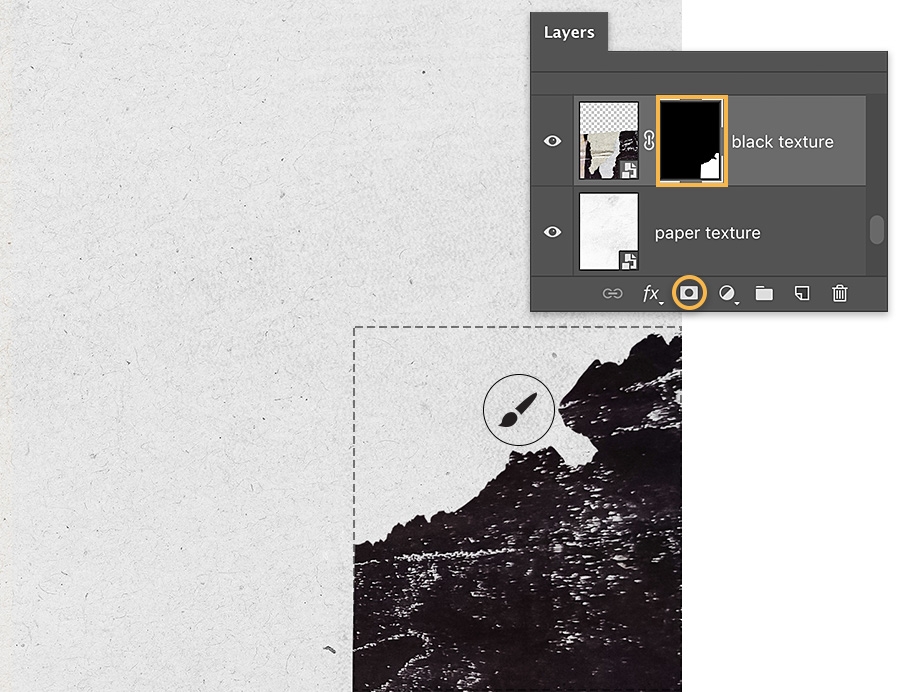
Araújo began by opening a previously saved poster-sized file with a background image that simulates the look of paper grain. He placed a black texture image in the lower-right corner and used the Rectangular Marquee (M) to select part of the new texture. Then, he applied a layer mask and painted with a black textured brush to create a ragged edge for the image.


Mix some media
To combine imagery and texture, Araújo added a blue texture and blended it into the scene with another layer mask. Then, he added an image of a wave into the composition.


Type it up
For this piece, Araújo synced Henderson Slab from Adobe Fonts, typed the word ÁGUA, and sized and positioned the copy to his liking. Then, in order to customize the letterforms, he had to right-click on the text layer and choose Rasterize Type.


Liquify the letters
To liquify the letters, Araújo chose Filter > Liquify. Then, he used a large-radius Forward Warp tool to drag and warp the U in ÁGUA. Next, he used the Freeze Mask tool to brush over the letter U to protect it from any accidental editing. He finished by using the Forward Warp tool to customize the letter G.


Let it stand
With the liquified type layer selected, Araújo used the Move (V) tool to rotate and move the ÁQUA layer. Then, he placed the water ripple image on to the canvas, scaled it to cover the letters and pressed Enter (Windows), or Return (macOS), to place it. He right-clicked and chose Create Clipping Mask to clip the texture to the liquified type layer, adding a ripple effect to the word.


Shape your message
Araújo made the event date stand out by typing around an invisible circle. He selected the Ellipse tool and held Shift as he dragged out a circle. He selected the Type tool, hovered over the circle, and clicked where he wanted the text to start. Then, he typed his own message to replace the default text that followed the path. Araújo ultimately added more text and experimented with size and placement. He also customized additional text in Adobe Illustrator and added it as a Smart Object to his Photoshop composition.


Mix it up and send it out
Share news and events in a way that people will be sure to notice.


Note: Project files included with this tutorial are for practice purposes only.
Artist: Tiago Araújo