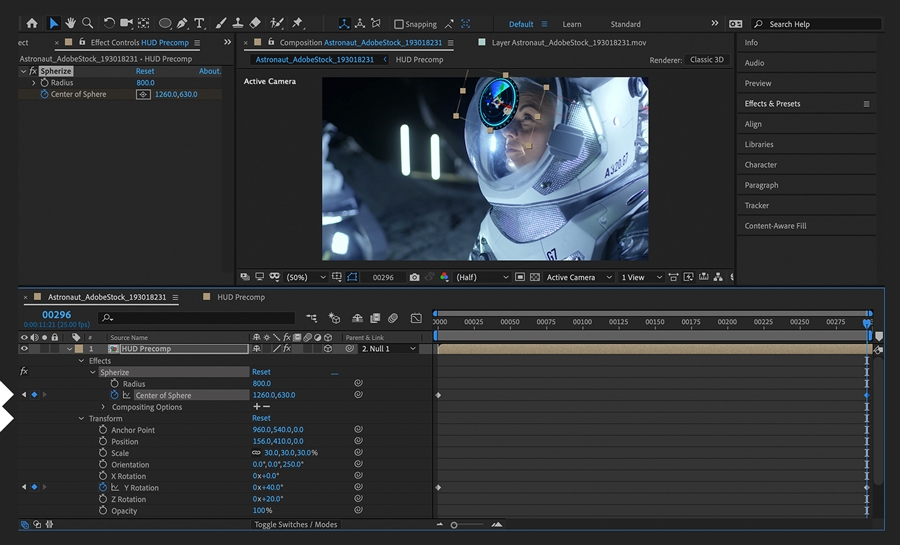
Create a curved heads-up display (HUD) by wrapping a flat design onto a rounded surface using the Spherize effect in Adobe After Effects.


Bạn cần những gì
This sample file is an Adobe Stock asset you can use to practice what you learn in this tutorial. If you want to use the sample file beyond this tutorial, you can purchase a license on Adobe Stock. Check out the ReadMe file in the folder for the terms that apply to your use of this sample file.
Starting in the Default workspace, add your footage to a new composition. If there’s any motion in your shot, track the main subject so that your HUD can move in unison. Setting the playhead at the beginning of the comp, select the layer in the Timeline panel and choose Animation > Track Motion. In the Tracker panel, leave Position selected and click Rotation and Scale. Two Track Point indicators will appear in the Comp panel. Zoom in to see things better. Hover the cursor over one track point until it becomes a black four-way arrow. Drag it to a fixed part of the subject. (Note the detailed pop-up as you drag.) Do the same with the second track point. Click the Analyze Forward button to generate the tracking point keyframes.


Add a null object to the comp (Layer > New > Null Object). Click Edit Target in the Tracker panel and choose the null as the layer in the Motion Target dialog box. The layer name will appear next to Motion Target in the Tracker panel. Click Apply and then click OK in the Motion Tracker Apply Options dialog box to accept the default X and Y dimensions being applied.


Move the playhead back to the beginning of the comp. Add your HUD footage above the null layer and toggle its 3D Layer setting on. (You may need to click Toggle Switches/Modes at the bottom of the Timeline panel to reveal this control.) Parent the HUD layer to the null object so it inherits the tracking data you just generated. Scale the layer and then position it (in all three dimensions) near the intended surface — in this case, the curved surface of the astronaut’s spacesuit helmet.


To mask only the HUD design, first select the HUD layer and choose Layer > Pre-compose, making sure Leave All Attributes is selected in the Pre-compose dialog box. Double-click the new precomp layer so it opens in a new Timeline panel tab. Press Q to activate the Shape tool and its properties in the toolbar. (Keep pressing Q to cycle through all the shapes until you find an appropriate one for your mask.) Click Fill in the toolbar and select None in the Fill Options dialog box. Do the same for Stroke. Keeping the HUD selected in the precomp, draw your mask. (Holding down Shift keeps the dimensions proportional. Pressing Command/Control+T displays a bounding box.)


Back in the main comp, add the Spherize effect to the precomp layer and increase Radius to add some curvature to it. Depending on where your HUD belongs in the scene, adjust Center of Sphere’s X and Y values too. Play the comp to see how the HUD appears affixed to its intended surface as the camera moves in on the subject.


Given the nature of the camera movement in the shot, you may need to animate the HUD’s orientation or rotation relative to the subject. Expand the precomp layer’s Transform properties and keyframe values for Orientation, X Rotation, Y Rotation, or Z Rotation — maybe even for the Spherize effect’s Center of Sphere value.


Add some finishing touches to the HUD itself — just be sure to make your changes in the precomp. For example, you could animate the mask quickly into view or reduce its opacity so it appears transparent.
With Adobe Stock, you have access to more than 100 million high-quality, royalty-free images including photos, graphics, videos, and templates to jump-start your creative projects. Try Adobe Stock and get 10 free images.