Blur or soften edges

The Blur tool softens hard edges or areas in an image by reducing detail. Blurring a busy background can bring your target images more into focus. You can also use Blur filters for this purpose.

Original photo (left), and photo after blurring the background (right).

  1. Select the Blur tool.

  2. Set options in the options bar:

    Brush

    Sets the brush tip, from the brush popup menu. For more brush shapes, click the Brush drop-down inside the popup, and then select a brush thumbnail.

    Size

    Sets the size of the brush, in pixels. Drag the Size slider, or enter a size in the text box.

    Mode

    Specifies how the pixels you blur blend into other pixels in the image.

    Strength

    Specifies the amount of blur that occurs with each stroke.

    Sample All Layers

    Blurs all visible layers. If this is deselected, the tool blurs only the active layer.

  3. Drag over the part of the image you want to blur.

Replace colors in an image

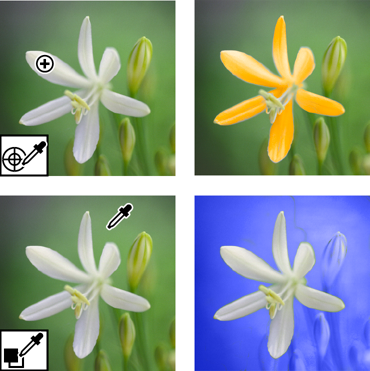
The Color Replacement tool simplifies replacing specific colors in your image. You can paint over a targeted color—for example, a yellow flower in an image—with a different color, like red. You can also use the Color Replacement tool to correct colors.

Replacing colors

  1. Select the Color Replacement tool (The Color Replacement tool is part of the Brush Tool Options bar).

  2. Choose a brush tip from the Brush menu in the options bar. For Mode, generally, you’ll want to keep the blending mode set to Color.
  3. For Limits, choose one of the following:

    Discontiguous

    Replaces the sampled color wherever it occurs under the pointer.

    Contiguous

    Replaces colors that are contiguous with the color immediately under the pointer.

  4. For Tolerance, specify a low percentage to replace colors very similar to the pixel you click, or raise the percentage to replace a broader range of colors.
  5. To give a smooth edge to the areas you correct, select Anti-aliasing.

  6. Choose the required method of sampling. Available options are:

    Continuous

    Continuously samples color, as you drag the color replacement tool.

    Once

    Samples color only once, when you start dragging the color replacement tool.

    Background Swatch

    Replaces the area containing the background color, whenever you drag the color replacement tool over it.

  7. Choose a foreground color to use to replace the unwanted color.
  8. Click the color you want to replace in the image.
  9. Drag within the image to replace the targeted color.

Clone images or areas in an image

The Clone Stamp tool paints with an image sample, which you can use to duplicate objects, remove image imperfections, or paint over objects in your photo.

Original photo (top), after adding two starfish with the Clone Stamp tool (center), and after removing a person with the Clone Stamp tool (bottom).

  1. Select the Clone Stamp tool.

  2. (Optional) Set options in the options bar:

    Brush

    Sets the brush tip. Click the arrow next to the brush sample, choose a brush category from the Brushes pop‑up menu, and then select a brush thumbnail.

    Sample All Layers

    To sample (copy) data from all visible layers, select Sample All Layers. To sample data from only the active layer, deselect this option.

    Opacity

    Sets the opacity of the paint you apply. A low opacity setting allows pixels under a paint stroke to show through. Drag the slider, or enter an opacity value.

    Size

    Sets the size of the brush in pixels. Drag the Size slider, or enter a size in the text box.

    Mode

    Determines how the source or pattern blends with existing pixels. Normal mode lays new pixels over the original pixels.

    Aligned

    Moves the sampled area with the cursor as you begin to paint, regardless of how many times you stop and resume painting. Selecting this option is useful when you want to eliminate unwanted areas, such as a telephone line across the skyline or a rip in a scanned photo. If Aligned is deselected, the Clone Stamp tool applies the sampled area from the initial sampling point each time you stop and resume painting. Deselecting this option is useful for applying multiple copies of the same part of an image to different areas within the same image or to another image.

  3. Click Clone Overlay, and set the following options:

    Show Overlay

    Select show Overlay for the overlay to be visible inside brush size.

    Opacity

    To set the opacity of the overlay, enter a percentage value in the Opacity text box.

    Clipped

    To clip overlay to the brush size, enable the Clipped option.

    Auto Hide

    To hide the overlay while you apply the paint strokes, select Auto Hide.

    Invert Overlay

    To invert the colors in the overlay, select Invert.

  4. Position the pointer on the part of any open image you want to sample, and press Option and click. The tool duplicates the pixels at this sample point in your image as you paint.

  5. Drag or click to paint with the tool.

Photomerge Faces

Note:

For a video about Photomerge features, see www.adobe.com/go/lrvid2342_pse9_en.

Use Photomerge Faces to combine multiple facial features to create one composite face.

  1. Do one of the following to select the face images you want to use as source images for Photomerge Faces:
    • In Elements Organizer, select the face image photos.
    • Open the face image photos.
  2. Choose Enhance > Photomerge > Photomerge Faces.

  3. Pick a face photo as your base image, and drag it from the Photo Bin to the Final window.

  4. Click another image in the Photo Bin, and click the Alignment tool. Place the three alignment markers on the eyes and mouth on the source image and the final image, and click Align Photos.

  5. Click other photos in the Photo Bin (color coded to help you keep track). Use the Pencil tool to mark the areas that you would like to merge into the final photo. To fine-tune the final image, use the Pencil tool to add additional content, or the Eraser tool to remove content.

  6. Set the following:

    Show Strokes

    Click this option to show the Pencil strokes you marked in the source image.

    Show Regions

    Click this option to reveal the selected regions in the final image.

  7. Click Reset to start the process over, Done to complete the Photomerge Faces, or Cancel to close Photomerge Faces.
Photomerge Faces window

Photomerge Exposure

Note:

For a video about Photomerge features, see www.adobe.com/go/lrvid2342_pse9_en.

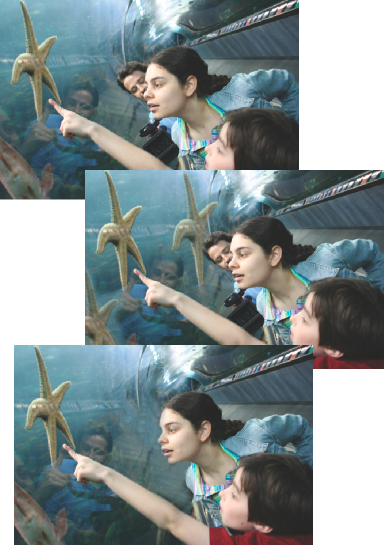
Use Photomerge Exposure to efficiently handle scenes in photos with exposure challenges. You can blend two photos together to get a perfectly exposed photo. For example, if you have a photo with a window in the background and you want a perfect photo with the following properties:

  • A good exposure of the scenery outside the window.

  • A good exposure of the darker objects inside the room.

In such a scenario, you often end up with either overexposed scenery outside the window or underexposed objects inside the room.

To ensure that you get a perfect photo, do the following:

  • Take two or more photos of the same scene with different exposures. For best results, take the photos at different exposure value, with minimum shake. For example:

    • You can take two or more photos with the flash turned on to properly expose the subject (the objects inside the room).

    • You can then take one photo with the flash turned off to properly expose the background (the scenery outside the window).

      Tip: You can use Exposure Bracketing in your camera to capture the same subject with a number of shots with different exposure settings.

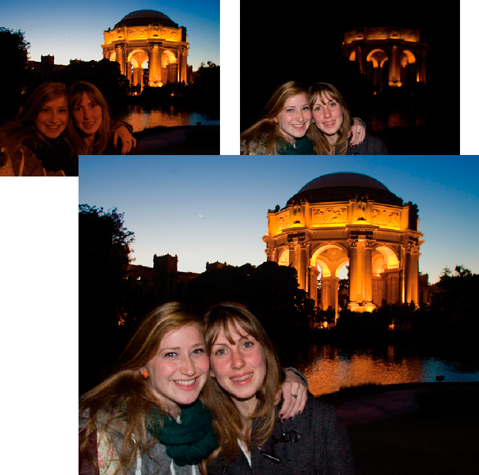
  • Blend the photos to create a perfectly exposed photo.

    Photomerge Exposure facilitates blending the two photos together to get a perfectly exposed photo.

Photomerge Exposure can be done in the following modes:

  • Automatic mode

  • Manual mode

Note:

To obtain best results while using the Automatic mode, use photos that are shot at different exposure values, using Exposure Bracketing. To obtain best results while using the manual mode, use photos shot with flash turned on and flash turned off.

Photomerge Exposure

Automatic Photomerge Exposure

You can select the required photos from Elements Organizer, and select and deselect the photos through the Photo Bin.

  1. Do one of the following:
    • In Elements Organizer, select a minimum of two and a maximum of ten photos, and select Enhance > Photomerge > Photomerge Exposure.
    • Open the required files using File > Open.
        1. Select Show Open Files In The Photo Bin to view all the opened files.

        2. Select a minimum of two and a maximum of ten photos from the Photo Bin.

        3. Select Enhance > Photomerge > Photomerge Exposure.

    Photoshop Elements displays the selected photos.

  2. In the Photomerge panel, select Automatic.
  3. Select one of the following options:

    Simple Blending

    This option does not allow you to change the Photomerge Exposure settings. Selecting this option displays the merged photo.

    Smart Blending

    Selecting this option enables you to adjust the settings using the sliders. You can view the final photo based on the settings you provide. You can adjust the following settings:

    Highlight

    Enables you to increase or decrease the details that are in the highlight.

    Shadows

    Enables you to lighten or darken the shadows.

    Saturation

    Enables you to change the intensity of the color.

  4. After you get the desired result, click Done to complete Photomerge Exposure.

Manual Photomerge Exposure

Note:

For Photomerge Exposure, if you are using photos that have been taken with your flash on, then manual Photomerge Exposure is the default mode.

  1. Do one of the following:
    • In Elements Organizer, select a minimum of two and a maximum of ten photos and select Enhance > Photomerge > Photomerge Exposure.
    • Open the required files using File > Open.
        1. Select Show Open Files In The Photo Bin to view all the opened files.

        2. Select a minimum of two and a maximum of ten photos from the Photo Bin.

        3. Select Enhance > Photomerge > Photomerge Exposure.

    Photoshop Elements displays the selected photos.

  2. In the Photomerge panel, select Manual.

    The first image in the Photo Bin is displayed as the source photo. You can select an image from the Photo Bin as the final photo.

  3. Set the following:

    Show Strokes

    Click to show your Pencil strokes in the source image.

    Show Regions

    Click to reveal the selected regions in the final image.

  4. Select exposed regions from the current source image by using the pencil tool. Change the source photo, and select regions from this photo if necessary.

    You can now view a final image with different regions copied from different source photos above the initially selected final photo.

  5. Change the transparency of these selected regions to blend them properly with the background by using the Transparency Slider. Select Edge Blending to smoothen the blended edges.

    Note:

    Transparency Slider affects only those regions that are selected from the currently displayed source image. Change to a different source image if you want to change the transparency of the regions selected from the other images. It remembers the value used for a particular image. If the slider is not changed, the default is set to 0.

  6. To correct the alignment of multiple photos, select Advanced Option, and click the Alignment tool. Place three markers in the source image and three markers in the final image, then click Align Photos. Click Done.