Click Expert, and then click Guided. From the list of Guided Edits, select Adding Video in Title.
- Get to know Premiere Elements
- Adobe Premiere Elements User Guide
- Introduction to Adobe Premiere Elements
- Workspace and workflow
- Working with projects
- 360° and VR Video Editing
- Importing and adding media
- Arranging clips
- Editing clips
- Reduce noise
- Select object
- Candid Moments
- Color Match
- Color Fonts and Emojis
- Smart Trim
- Freehand Crop
- Delete All Gaps
- Change clip speed and duration
- Split clips
- Freeze and hold frames
- Adjusting Brightness, Contrast, and Color - Guided Edit
- Stabilize video footage with Shake Stabilizer
- Replace footage
- Working with source clips
- Trimming Unwanted Frames - Guided Edit
- Trim clips
- Editing frames with Auto Smart Tone
- Artistic effects
- Color Correction and Grading
- Applying transitions
- Special effects basics
- Effects reference
- Applying and removing effects
- Create a black and white video with a color pop - Guided Edit
- Time remapping - Guided edit
- Effects basics
- Working with effect presets
- Finding and organizing effects
- Editing frames with Auto Smart Tone
- Fill Frame - Guided edit
- Create a time-lapse - Guided edit
- Best practices to create a time-lapse video
- Applying special effects
- Use pan and zoom to create video-like effect
- Transparency and superimposing
- Reposition, scale, or rotate clips with the Motion effect
- Apply an Effects Mask to your video
- Adjust temperature and tint
- Create a Glass Pane effect - Guided Edit
- Create a picture-in-picture overlay
- Applying effects using Adjustment layers
- Adding Title to your movie
- Removing haze
- Creating a Picture in Picture - Guided Edit
- Create a Vignetting effect
- Add a Split Tone Effect
- Add FilmLooks effects
- Add an HSL Tuner effect
- Fill Frame - Guided edit
- Create a time-lapse - Guided edit
- Animated Sky - Guided edit
- Select object
- Animated Mattes - Guided Edit
- Double exposure- Guided Edit
- Special audio effects
- Movie titles
- Creating titles
- Adding shapes and images to titles
- Adding color and shadows to titles
- Apply Gradients
- Create Titles and MOGRTs
- Add responsive design
- Editing and formatting text
- Text Styles and Style Browser
- Align and transform objects
- Motion Titles
- Appearance of text and shapes
- Exporting and importing titles
- Arranging objects in titles
- Designing titles for TV
- Applying styles to text and graphics
- Adding a video in the title
- Disc menus
- Sharing and exporting your movies
The Adding Video in Title Guided Edit shows you how to add a video in the title of your video to make the title interesting and impactful. This Guided Edit is available only in the Expert view.
-
Select the Guided Edit Select the Guided Edit -
Click Add Media to import clips.
-
Select a media source. For example, select Files and Folders if the video clips are on your computer's hard drive.
Select a media source Select a media source -
Select the files and folders you want to import and click Open (Win) or Import (Mac). Hold the command key or use shift to select multiple files.
-
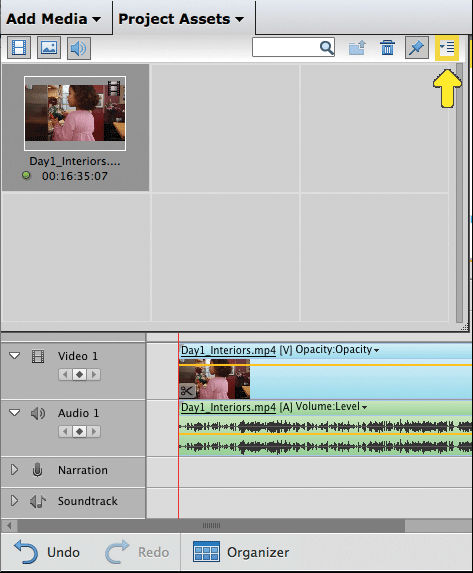
All the clips you import are stored in the Project Assets bin. Drag and drop these to Video 1 track on the timeline.
Drag video clip to Video 1 track Drag video clip to Video 1 track -
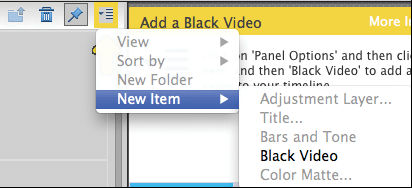
Add a Black Video to the timeline. Click Project Assets > Panel Options > New Item > Black Video.
Add a Black Video Add a Black Video -
Drag the Black Video and drop it on the Video 2 track to place it directly above your clip on the Video 1 track.
Notă:Expand the timeline if the Video 2 track is not visible.
Add the Black Video to the track above the video clip Add the Black Video to the track above the video clip -
Extend the duration of the Black Video so that it lasts for at least ten seconds for the effect to be displayed.
-
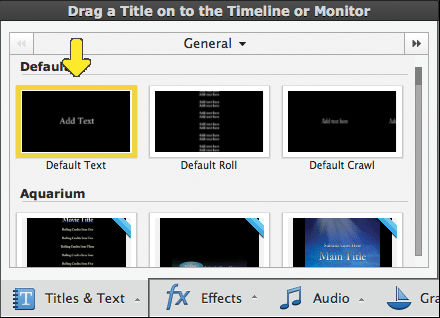
Click Titles & Text on the Action bar. Drag-and-drop a title from the list to the Video 3 track. For best results, use the Default title.
Select a title Select a title -
Expand the duration of the title (Video 3 track) to match the duration of the Black Video (Video 2 track). Click Next after you have adjusted the duration.
-
Double-click the title on the monitor and type your title.
-
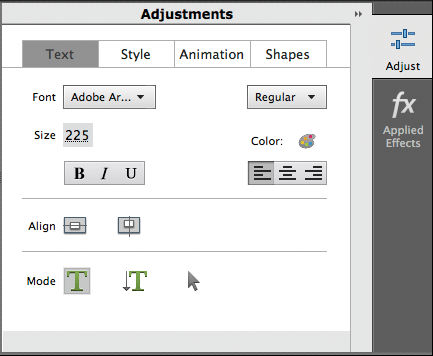
You can change the font and the font size from the Adjust > Adjustments tab.
Notă:Use the Arrow mode in the Adjust tab to move the title to the desired position.
Adjust the font and position of the title Adjust the font and position of the title -
Click Effects on the Action bar.
-
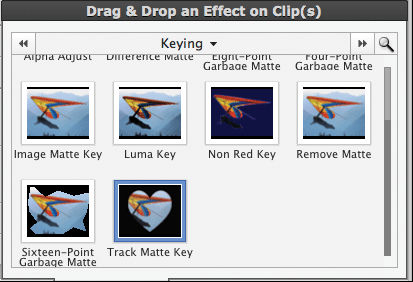
Select the Track Matte Key effect from the Keying category. Drag-and-drop the effect on the Black Video (Video track 2) on the timeline.
Track matte key Track matte key -
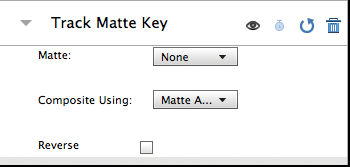
In the Track Matte Key in Applied effects, do the following:
- Select Video 3 from the Matte drop-down menu.
- Select the Reverse option.
Track Matte options Track Matte options -
You can add the video in different shapes in the Title Adjust panel.
-
Click the Play button in the source monitor to view the applied Guided Edit. Click Render to improve the quality.
Video appears inside the title Video appears inside the title


