Update to InDesign CC available
For more information, see the New features summary.
Equitable Language: We are replacing non-inclusive language from InDesign 2022 (version 17.0) onwards, to reflect core Adobe values of inclusivity. Any reference to Master page is replaced by Parent page in our Help articles for the English, Danish, Hungarian, Spanish, Italian, Brazilian, Portuguese, and Japanese locales.


Update to InDesign CC available
For more information, see the New features summary.
This release contains several enhancements and new features that provide you with pixel-perfect control over design and typography for publishing to all media. With Adobe Digital Publishing Suite, you can design and publish for tablet devices using the familiar InDesign workflows.
Alternate layouts and Liquid Layout page rules, give you the flexibility to design for multiple page sizes, orientations, or aspect ratios.
Use Alternate Layouts if you require different page sizes for print or digital publishing within the same document. You can use it to create different sizes of a print advertisement. Or to design the horizontal and vertical layouts for devices such as the Apple iPad or Android tablets.


Used in combination with Liquid Layout, you can significantly reduce the amount of manual work required to re-layout content for every new page size and orientation. You can also redefine liquid page rules, create links to original stories, automatically copy text styles to a new style group, and activate Smart Text Reflow to repaginate the story in the new page size.
To create an alternate layout, do one of the following:
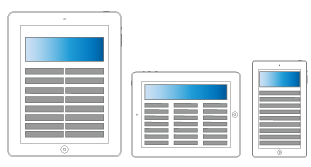

Liquid layouts make it easier to design content for multiple page sizes, orientations, or devices. Apply liquid page rules to determine how objects on a page are adapted when you create an alternate layout and change the size, orientation, or aspect ratio.
Use Liquid page rules to adapt layouts when using the Alternate Layout feature. Select the Page tool ![]() and click a page to select it. Then choose a liquid page rule from the control bar. You can also use the Liquid Layouts panel (Window > Interactive > Liquid Layout).
and click a page to select it. Then choose a liquid page rule from the control bar. You can also use the Liquid Layouts panel (Window > Interactive > Liquid Layout).
Using the Page tool, you can drag the corners and center points of the page to preview the Liquid layout.
For more information see Liquid Layouts.
Use linked content functionality to duplicate page items, and place them on other pages. Both inter-document and intra-document links are supported. You can place and link stories, text frames, page items, interactive objects as well as groups. You can link content, with or without the frames that they are contained in. You can customize the link options to control the update aspects.
While links are useful for all types of publications, they are almost essential when you're working on multi-device publications. Alternate Layouts also use this functionality to link stories in the generated layouts.
To place and link page items, you can use the following:
For more information see Linked content.
For a quick overview, see Linked content video by Lynda.com.
Content Collector and Placer tools let you duplicate objects and place them on open InDesign documents. As content is collected, it is displayed in the Content Conveyor. Use Content Conveyor to easily and quickly place and link multiple page items within and across any open documents.
Click ![]() in the toolbox to open the Content Conveyor.
in the toolbox to open the Content Conveyor.


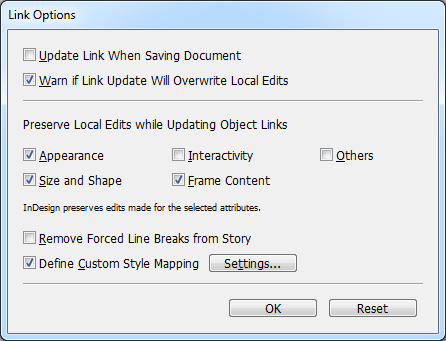
Text styles (paragraph, character, table, cell) or style groups can be mapped to different styles while linking. In the Link Options dialog box (Links panel > Link Options), enable Define Custom Style Mapping and then click Settings.
Custom style mapping comes in handy, for example, when you want to use sans serif fonts for digital and serif fonts for print publications. Or if you want, vary the text style between the horizontal and vertical layouts.
In the Link Options dialog box, enable Define Custom Style Mapping and then click Settings.
For more information, see Custom style mapping.
Use Preserve Local Edits option to modify linked content. Often, you would like the linked item to differ slightly from the original item. For example, if you place an image and then resize the frame or add a stroke to the frame, you can preserve these changes on updating the link.
In the Link Options dialog box (Links panel menu), select the options under preserve local edits.

For more information, see Preserve local edits.
In addition to the Web and Print intents, you can specify Digital Publishing intent while creating a document (File > New). You can specify sizes (including custom sizes) and orientations for several common devices. When you choose the Digital Publishing intent, page size is set to that of the chosen device size in pixels. The Primary Text Frame option is also enabled.
If you want more control on device size and orientation, create a Document Preset or specify a custom page size.
You can now designate a text frame on the parent page as the primary text frame. When you apply a new parent page to a layout page, the story in the primary text frame flows into the primary text frame. Primary Text Frames are automatically overridden on layout pages, so that you no longer need to override them before adding text.
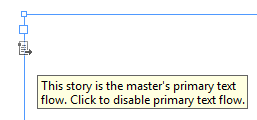

To designate a primary text frame, open a parent page and do one of the following:
Note: Only a single text frame can be designated as primary on a parent page.
You can use the Flexible width option to adjust the number and width of columns as the text frame is resized. Columns are automatically added or deleted when the maximum column width is reached as the text frame is resized.
Choose Flexible Width from the Columns drop down list in the Text Frame Options dialog box (Object > Text Frame Options)
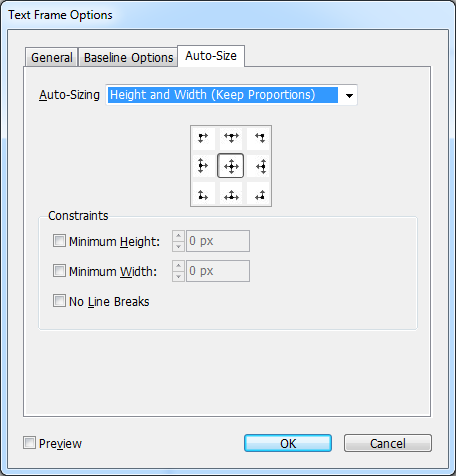
Auto-size text frame options make it possible to set up a text frame so that it is automatically resized when you add, delete, or edit text.
To access the Auto-size options, do the following:

The Package functionality (File > Package) now includes Digital Publishing Suite assets in Folio Overlays. If you've placed links from other InDesign documents, they are included as well.
Additional preflight profile for Digital Publishing is also available (Window > Output > Preflight).
The Folio Builder and Folio Overlay panels are located under the Window menu.
In InDesign CS5.5, Folio Overlay panel was called Overlay Creator, and these panels were available under the Windows > Extensions menu.
Use the Digital Publishing workspace to display all the tools and panels required for working on digital publications. Select Digital Publishing workspace from the workspace switcher in the Application bar.
EPUB Export workflows have been simplified, and you can now choose an EPUB version to export to. The Export to EPUB dialog box has been reorganized and simplified.
Watch this video by Lynda.com for a quick overview of how to Export to EPUB.
Several enhancements were made in the EPUB2 export in InDesign CS6, to provide better control and efficiencies while export. EPUB2 remains the most dominant EPUB standard with a majority of devices and readers supporting it.
IDPF approved the EPUB3 standard in October, 2011. This format supports, among others, audio, video, JavaScript, and japanese vertical text. EPUB3 export for InDesign supports the following:
For more information see, Export content for EPUB.
NOTE: EPUB3 validators may report errors if placed HTML or HTML animations are not fully XHTML-compliant. However, EPUB3 viewers may still function correctly. Adobe Systems cannot guarantee how placed HTML or Adobe Edge animations will perform in third-party EPUB3 viewers.
EPUB3 with Layout is an experimental format that builds on the EPUB 3.0 specification. Support for alternate and adaptive layouts including: multiple columns, text wrap, and liquid layouts has been added. Using this technology it is possible to create true adaptive layouts that look good on all devices and screen sizes and minimizes autoflow issues.
Adobe has submitted this technology to the IDPF for consideration as an extension of the EPUB3 specification. At the time of CS6 launch, there are no publicly available EPUB viewers that support this feature.
Enhanced Export to HTML supports the following:
You can design forms in InDesign and export them directly to PDF. InDesign now supports form fields and additional form actions. The Buttons and Forms library (Window > Interactive > Buttons and Forms) contains items that you can use to design interactive forms. You can also specify tab orders and tool tips without post-processing in Adobe Acrobat. Accessibility tags are also added to the exported PDF form.
Watch Create PDF forms video by Lynda.com for a quick overview.
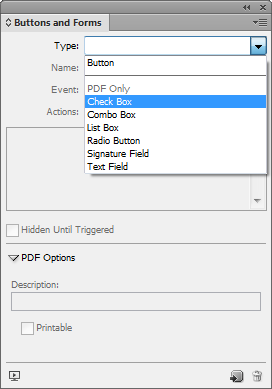

For more information on adding form fields and specifying tab order, see Forms.
You can now export interactive PDFs as either spreads or pages. In the Export to Interactive PDF dialog box (File > Export), choose either Pages or Spreads. The default selection is spreads.
Use the new Adobe® Edge web motion and interaction design tool to bring animated content to websites, using web standards like HTML5, JavaScript, and CSS3. You can place an Adobe Edge package on your layout to add interactivity and animation to your Folio or HTML export.
When you preview the folio or export to HTML, the placed Edge design plays.
Older versions of Adobe Edge do not support exporting to OAM. Zip the output folder and rename the extension to OAM.
You can embed common HTML elements, such as embed codes for YouTube videos or Google Maps. You can copy the HTML embed code and paste in into InDesign
InDesign automatically fetches a poster image. The embedded object is not interactive in the InDesign layout. Export the layout to HTML or preview the folio (File > Folio Preview) to interact with the object.
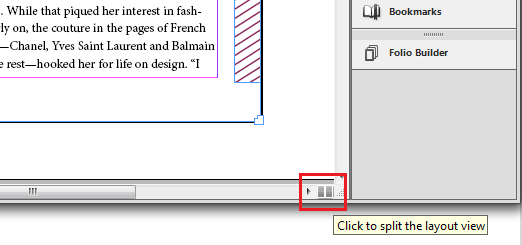
To compare two different layouts in the same document, you can split the active window. Use the two panes to view alternative layouts side by side.

To find fonts easily and reduce scrolling, view the recently used fonts at the top of the Font pop-up and Type > Fonts menus.
An additional option is available for distributing objects in the Align panel.
To open an InDesign document in a previous version, or to send it to someone who has not upgraded yet, save the document in the InDesign Markup Language (IDML) format. IDML files are supported by InDesign CS4 or later. Features not supported by the earlier version will not work.
The option to save documents to earlier versions is now available from the Save and Save As dialog boxes.
You can now proof and export designs as grayscale PDFs. For example, use this feature to quickly export your layout for grayscale printing. The digital publication remains full color, and you can avoid maintaining separate layouts for grayscale and color outputs.
Use Proof Setup (View > Proof Setup) to specify grayscale proof options, and choose a Dot Gain or Gamma destination. After you've setup the proof, choose View > Proof Colors to toggle between grayscale and color output.
You can also export a grayscale PDF from within InDesign. All page items, irrespective of their original color space, are converted to grayscale while exporting to PDF.
Grayscale destinations are not available under the PDF/X-1a standard. The standard supports only CMYK intents. Similarly, PDF/X-2 or PDF/X-3 standards do not support Gamma Gray destinations.
You can now perform complex calculations within the text fields in panels and dialog boxes. Enter a mathematical expression using mathematical operators, for example, 120p0/2 + 10.
To export a selection or a range of pages as an image, choose File > Export and then select PNG from the Save As Type list. Use the Export Options dialog box to specify what to export and the export settings.
Adobe World-Ready composers and support for open-source HunSpell dictionaries enable you to use several additional languages using InDesign.
You can enter placeholder text Roman, Arabic, Hebrew, Chinese among others.
To specify the language of placeholder text, press Ctrl (Windows) or Command (Mac OS) when you choose Type > Fill With Placeholder Text. In the Fill Options dialog box, choose an alphabet and click OK.
For most languages, InDesign ships with open-source HunSpell dictionaries and HunSpell is the default dictionary provider. You can download and install additional spelling and hyphenation dictionaries for other languages from the OpenOffice website.
To use InDesign with additional languages, choose Edit > Preferences > Dictionary and then click HunSpell Info.
Adobe World-Ready Composer (WRC) provides correct word shaping for many of the non-Western scripts, such as Devanagari. Adobe World-Ready composers in the International English version of InDesign, support several indian languages including Hindi, Marathi, Gujarati, Tamil, Punjabi, Bengali, Telugu, Oriya, Malayalam, and Kannada.
Hunspell spelling and hyphenation dictionaries are inluded, and so is the Adobe Devanagari font family.
Enable the Adobe World-Ready Composer through a paragraph style (Paragraph Style > Justification > Composer) or using the Paragraph panel menu.
Set indic preferences to work on indic scripts, and correctly import content into InDesign.
InDesign CS6 is also available in middle eastern and north african editions. It adds support for Arabic and Hebrew, and provides several features for working with right-to-left, bi-directional scripts, and other language-specific features. Enhanced functionality includes support for tables in the Story Editor, improved Kashida justification, enhanced diacritic positioning, and other text-handling improvements.
See Working with Arabic and Hebrew for more details.
With Extension Manager CS6, you can create, edit, activate, import, and export extension sets. Extension Manager CS6 supports the following:
For more information on using Extension Manager CS6, see Extension Manager CS6
Create and publish ebooks, brochures, flyers, postcards, posters, interactive page layouts, and more with Adobe InDesign.
Create print and digital materials with InDesign
Design impactful ads, magazine and book layouts, and more.