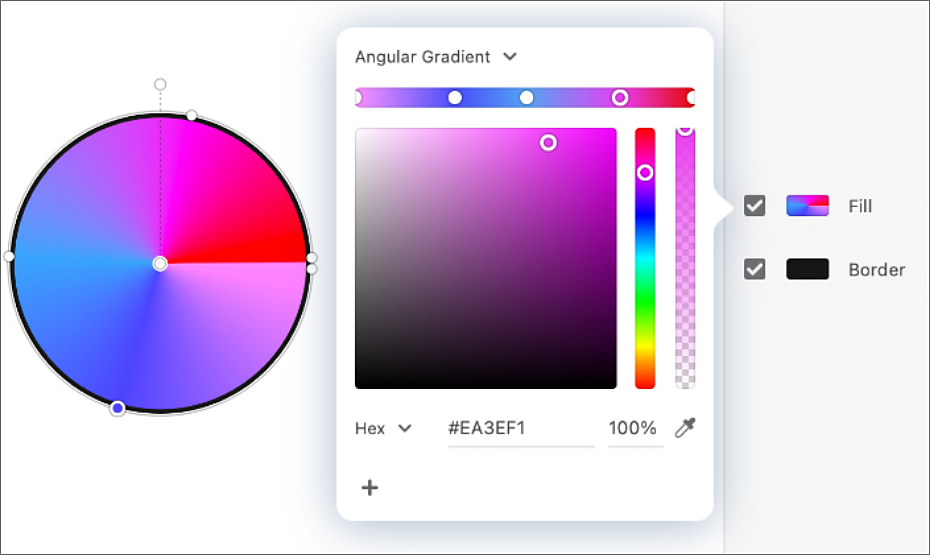
Select an object and click Fill in the Property Inspector.
- Adobe XD User Guide
- Introduction
- Design
- Artboards, guides, and layers
- Shapes, objects, and path
- Text and fonts
- Components and states
- Masking and effects
- Layout
- Videos and Lottie animations
- Prototype
- Create interactive prototypes
- Animate prototypes
- Object properties supported for auto-animate
- Create prototypes with keyboard and gamepad
- Create prototypes using voice commands and playback
- Create timed transitions
- Add overlays
- Design voice prototypes
- Create anchor links
- Create hyperlinks
- Preview designs and prototypes
- Share, export, and review
- Share selected artboards
- Share designs and prototypes
- Set access permissions for links
- Work with prototypes
- Review prototypes
- Work with design specs
- Share design specs
- Inspect design specs
- Navigate design specs
- Review and comment design specs
- Export design assets
- Export and download assets from design specs
- Group sharing for enterprise
- Back up or transfer XD assets
- Design systems
- Cloud documents
- Integrations and plugins
- Work with external assets
- Work with design assets from Photoshop
- Copy and paste assets from Photoshop
- Import or open Photoshop designs
- Work with Illustrator assets in Adobe XD
- Open or import Illustrator designs
- Copy vectors from Illustrator to XD
- Plugins for Adobe XD
- Create and manage plugins
- Jira integration for XD
- Slack plugin for XD
- Zoom plug-in for XD
- Publish design from XD to Behance
- XD for iOS and Android
- Troubleshooting
- Known and fixed issues
- Installation and updates
- Launch and crash
- Cloud documents and Creative Cloud Libraries
- Prototype, publish, and review
- Import, export, and working with other apps
Create, edit, import, use gradients in Adobe XD. Add color stops and control gradient opacity using the Gradient panel.
A gradient is a graduated blend between two or more colors or tints of the same color or different colors. You can use gradients to create color blends, pie-charts, add volume to vector objects, and add a light and shadow effect to your designs.
XD supports linear, radial, and angular gradients.
Linear gradient
XD shades from the starting point to the ending point in a straight line.
Radial gradient
XD shades from the starting point to the ending point in a circular pattern.
Angular gradient
XD applies a fill with color gradients that sweep around a shape from the center of a circle.
The Gradient color picker
To access the Gradient color picker in XD, select an object, and click Fill in the Property Inspector. You can create linear, radial, and angular gradients in XD.
Choose Linear Gradient, Radial Gradient or Angular Gradient from the drop-down list at the top of the color picker.

A. Gradient editor B. Color stop C. Opacity slider D. Color field E. Save as swatch F. On-canvas gradient editor

You can use the Gradient color picker to choose the colors and set the opacity for gradients.
The Gradient color picker has a gradient editor that shows a quick preview of all the colors used in a gradient. Checkerboards indicate the transparent parts.
The gradient editor also displays the color stops in a gradient. Small circles indicate the color stops. The colors change and mix depending on how close the color stops are to each other. The color stops are also displayed in the on-canvas gradient editor that appears on the object to which the gradient is applied.
Two color stops are available by default. You can add more color stops by clicking the gradient editors. You can drag the color stops along the gradient editors to change the positions of the color stops and vary the spread of each color. To delete or remove a color stop, drag it away from the gradient editor in the Gradient color picker. Or, click the color stop on the on-canvas gradient editor and press Delete.
The on-canvas gradient editor helps you change the direction of the gradient.
The corner handle helps you change the origination point and angle of a radial gradient.
The slider on the right of the Gradient color picker allows you to control the opacity of the color stop.
Apply a linear, radial, or angular gradient fill
-
-
From the color picker, select Linear Gradient, Radial Gradient, or Angular Gradient from the drop-down list.
Color picker Color picker linear, radial, and angular gradients linear, radial, and angular gradients -
Click the color stops in the gradient editor and select the required colors using the color picker.
- To add more color stops, click the gradient editor.
- To modify the color assigned to a color stop, click the color stop.
- To move color stops, drag them along the gradient editor.
Note: You cannot move the color stops on either end of the gradient editor.
- To delete a color stop, drag it away from the gradient editor. If you are using the on-canvas gradient editor, click the color stop and press Delete.
- To shift between color stops, use the Tab key.
- To change the orientation point and the angle of radial gradients, drag the corner handle.

Working with a radial gradient 
Working with a radial gradient - To add more color stops, click the gradient editor.
-
To change the direction of the gradient, drag the on-canvas gradient editor segment (on the object) as required.
You can also drag the end-points of the on-canvas gradient editor segment outside the bounds of the object. If a color stop is placed outside the bounds of an object, the color (associated with the color stop) is not shown on the object.
NoteYou can move the end of the on-canvas gradient editor segment by using the arrow keys and shift-arrow keys. Once you select an inner color stop, you can move it along the segment by using the arrow keys and shift-arrow keys. You can also press Tab to change color stops along the on-canvas gradient editor.
-
After creating a gradient, you can save it for later reuse in the Assets panel. Click an object with the gradient and click the + icon next to Colors in the Assets panel to save it.
Gradients saved in the Assets panel Gradients saved in the Assets panel
The color gradation between color stops in an angular gradient created using the CSS code in Design Specs may vary from the Angular Gradient rendering in the design canvas.
You can create color wheels, pie-charts, or progress indicators using angular gradients. Angular Gradient applies a fill with color gradients that sweep around a shape from the center of a circle.
Follow these steps to apply Angular Gradient to a circle and create a color wheel.
Apply Angular Gradient to a circle


Select a circle on the canvas, click Fill in the Property Inspector, and select Angular Gradient.
Add more colors


Click the Angular Gradient editor to add more color stops. Click the color stops and select the required colors.
Add seamless color transition


To create a contiguous color wheel, use the same color for last color stop and first color stop using Eyedropper tool.
Add contrast colors


You can also create a color wheel with sharp contrast colors by selecting different colors for last and first color stops.
Once you complete creating a color wheel, you can copy and reuse the Angular Gradient effects in other shapes like Rectangle or Triangle.
Examples
Find below, some of the samples that are created using Angular Gradient.
Progress spinners


Pie-charts or color wheels


Enhanced vector graphics


Dashboard elements or objects


Tutorial
Angular gradients, which are different from linear and radial gradients, can be really useful for the designs like progress spinners and color wheels. Watch this tutorial from Dani Beaumont — Principal Product Manager, Adobe XD — to learn how to use Angular Gradient.
Watching time: 4 minutes 7 seconds.
Import objects with gradient fill
-
Ensure that you save the file as a .svg file before importing into Adobe XD.
-
Click File > Import, select the SVG file, and click Import.
When you import a gradient as an SVG, the color picker displays the Gradient option by default. When you copy and paste an object in XD, the gradient fill is also copied. You can modify the color and the color stops of the gradient that you import.
Imported radial gradients with off-centered origin points are not editable in XD.


