Open a blank project.
Multi-state objects in Adobe Captivate can convert any interactive or non-interactive object to a multi-state object. In this section, you learn about how you can develop a basic multi-state interaction.
Assets and samples
The procedures in this document require you to use assets such as images and sample Adobe Captivate project files. You can choose to use your own assets and samples. However, it is recommended that you download and extract the following zip file to your computer:
Before working with Multi-state objects in Adobe Captivate, keep these points in mind:
- Any object can have multiple states.
- Interactive objects have in-built states.
- You can customize the states of static and interactive objects.
- Buttons and smart shapes have in-built states with associated styles.
Add states to an object
Let's add states to an object using the following steps:
-
-
From the Slides menu, add a Content Slide to your project.
-
To add objects, click assets and add a Character to your slide. You can select between CloseUp, Half, and Full character. Let's rename the state as Joe. Similarly, rename all the objects in your slide. To learn, see Rename objects in your project.
Merk:Ensure that you add assets you use in your project to the Captivate Library for the project to be able to access them.
-
Enter a name for the state Enter a name for the state To add a state to an object, select the character (Joe) and in the Properties inspector, click the + icon under the Object State. Enter a name for the state in the dialog that is displayed and click OK.
-
Click State View for the different states Click State View for the different states In the Object State section, click State View to view all the current states in your project.
Rename objects and states
You can rename objects and states in Adobe Captivate. When you add an object to your project, a dialog is displayed. Enter a name and click OK. To rename, select the object and rename at the top field of the Properties inspector.
To rename a state, select the state and click State View in the properties panel. In the state list, right-click the slide and select Rename State.
Add multiple states to an object
Use the following steps to add multiple states to an object in Adobe Captivate:
-
Add states in the States Of panel Add states in the States Of panel To add multiple states to an object, open the State View and click the +New State option in the States of panel. Rename the state in the dialog and click OK.
-
Add another character from the Captivate Library panel on the left of the workspace and rename it.
-
Follow the same procedure and add a third state. Add another character to the slide from the Library panel and rename it as John.
-
Once you are done adding states, click Exit State in the toolbar.
Add buttons to your project
Use the following steps to add buttons to navigate and view the different states:
-
Add Buttons to your project Add Buttons to your project To add buttons, in the toolbar, click the Interaction menu and select Button.
-
Select the first button and open the Actions menu in the Properties inspector.
-
Change State of action Change State of action Click the On Success field and select Change State of action from the drop-down. Custom states support static and interactive objects. You can trigger them through the Change State of option.
-
From the next two drop-downs, select the object and the expected state you have created. Ensure to deselect Continue Playing the Project option.
If you add any Smart Shape to the slide, convert them into a button to activate the Actions option in the Properties inspector.
Introduction to Button states


- Normal: The default state of an object in the state view. This is the state you first see when you play your project.
- Rollover: The state highlights the button when a user hovers the pointer over the selected state. For example, for quiz questions, if you have five options for the correct answer, the rollover state assists identify the previously selected answers.
You can use different formatting for all the four button states. To change formatting, select a button and use the settings in the Character section of the Properties inspector.
Retain state on revisit
For multi-state objects, you can choose to retain state on revisiting the slide. This is helpful when you are creating an interaction with multiple slides involved and want the selected state to be retained on revisiting the slide. For example:
- Using states for module buttons in a custom menu slide.
- Using states for the Progress Bar elements, which are displayed for the rest of the project.
- Branching interaction where the learners need to return to the main slide to explore the rest of
- the options.
- When you are using Go to the next/previous state actions, and you revisit the slide, object reset to the initial state. By using this option, you can start looping from the state last visited.
To retain the state on revisit, select the multi-state object, go to the Properties Inspector, and select Retain State on Slide Revisit.
Delete/reset states
You can reset the changes you make to the states in the States View. Right-click a state and select Reset State. To delete, select Delete State. When you are done with the changes, click Exit State in the toolbar.
Example: Color visualizer project
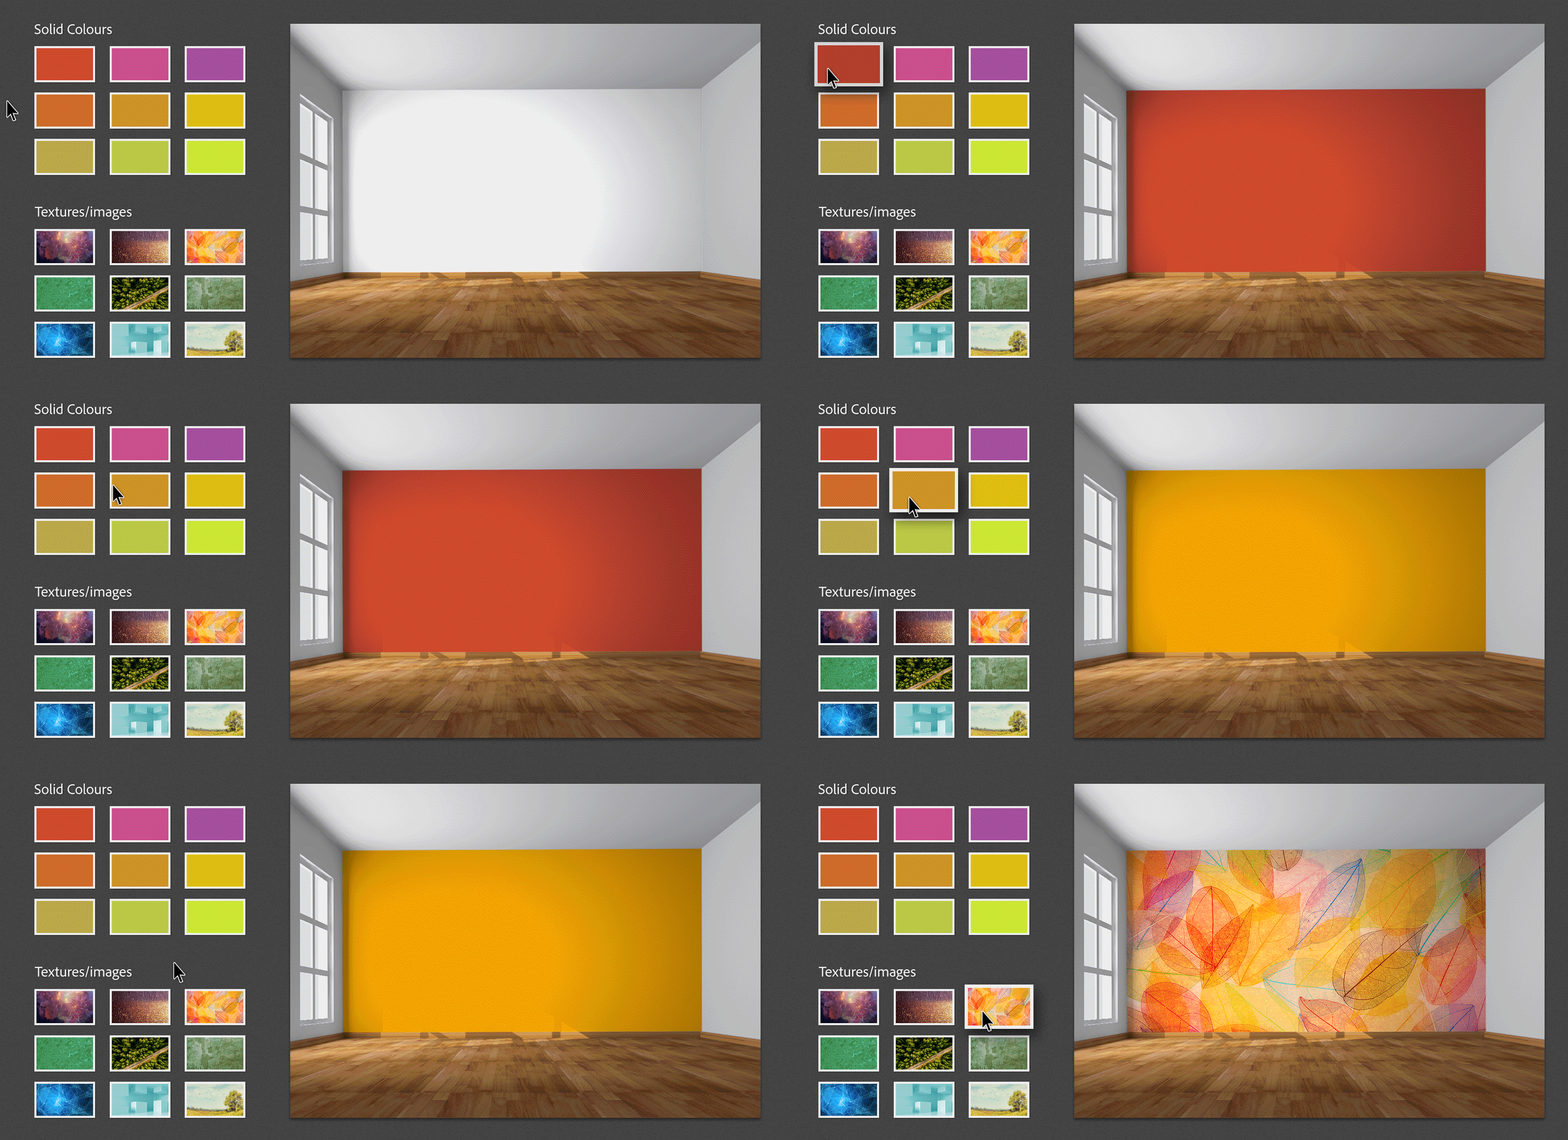
Now that you have tried working with multi-state objects in Adobe Captive, let's create an interesting color visualizer project. In this project, users can check how the wall looks with different colors and textures.
Here is how the final project looks like:


To create this project, use the following steps:
-
In a blank project, in the toolbar, click Shapes to add rectangle shape to the slide.
Add shapes to your project Add shapes to your project -
Let's distribute the shapes across two sections:
- Colors
- Textures
Add 12 rectangles each for both the sections. To add multiple rectangles, create duplicates with Cmd+D (Mac) or Ctrl+D (Win).
-
Select each rectangle and change the color in the Style section in the Properties inspector. Use Fill and Stroke settings to achieve the look.
Fill settings in the Properties inspector Fill settings in the Properties inspector -
Add the image of the room you are using for this project (download the assets added at the beginning of this article). To add, click Media and select Image.
Add image to your project Add image to your project -
Let's create multi-states for the image. Follow the instructions in the Add states to an object and Add multiple states to an object sections. Name the states as per the color options you add to the project. Create states equal to the total shapes you add to the project.
-
After you add states to the image, exit the state view and link the shapes to their respective states. For example, match the shape with color blue with the Blue state. Now, convert the shapes to buttons to enable linking. Select a shape and in the Properties inspector, select the Use as Button option under the Style Name section.
Use shapes as Buttons Use shapes as Buttons -
Follow the steps in the Add buttons to your project section to link states to the shapes.
-
In the toolbar, click Preview and select Project from the drop-down.
-
To publish your project, click Publish and choose from the different publish options.


