
某些 Creative Cloud 应用程序、服务和功能在中国不可用。

-
Note
You can add photos to a print job from within the Print dialog box. See Add photos using the Print dialog box for more information.
-
Select a print size for the photos. See the scale an image in the Print dialog box topic if you plan to use the Custom print size option.
-
To place the image at a specific location, deselect the Center Image check box and specify Top and Left values. Leave the option selected if you want the image to appear at the center.
Note
If you pan the image inside the photo holder or drag the photo holder, the Center Image check box gets deselected automatically.
Note
You can choose any other unit from the predefined list of units.
An image can be rotated in the Print dialog box. Both the Photoholder and the image in specific can be rotated.
Click the Rotate Image buttons to rotate the Photoholder.
Check Image Only to rotate just the image. The Photoholder does not rotate.
You can Zoom In or Out of the image using the slider.
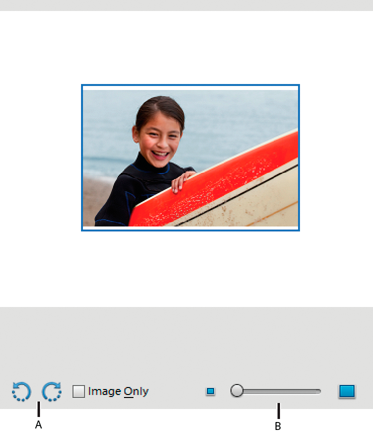
A. Rotate Image B. Zoom slider
Printing Choices
Enables you to specify the following settings:
Photo Details
You can print the date, caption, and filename by selecting the following options:
Show Date
Show Caption
Show File Name
Border
You can specify the following details for the border:
Thickness in inches, mm, or points.
Color of the border
Background color
Iron-on Transfer
Select Flip Image to use image for T-shirt transfers.
Note
Some printers have the inverting images option. If so, ensure that you use either your printer driver settings or the Invert image option to invert images. Selecting both the options horizontally flips the image twice.
Trim Guidelines
Select Print Crop Marks (guide lines on all four edges of the photo) to make it easier to trim a photo.
Color Management
Displays the color profile of the image. Image Space shows the color space embedded in your photo file. (The print preview in the Print dialog box is not color managed and doesn’t update as you choose a profile.) You can change the profile for printing from the following options:
Scaling an image in the Print dialog box changes the size and resolution of the printed image (the file size of the image doesn’t change).
-
Choose File > Print. Click More Options in the Print dialog box. Select Custom Print Size option and do one of the following:
Select Scale To Fit Media to scale the image to fit on the page.
Specify the units of measurement from the Units menu and enter values for Height and Width to rescale the image numerically. The dimensions are constrained, meaning that changing one dimension proportionately changes the other dimension.
If your image (PSD or TIFF) is multi-layered, use the Layers panel to temporarily hide the layers from view and prevent them from printing.