API Name
Adobe ColdFusion API Manager, introduced in ColdFusion (2016 release), is a standalone server component that provides monitoring, measuring, securing, and monetizing your APIs. API Manager is a technology-agnostic platform to create REST or SOAP APIs. Irrespective of an ASP.NET API or a CFML-based API, API Manager routes all client requests to the actual endpoint URL.
API Manager is a full-featured management tool integrated with ColdFusion (2016 release) to bring in all elements of the development and management process for your API needs. With Adobe ColdFusion, developers are already able to quickly build and deploy both REST and SOAP APIs. API Manager will allow system administrators to also secure APIs through role-based access control.
Basic API Manager concepts
Roles and users
API Manager supports the following roles:
- Administrator – An administrator adds and manages users, enforces throttling and rate-limiting of APIs, configures security, and so on. For more information, see Administrator.
- Publisher – A publisher creates and publishes APIs (REST, ColdFusion, or Swagger), enforces security, plans API consumption, approves subscriptions, and so on. For more information, see Publisher.
- Subscriber – A subscriber consumes an API, generates API keys, subscribes to applications, views notifications from publishers, and so on. For more information, see Subscriber.
Throttling and rate-limiting
Throttling controls API usage within a time period. You can define throttling at the application level and API level. Rate limiting defines the rate at which consumers can access APIs.


For more information, see Throttling and rate limiting. To know more about how an API administrator enforces throttling and rate limiting, see Configuring SLAs.
API authentication
In the API Manager, you can use API keys to authenticate your APIs and applications. The API Manager generates the API keys and enable you to add API key-based authentication to your APIs. There are three authentication types:
- apiKey
- basicAuth
- OAuth2
- None
For more information, see API authentication types.
Applications
Create your application and get your API subscribed to the application. For more information, see Creating an application.
Installing API Manager
The API Manager installer is available as part of a licensed, enterprise-only version of Adobe ColdFusion (2016 release). As you install ColdFusion, you can see a dialog box to install API Manager. After you install API Manager, there are some post-installation steps that depend on the Operating System.
For more information, see Installing API Manager. The installation steps differ according to OS.
After you install, enter http://<localhost>:9000/portal.html in your browser to launch the API Manager portal.
If there are issues launching the API Manager, refer to the troubleshooting document and then start API Manager.
Creating a REST API
Basic settings of the API
To create your first REST API, log in to the API Manager portal as a publisher. After you log in, you can see a screen that lists various ways to create an API. Click Create REST API.


As an example, you can create an API that finds the median value of a house in a particular zip code in USA . In this case, you require the following details:
|
|
The name of the API you will create. Enter a meaningful name. For this example, enter Demographics |
|
Context |
Browser-friendly name that defines the context of your API. Enter the context as the same as your API. |
|
Version |
The version of the API. An API can have multiple versions. Enter v1.0 as the version of the API. |
|
Endpoint |
For this example, you can work with a service exposed by the Cdyne services provider. Use the endpoint, http://ws.cdyne.com/DemographixWS/DemographixQuery.asmx |
|
Visibility |
Set it to public, private, or partner depending on how you want to expose the API to users. |
|
Description |
Enter the API description. |


Defining the API resources
The example endpoint has the resource GetIncomeHouseValueByAddress. Use GET method with the endpoint. Enter /GetIncomeHouseValueByAddress in the Add Resource Path field.
The endpoint has the following parameters:
- AddressLine1
- City
- StateAbbrev
- ZipCode
- LicenseKey
Add the information to the Resources section, as shown below:


|
1 |
GET method |
|
2 |
Resource |
|
3 |
Parameters of the resource. |
Authenticating the API
For this example, choose None as authentication type in the Authentication section.
Publishing the API
To publish the API, click Publish. Once the API is published, you can preview of the API. You can verify the details and if required, edit and re-publish the API.
Testing the API
To test this API, click Test this API on the left navigation panel. Expand the resource. Enter the values of the parameters as shown below:


Click Run API Call. The following displays:


You can also enter the following in your browser and get the response body:
Subscribing to the API
Once the publisher creates and publishes an API, you can subscribe to it. Log in to the API Manager portal as a subscriber and choose the API from the API catalog.
Subscribe to an application and choose your SLA plan. You can also see the application key that you can use to try out the API.


Creating a REST API from SOAP
Basic settings
To create your first REST API, log in to the API Manager portal as a publisher. After you log in, you can see a screen that lists various ways to create an API. Click Create REST API from SOAP.


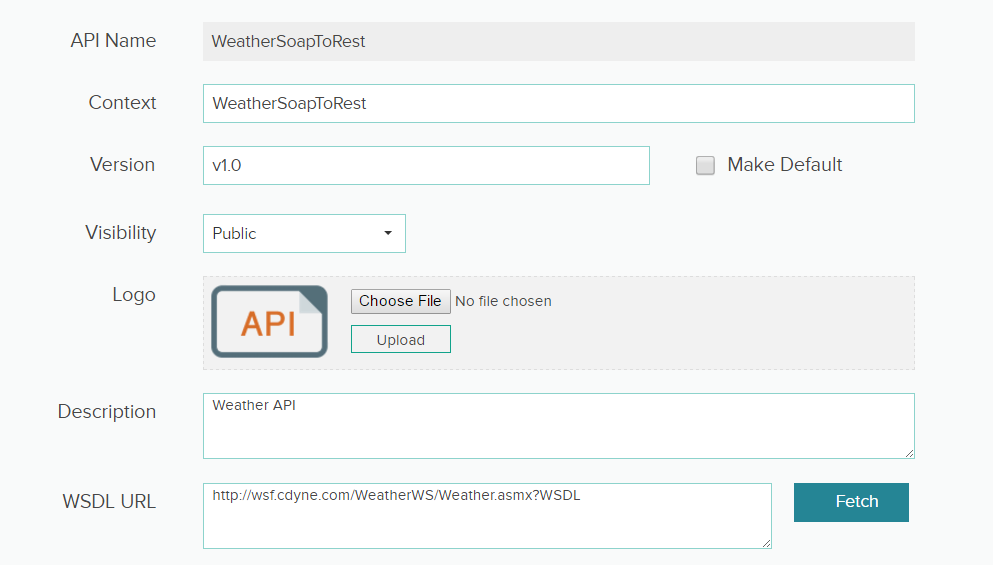
As an example, you will use a publicly accessible SOAP web service and generate REST endpoint for the same. The WSDL URL for sample SOAP service is http://wsf.cdyne.com/WeatherWS/Weather.asmx?wsdl
Enter all the fields in Basic Settings and click Fetch, which takes you to the SOAP to REST Mapping Wizard.


SOAP to REST mapping
In the SOAP to REST Wizard, you can see the following:


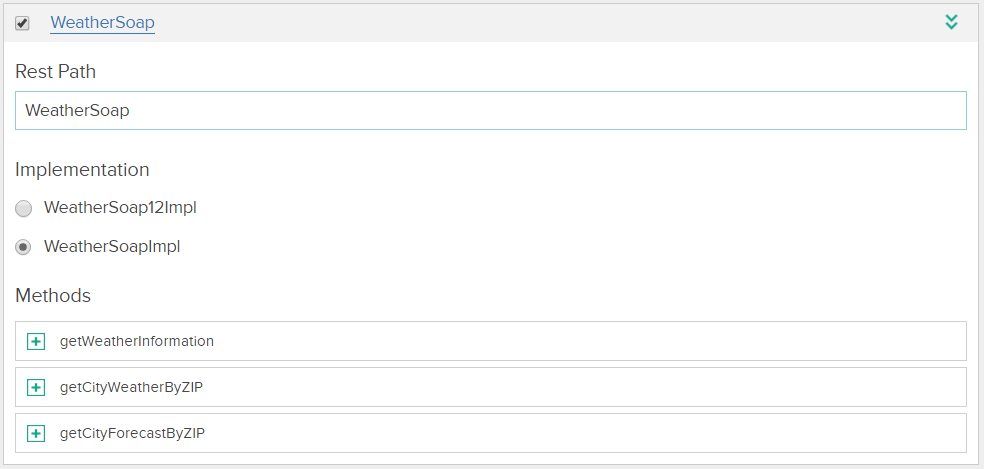
Under Mapping, there are three rows. For this example, choose WeatherSoap, because the SOAP binding uses this portType. When you expand the port type, you can see the methods for the port type.


The implementation represents the bindings supported for the portType. In this case, SOAP1.1 and SOAP1.2 are present, and you selected WeatherSoapImpl, which is SOAP 1.1 binding. You cannot select more than one binding at a time while publishing a SOAP to REST API.
The REST Path (WeatherSoap) is the resource path where the converted REST service will be available. This field is editable, you can define your own resource path (REST path).
SOAP to REST Methods
Now map the individual operations to REST. Choose the method getWeatherInformation, as shown below:


This method does not take any input arguments and only returns some info. You can enter Produces (Accept header). By default, application/json is populated in Produces. You can apply multiple comma-separated accept headers. As the operation does not take any input argument, keep Consumes (Content-type header) empty.
Type is resource method designator as defined by JAX-RS and corresponds to similarly named HTTP methods. GET, PUT, POST, DELETE are valid types for SOAP TO REST translation.
For this operation, keep Type as GET, which is the default value.
Generating the REST endpoints
To generate the REST endpoints after mapping, click Generate Rest Endpoints. The REST Service endpoints are now created and hosted. You can invoke the endpoint by entering the following URL in a browser:
http://localhost:9100/ WeatherSoapToRest/v1.0/WeatherSoap/ getCityWeatherByZIP/ “<cityZipCode>”
Review the API in the Resources section.
Endpoints
In this section, you can see the endpoint URL for generated REST service for the input WSDL document.


For the current example, Swagger Doc is available at this URL: http://localhost:9100/soaptoRest/WeatherSoapToRest/api-docs
The URL is a link to Resource Listing doc, and from this doc you can get the URL to API Listing doc, which is in this case is:
http://localhost:9100/soaptoRest/WeatherSoapToRest/api-docs/WeatherSoap.
For details about Swagger Document, you can refer to the Swagger 1.2 specification.
Testing the API
To test this API, click Test this API in the left navigation panel. Enter the following details and click Run API Call.


You can see the following responses:


In the Request Details section, you can see the request URL for this operation, HTTP Method, Accept header sent to the endpoint, and other headers. Params is the QueryParam sent, in this case apiKey= 808a92a6554c4b6b8fffabbf2e2d05f8 and arg0=10036, which you can invoke through:
http://localhost:9100/WeatherSoapToRest/v1.0/WeatherSoap/getCityWeatherByZIP?api_key= 808a92a6554c4b6b8fffabbf2e2d05f8&arg0=10036
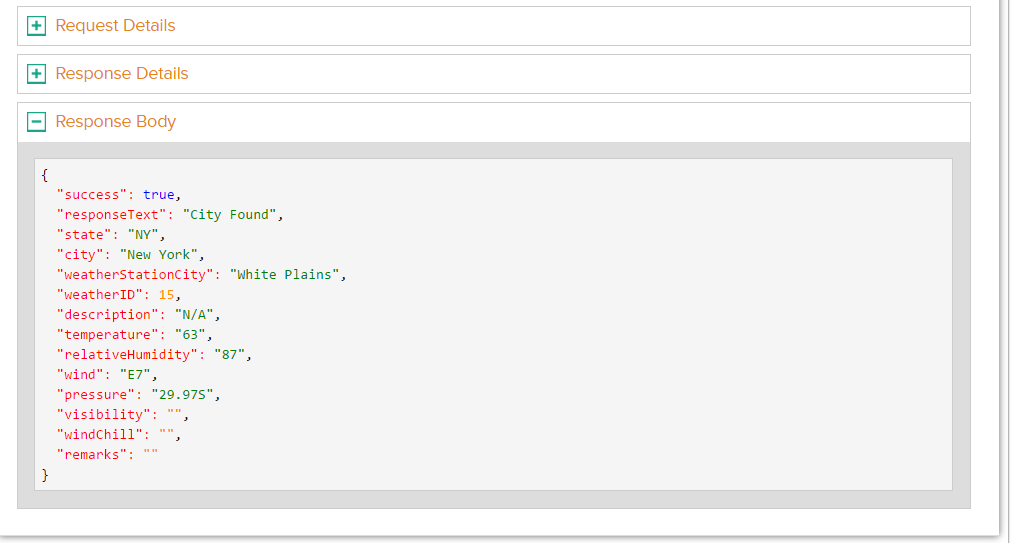
You can see the following result:
{"success":true,"responseText":"City Found","state":"NY","city":"New York","weatherStationCity":"White Plains","weatherID":15,"description":"N/A","temperature":"63","relativeHumidity":"87","wind":"E7","pressure":"29.97S","visibility":"","windChill":"","remarks":""}
Importing REST API from Swagger
Swagger is a specification and a framework to build API documentation and sandboxes, and to generate the code of an API client.
In ColdFusion API Manager, you can import REST resources based on Swagger specifications and publish them.
The API Manager supports importing an API from Swagger 1.2 and Swagger 2.0.
Basic settings
To import a REST API from Swagger, click Import REST API from Swagger.


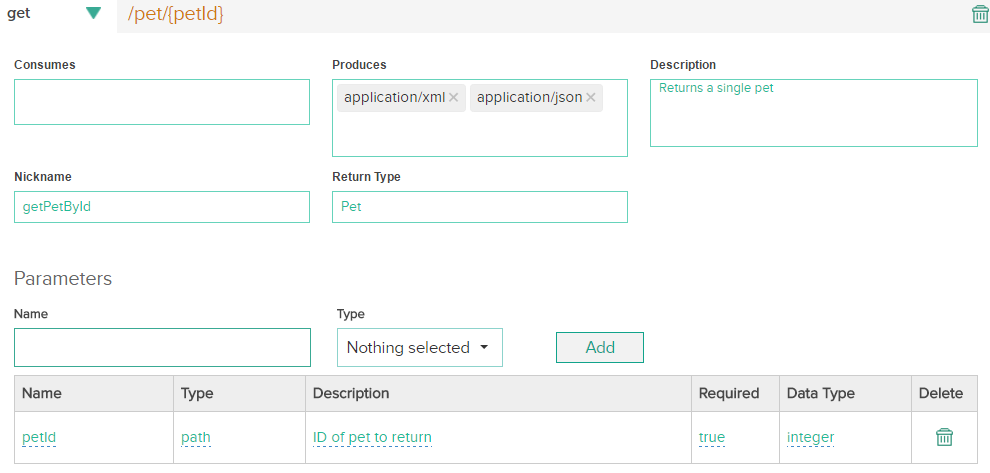
As an example, you will use import the Swagger doc of Petstore API. Enter the following URL:


Click Import. You can see that the Swagger endpoint, version, and description are populated in the page. Enter the API name and context.


Resources
In the Resources section, click any resource and view its parameters, methods, authentication types, and so on.


Authenticating the API
For this example, you will use the basicAuth authentication method.
Basic authentication is the simplest form of authenticating a user via user name and password. The API Manager allows protecting an API using the Basic authentication scheme. The publisher needs to configure the user store against which the credentials needs to be authenticated. If the API resource is protected with a Scope and configured with roles, then role authorization also happens during the consumption of the API.
The example below provides a step by step procedure that shows how to authenticate and authorize the publicly available pet store API using Basic authentication scheme. The example also uses LDAP Directory as the backend user store through the API Manager gateway.
To set the authentication type:
Navigate to Security > Authentication and choose basicAuth as the authentication type. Click Apply to all resources. Doing so sets basicAuth as the authentication method to all the resources. You can also override this authentication type at the sub-resource level as well.


In the Configuration page, choose User store as the user store against which the credentials are to be authenticated.


Create two scopes, pet_write and pet_read. Only users with Pet Reader role can read the pets. Users with role Pet Writer can write and delete the pets.


Assign pet_read to all the resources for all the GET operations of pet resource. Assign pet_write to all the resources of pet other than GET.
Choose the relevant SLA plans and publish the API.
Import REST API from ColdFusion
In API Manager, you can also import REST services registered in any ColdFusion server.


As an example, create a CFC called HelloWorld.cfc that displays a message. Using the ColdFusion Builder, create a CFC and add the following lines in the file:
<cfcomponent rest="true" restpath="/hello">
 <cffunction name="sayHello" access="remote" returnType="string" httpMethod="GET">
  <cfset myStr="Hello. This is a REST app.">
  <cfreturn myStr>
 </cffunction>
</cfcomponent>
Register the service in ColdFusion Administrator.
- Enable Allow REST Discovery in Server Settings > Settings.


- Register the CFC that you created in the ColdFusion Administrator.


Register the ColdFusion server in API Manager Administrator
In the CF Discovery Server window, enter the following information, as shown below:


Importing the REST API in API Manager
After clicking Import REST API from ColdFusion, you can see the following. Choose the appropriate server.


Click Import. In the Resources section, you can see that there are no resources because there were no resources defined for this API. This API only returns a message. Publish and test the API. You can see the message, as shown below:


Importing REST API from SOAP Web service
In ColdFusion API Manager, you can expose a SOAP web service as a REST API. Click Import SOAP API from the Create API window.


In the Basic Settings page, enter the API information and WSDL URL, as shown below:


Click Fetch. The API Manager parses the WSDL to identify SOAP endpoints, port types, operations, and so on, and also rewrites all endpoints and XSD document references to point to the API Manager runtime gateway. You can see the following:


You can see that you have a proxy WSDL now. The page lists all available Port Types, possible Message Envelopes, and Endpoints. Message envelopes are also generated automatically. Clicking any button near the Envelope displays a dialog showing the SOAP Action, Body Type, and a sample Message. The API Manager generates the sample, and the sample is validated for documentation of the original API.
The example below is a SOAP 1.2 message envelope for Port Type: WeatherHttpGet and Operation: GetCityWeatherByZIP.


Click Save and you can see a summary of the newly created proxy service endpoints.


Click Publish.
Try-out the API
After you click Test this API after publishing the API, you can see two WSDL URLs. The first URL is the original WSDL URL and the second URL is the proxy URL generated by the API Manager.
If the two WSDLs are compared, you can see that the actual endpoints (http://wsf.cdyne.com/WeatherWS/Weather.asmx) are replaced with the API Manager-generated proxies ( http ://localhost:9100/WeatherWSDL/v1.0/{Binding}).
Before publishing the API, ensure that all endpoints / XSD references start with the URL, http://localhost:9100/WeatherWSDL/v1.0/.
Test the service GetCityWeatherByZIP and the port type, WeatherHttpGet. You can see a try-out window.


Enter a ZIP code and click Run API Call. If you enter a valid ZIP code in <ns1:ZIP>?xxx?</ns1:ZIP>, you can see the following in the response:


If you enter an invalid ZIP code, you can see the following response:


Analytics in API Manager
In API Manager, you can track key metrics, SLA usage, and so on, in a set of interactive and graphical dashboards. In any API Manager dashboard, you can:
- Gain insights to an API performance
- Monitor API availability and response times
- Track API usage
The Analytics Dashboard in API Manager consists of multiple dashboards separated logically. For example, a publisher dashboard has the following panels:
- Home panel for overall view of API requests
- APIs panel for comparing APIs on different aspects
- API and Versions panel for comparing different versions of an API
- Errors panel for analyzing errors in your APIs
- Developers panel for tracking subscriber requests and plans.


Each dashboard has multiple visualizations (or charts or graphs). Visualizations can be of different forms like pie, donut, bars, and lines. Each visualization provides you information based on the fields they are made of. Fields are a set of different data collected from the API manager, such as, API name, API version, type of request, and response time of request.
There are separate dashboards for Administrators and Subscribers. For more details, refer to the following links:
- Adobe help article on Administrator dashboards.
- Adobe help article on Publisher dashboards.
- Adobe help article on Subscriber dashboards.