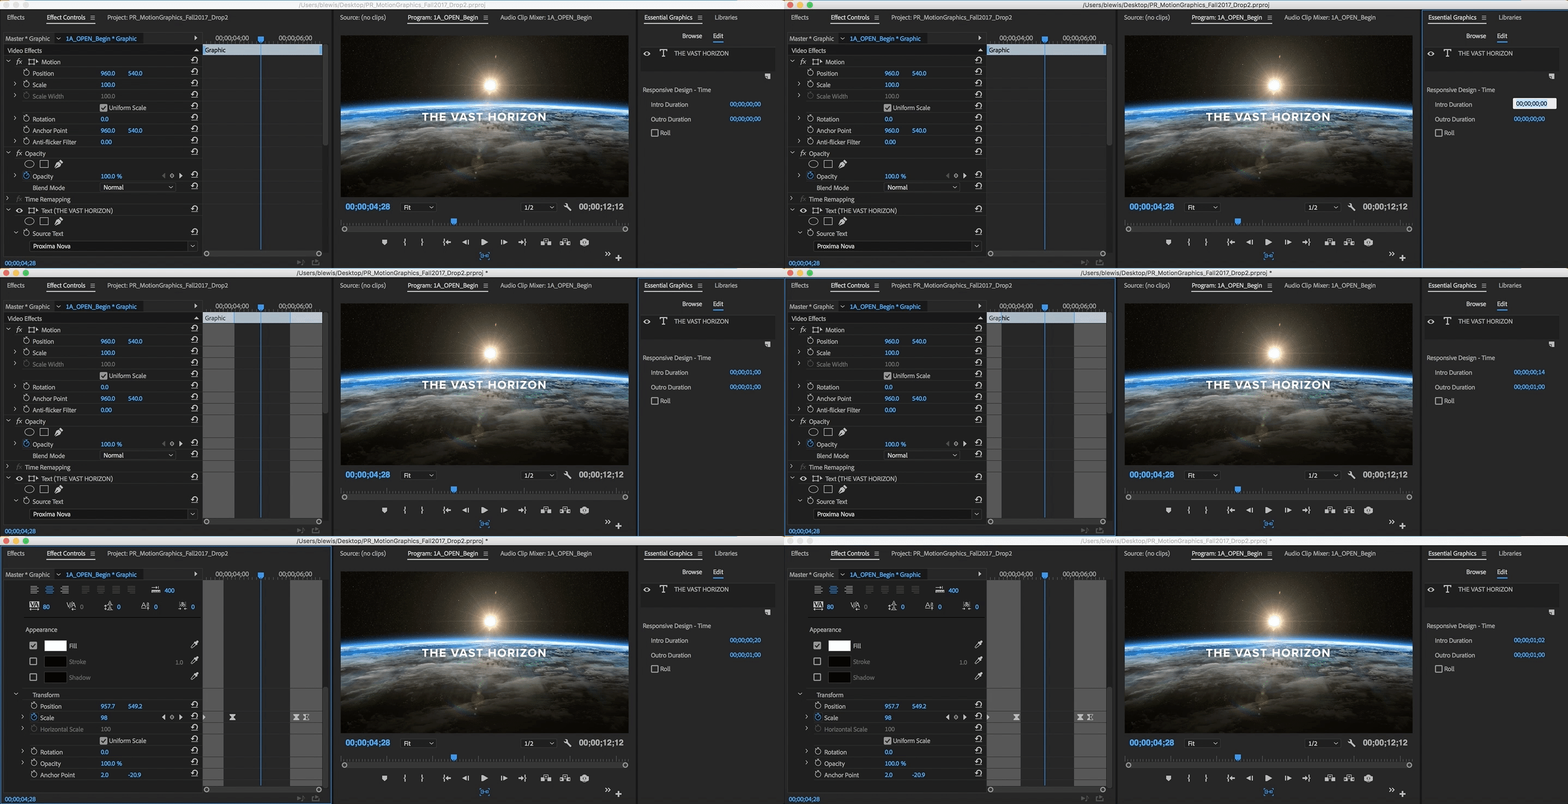
Select a Graphic in your timeline and navigate to the Edit tab of the Essential Graphics panel.
- Adobe Premiere Pro User Guide
- Beta releases
- Getting started
- Hardware and operating system requirements
- Creating projects
- Workspaces and workflows
- Frame.io
- Import media
- Importing
- Importing from Avid or Final Cut
- File formats
- Working with timecode
- Editing
- Edit video
- Sequences
- Create and change sequences
- Set In and Out points in the Source Monitor
- Add clips to sequences
- Rearrange and move clips
- Find, select, and group clips in a sequence
- Remove clips from a sequence
- Change sequence settings
- Edit from sequences loaded into the Source Monitor
- Simplify sequences
- Rendering and previewing sequences
- Working with markers
- Add markers to clips
- Create markers in Effect Controls panel
- Set default marker colors
- Find, move, and delete markers
- Show or hide markers by color
- View marker comments
- Copy and paste sequence markers
- Sharing markers with After Effects
- Source patching and track targeting
- Scene edit detection
- Cut and trim clips
- Video
- Audio
- Overview of audio in Premiere Pro
- Edit audio clips in the Source Monitor
- Audio Track Mixer
- Adjusting volume levels
- Edit, repair, and improve audio using Essential Sound panel
- Enhance Speech
- Enhance Speech FAQs
- Audio Category Tagging
- Automatically duck audio
- Remix audio
- Monitor clip volume and pan using Audio Clip Mixer
- Audio balancing and panning
- Advanced Audio - Submixes, downmixing, and routing
- Audio effects and transitions
- Working with audio transitions
- Apply effects to audio
- Measure audio using the Loudness Radar effect
- Recording audio mixes
- Editing audio in the timeline
- Audio channel mapping in Premiere Pro
- Use Adobe Stock audio in Premiere Pro
- Overview of audio in Premiere Pro
- Text-Based Editing
- Advanced editing
- Best Practices
- Video Effects and Transitions
- Overview of video effects and transitions
- Effects
- Transitions
- Titles, Graphics, and Captions
- Properties panel
- Essential Graphics panel (24.x and earlier)
- Overview of the Essential Graphics panel
- Create a title
- Linked and Track Styles
- Working with style browser
- Create a shape
- Draw with the Pen tool
- Align and distribute objects
- Change the appearance of text and shapes
- Apply gradients
- Add Responsive Design features to your graphics
- Speech to Text
- Download language packs for transcription
- Working with captions
- Check spelling and Find and Replace
- Export text
- Speech to Text FAQs
- Motion Graphics Templates
- Best Practices: Faster graphics workflows
- Retiring the Legacy Titler FAQs
- Upgrade Legacy titles to Source Graphics
- Fonts and emojis
- Animation and Keyframing
- Compositing
- Color Correction and Grading
- Overview: Color workflows in Premiere Pro
- Color Settings
- Auto Color
- Get creative with color using Lumetri looks
- Adjust color using RGB and Hue Saturation Curves
- Correct and match colors between shots
- Using HSL Secondary controls in the Lumetri Color panel
- Create vignettes
- Looks and LUTs
- Lumetri scopes
- Display Color Management
- Timeline tone mapping
- HDR for broadcasters
- Enable DirectX HDR support
- Exporting media
- Collaborative editing
- Collaboration in Premiere Pro
- Get started with collaborative video editing
- Create Team Projects
- Add and manage media in Team Projects
- Invite and manage collaborators
- Share and manage changes with collaborators
- View auto saves and versions of Team Projects
- Manage Team Projects
- Linked Team Projects
- Frequently asked questions
- Long form and Episodic workflows
- Working with other Adobe applications
- Organizing and Managing Assets
- Improving Performance and Troubleshooting
- Set preferences
- Reset and restore preferences
- Recovery Mode
- Working with Proxies
- Check if your system is compatible with Premiere Pro
- Premiere Pro for Apple silicon
- Eliminate flicker
- Interlacing and field order
- Smart rendering
- Control surface support
- Best Practices: Working with native formats
- Knowledge Base
- Known issues
- Fixed issues
- Fix Premiere Pro crash issues
- Unable to migrate settings after updating Premiere Pro
- Green and pink video in Premiere Pro or Premiere Rush
- How do I manage the Media Cache in Premiere Pro?
- Fix errors when rendering or exporting
- Troubleshoot issues related to playback and performance in Premiere Pro
- Set preferences
- Extensions and plugins
- Video and audio streaming
- Monitoring Assets and Offline Media
Responsive Design for Motion Graphics makes it possible to design rolls and graphics that adjust to changes in duration and layer positioning.
Starting with Premiere Pro version 25.0, the Essential Graphics panel is no longer included. You can now edit titles, captions, audio, video, and graphics more efficiently using the new Properties panel and browse Motion Graphics and Stock Audio using the Graphics Templates panel.
Check for updates
Start exploring the latest enhancements and features.
Responsive Design - Position
You can design your graphics to automatically adapt to changes in the video frame aspect ratio, or to the position or scale properties of another graphic layer. For example, you might want an underlying shape layer to respond to the width, height and position of your text.
Small blue pins on the Program Monitor indicate whether the currently selected layer is pinned to another layer.
To define spatial relationships between layers:
-
-
Select a layer that you want to make responsive to the changes in another layer.
-
Under Responsive Design – Position > Pin To, specify which layer the currently selected layer should be pinned to.
The currently selected layer gets parented by the layer you choose from the drop-down list.
-
To define which edges the child layer should be pinned to, use the diagram on the right side - Top, Bottom, Left or Right of the parent. You can also click the center of the diagram to pin to all edges or unpin from all edges.
For example, you have a rectangle containing text. If you pin the rectangle to the text, the text responds automatically to any change in the rectangle.
Obs!Use the square in the center to quickly toggle on or off pinning for all edges.
-
The selected layer now responds in position, length/width, and scale based on changes to its parent layer. When you select this layer in the program monitor, its parent layer displays small blue pins on the pinned edges.

Set responsive design - position 
Set responsive design - position
You can create title or credit rolls that move vertically over the screen by enabling Roll. When Roll is enabled, you see a translucent blue scroll bar in the Program Monitor.
This Document View scroll bar allows you to scroll the text and graphics in your credit roll for easier editing. You do not have to move the playhead in the timeline to a specific position.
The duration of the Roll-enabled Graphic and the combined height of all that Graphic's layers determine the speed of the roll.
To enable rolls for your graphics:
-
Select a Graphic in your timeline and navigate to the Edit tab of the Essential Graphics panel.
Enable rolls Enable rolls -
Make sure that the graphic you selected has none of its individual layers selected.
Obs!Make sure that the text layer in the Program monitor is deselected. If one or more layers are selected in the Program Monitor, the Roll option is not visible.
-
Select the check-box next to Roll to enable credit rolls.
-
Specify whether or not you want your text or other layers to start or end offscreen.
-
Adjust the timing for Preroll, Postroll, Ease in, and Ease out using the timecode for each property.

Roll scroll bar 
Roll scroll bar
Preserve Intro and Outro Animation
You can define segments of your graphics that preserve intro and outro keyframes, even when the overall duration of the graphic changes. Keyframes that fall within the intro and outro time ranges are protected when the Graphic is trimmed in or out. With these keyframes protected, you can trim your graphic clip and still preserve intro and outro animations. Keyframes that fall between intro and outro regions will be stretched or compressed as needed to fit.
A transparent white overlay on your Graphic in the timeline and in the Effect Controls panel indicate the intro and outro segments of the clip. These segments can be defined either in the Essential Graphics panel or in the Effect Controls panel.


Define intro and outro segments and preserve animations using the Essential Graphics panel
-
Select the graphic in your timeline and navigate to the Edit tab of the Essential Graphics panel.
-
Make sure that the graphic that you selected has none of its individual layers selected.
-
Under Intro duration, specify the amount of time that you want to define as the intro/entrance section using the timecode controls.
-
Under outro duration, specify the amount of time that you want to define as the outro/exit section using the timecode controls.
Define intro and outro segments and preserve animations using the Effect Controls panel
-
Select the graphic in your timeline and navigate to the Effect Controls panel.
-
At the top of the Effect Controls panel is a small blue handle at the beginning and end of the selected clip.
-
Drag the left handle out to define the intro/entrance segment. You see a grey overlay that covers the keyframes that fall within the specified time range.
-
Drag the right handle out to define the outro/exit segment. You see a transparent white overlay that covers the keyframes that fall within the specified time range.
Specify intro and outro duration using keyboards shortcuts
You can set keyboard shortcuts for specifying Intro and Outro duration using the keyboard shortcut map. Go to Edit > Keyboard Shortcuts (Windows) or Premiere Pro > Keyboard Shortcuts(macOS). These keyboard shortcuts are not assigned by default. These commands are used to assign keyboard shortcuts:
- Set Intro End
- Set Outro Start
To use your keyboard shortcuts for Intro and Outro duration:
-
Select the graphic clip in the timeline for which you want to preserve an intro or outro animation.
-
Position the playhead to the position that you want to set the Intro or Outro setting and click the keyboard shortcut that was assigned.
The keyboard shortcuts are enabled only when the timeline is selected.
