- Adobe Premiere Pro User Guide
- Beta releases
- Getting started
- Hardware and operating system requirements
- Creating projects
- Workspaces and workflows
- Frame.io
- Import media
- Importing
- Importing from Avid or Final Cut
- Searching for imported media
- File formats
- Working with timecode
- Editing
- Edit video
- Sequences
- Create and change sequences
- Set In and Out points in the Source Monitor
- Add clips to sequences
- Rearrange and move clips
- Find, select, and group clips in a sequence
- Remove clips from a sequence
- Change sequence settings
- Edit from sequences loaded into the Source Monitor
- Simplify sequences
- Rendering and previewing sequences
- Working with markers
- Add markers to clips
- Create markers in Effect Controls panel
- Set default marker colors
- Find, move, and delete markers
- Show or hide markers by color
- View marker comments
- Copy and paste sequence markers
- Sharing markers with After Effects
- Source patching and track targeting
- Scene edit detection
- Generative Extend
- Cut and trim clips
- Video
- Audio
- Overview of audio in Premiere Pro
- Edit audio clips in the Source Monitor
- Audio Track Mixer
- Adjusting volume levels
- Edit, repair, and improve audio using Essential Sound panel
- Enhance Speech
- Enhance Speech FAQs
- Audio Category Tagging
- Automatically duck audio
- Remix audio
- Monitor clip volume and pan using Audio Clip Mixer
- Audio balancing and panning
- Advanced Audio - Submixes, downmixing, and routing
- Audio effects and transitions
- Working with audio transitions
- Apply effects to audio
- Measure audio using the Loudness Radar effect
- Recording audio mixes
- Editing audio in the timeline
- Audio channel mapping in Premiere Pro
- Use Adobe Stock audio in Premiere Pro
- Overview of audio in Premiere Pro
- Text-Based Editing
- Advanced editing
- Best Practices
- Video Effects and Transitions
- Overview of video effects and transitions
- Effects
- Types of effects in Premiere Pro
- Modern transitions, effects, and animations in Premiere Pro
- Apply and remove effects
- Use FX badges
- Effect presets
- Metadata effect in Premiere Pro
- Automatically reframe video for different social media channels
- Color correction effects
- Effects Manager
- Change duration and speed of clips
- Adjustment Layers
- Stabilize footage
- Transitions
- Titles, Graphics, and Captions
- Properties panel
- About Properties panel
- Edit text
- Edit shapes
- Change the appearance of text and shapes
- Apply gradients
- Linked and Track Styles
- Working with style browser
- Draw with the Pen tool
- Align objects
- Add Responsive Design features to your graphics
- Edit audio
- Edit video
- Mask with shape
- Create reveal animations using masking techniques
- Create, apply, and redefine text styles
- Add Responsive Design features to your graphics
- Captions
- Motion Graphics Templates
- Best Practices: Faster graphics workflows
- Retiring the Legacy Titler FAQs
- Upgrade Legacy titles to Source Graphics
- Properties panel
- Fonts and emojis
- Animation and Keyframing
- Compositing
- Color Correction and Grading
- Overview: Color workflows in Premiere Pro
- Color Settings
- Auto Color
- Get creative with color using Lumetri looks
- Adjust color using RGB and Hue Saturation Curves
- Correct and match colors between shots
- Using HSL Secondary controls in the Lumetri Color panel
- Create vignettes
- Looks and LUTs
- Lumetri scopes
- Timeline tone mapping
- HDR for broadcasters
- Enable DirectX HDR support
- Color management
- About color management
- How color management works
- Auto Detection of Log Camera Formats and Raw Media
- Disable color management
- Manage source media colors in the Program Monitor
- Configure clips for color management using Clip Modify
- Configure sequence color management
- Customize color presets for new or existing sequences
- Configure a sequence’s output color space
- Color management options
- Color management and Lumetri Color
- Premiere Pro and After Effects color management compatibility
- Working with color managed iPhone media
- Frequently asked questions
- Color management and new version compatibility FAQ
- Exporting media
- Export video
- Export Preset Manager
- Workflow and overview for exporting
- Quick export
- Exporting for the Web and mobile devices
- Export a still image
- Content Credentials in Premiere Pro and Adobe Media Encoder
- Exporting projects for other applications
- Exporting OMF files for Pro Tools
- Export to Panasonic P2 format
- Create and export HDR videos for YouTube on Macintosh
- Export settings
- Best Practices: Export faster
- Collaborative editing
- Collaboration in Premiere Pro
- Get started with collaborative video editing
- Create Team Projects
- Add and manage media in Team Projects
- Invite and manage collaborators
- Share and manage changes with collaborators
- View auto saves and versions of Team Projects
- Manage Team Projects
- Linked Team Projects
- Frequently asked questions
- Long form and Episodic workflows
- Working with other Adobe applications
- Organizing and Managing Assets
- Improving Performance and Troubleshooting
- Set preferences
- Reset and restore preferences
- Recovery Mode
- Working with Proxies
- Check if your system is compatible with Premiere Pro
- Premiere Pro for Apple silicon
- Eliminate flicker
- Interlacing and field order
- Smart rendering
- Control surface support
- Best Practices: Working with native formats
- Removal of software rendering options
- Knowledge Base
- Known issues
- Fixed issues
- Fix Premiere Pro crash issues
- Why do my Premiere Pro exports look washed out?
- Unable to migrate settings after updating Premiere Pro
- Green and pink video in Premiere Pro or Premiere Rush
- How do I manage the Media Cache in Premiere Pro?
- Fix errors when rendering or exporting
- Troubleshoot issues related to playback and performance in Premiere Pro
- Set preferences
- Extensions and plugins
- Video and audio streaming
- Monitoring Assets and Offline Media
Learn how to use the Lumetri scopes feature in Premiere Pro to monitor color in an image.
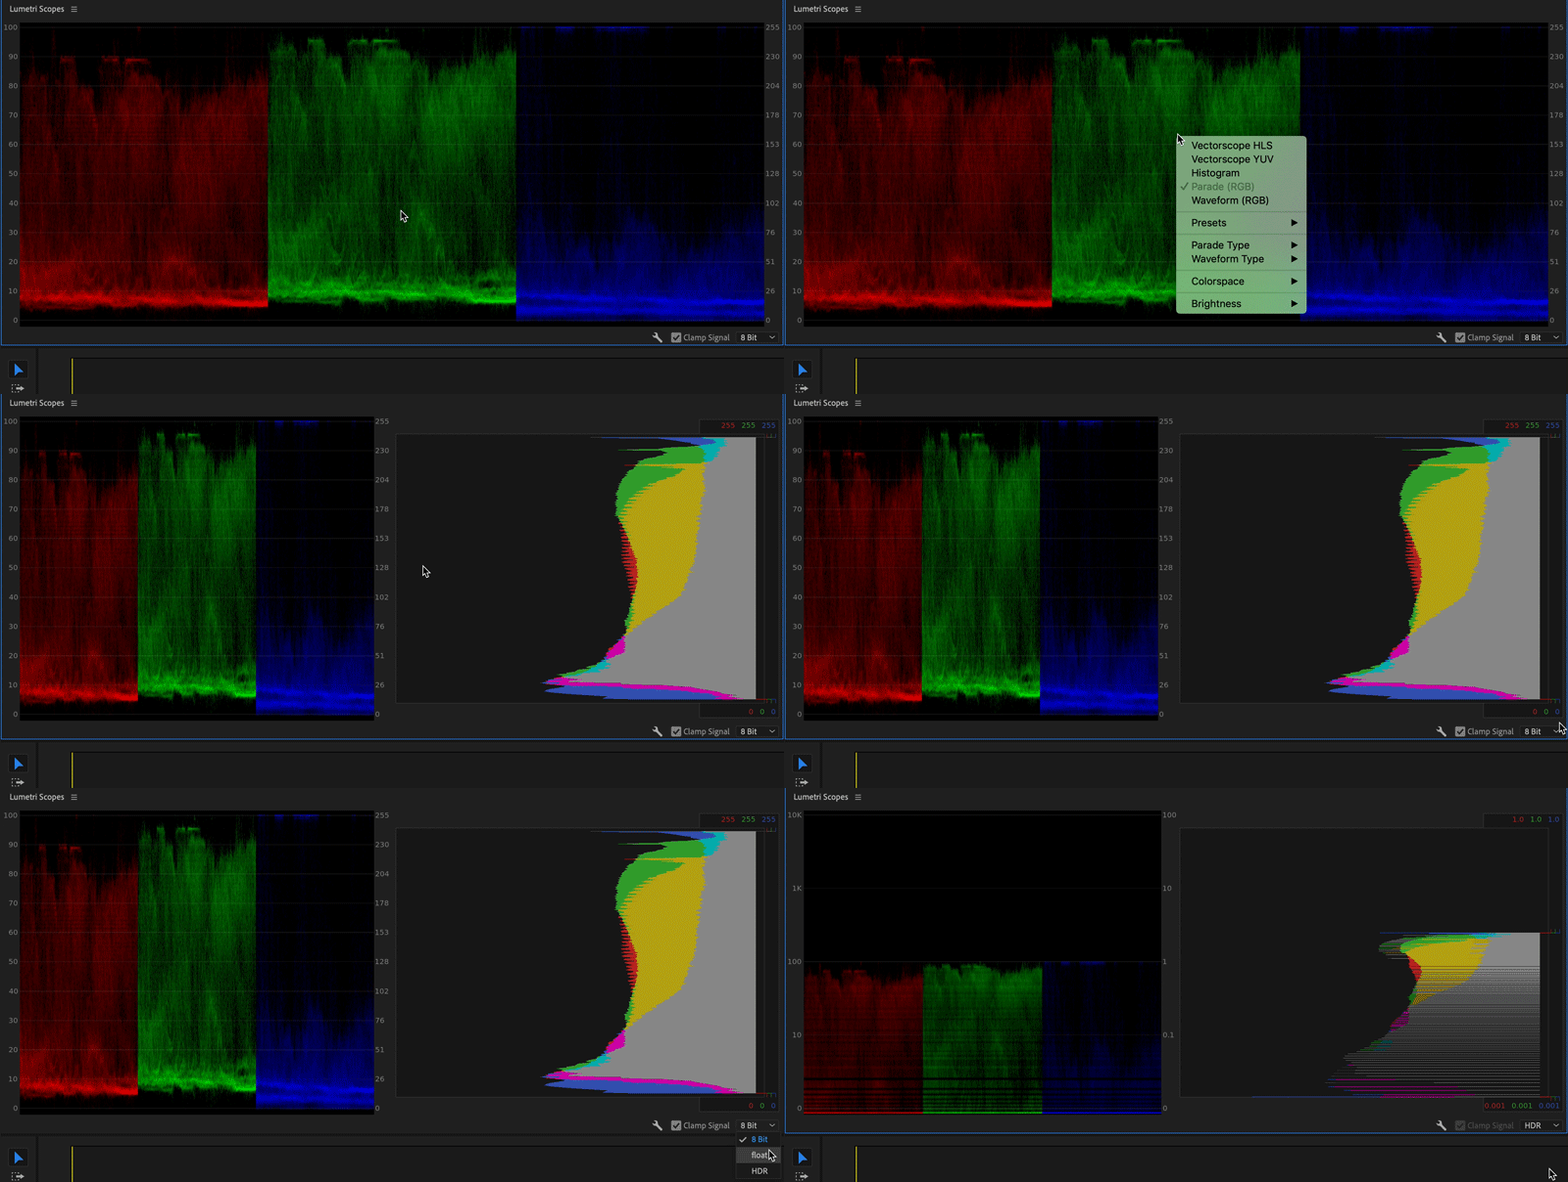
The Lumetri Scopes panel (Window > Lumetri Scopes) displays a set of resizable built-in video scopes: Vectorscopes, Histogram, Parade, and Waveform. These scopes help you evaluate and color-correct your clips. To display a scope, right-click in the Lumetri Scopes panel and select a scope from the drop-down list.


You can also select 8-bit, 10-bit, float, or HDR in the drop-down list on the lower-right corner of the Lumetri Scopes panel depending on the nature of the scopes that you want to analyze. For example, if you select HDR, the scopes change to high dynamic range data, with the scope scale showing a range between 0-10000 Nits.
Select Clamp Signal if you want to clip any signal over 100 IRE or below 0 IRE that is displayed in the scopes. Clamp signal only impacts output in the Lumetri Scopes window. Clamping the scope does not impact the frame being rendered on timeline or export output.
![]() At any given point, you can display all the scopes in the Lumetri Scopes panel. Simply right-click the Lumetri Scopes panel, and select Presets > All Scopes RGB or All Scopes YUV/YC.
At any given point, you can display all the scopes in the Lumetri Scopes panel. Simply right-click the Lumetri Scopes panel, and select Presets > All Scopes RGB or All Scopes YUV/YC.
Vectorscopes
A vectorscope is a circular graph the monitors the color information of an image. It measures saturation outward from the center and measures hue in a circular pattern.
Premiere offers two different flavors of the vectorscope: YUV and HLS (Hue, Lightness, and Saturation).


Vectorscope HLS
Displays hue, saturation, lightness, and signal information in a glance.


Vectorscope YUV
The YUV mode contains several color boxes, allowing you to see if your hue and saturation levels are correct.
Histogram
Histograms can help you accurately evaluate shadows, midtones, and highlights, and adjust the overall image tonal scale. It displays a statistical analysis of the pixel density at each color intensity level.
Histogram use RGB values. The minimum Luma values per channel are displayed as numerical feedback at the bottom. Maximum values are displayed at the top. Two horizontal lines indicate the output range. The default range is set to CIN code values (95 - 685).


Parade
Parade scope displays separate waveforms for the different components of an image. The waveforms are displayed side by side, making it easy to compare the relative levels of color in an image, and make adjustments as required. The Parade scope also makes it easy to spot color casts in your image.
It displays waveforms representing levels of the luminance and color difference channels in the digital video signal. You can choose from RGB, YUV, RGB-White, and YUV-White parade types.


Waveform
You can select from the following available waveform scopes:


RGB waveform
Displays the RGB signals overlaid to give a snapshot view of the signal level of all the color channels.


Luma waveform
Displays the IRE values between –20 to 120, allowing you to effectively analyze the brightness of shots and measure the contrast ratio.


YC waveform
Displays the luminance (represented as green in the waveform) and chrominance (represented as blue) values in your clip.


YC no Chroma waveform
Displays only the luminance values in your clip.