- Adobe Premiere Pro User Guide
- Beta releases
- Getting started
- Hardware and operating system requirements
- Creating projects
- Workspaces and workflows
- Frame.io
- Import media
- Importing
- Importing from Avid or Final Cut
- Searching for imported media
- File formats
- Working with timecode
- Editing
- Edit video
- Sequences
- Create and change sequences
- Set In and Out points in the Source Monitor
- Add clips to sequences
- Rearrange and move clips
- Find, select, and group clips in a sequence
- Remove clips from a sequence
- Change sequence settings
- Edit from sequences loaded into the Source Monitor
- Simplify sequences
- Rendering and previewing sequences
- Working with markers
- Add markers to clips
- Create markers in Effect Controls panel
- Set default marker colors
- Find, move, and delete markers
- Show or hide markers by color
- View marker comments
- Copy and paste sequence markers
- Sharing markers with After Effects
- Source patching and track targeting
- Scene edit detection
- Generative Extend
- Cut and trim clips
- Video
- Audio
- Overview of audio in Premiere Pro
- Edit audio clips in the Source Monitor
- Audio Track Mixer
- Adjusting volume levels
- Edit, repair, and improve audio using Essential Sound panel
- Enhance Speech
- Enhance Speech FAQs
- Audio Category Tagging
- Automatically duck audio
- Remix audio
- Monitor clip volume and pan using Audio Clip Mixer
- Audio balancing and panning
- Advanced Audio - Submixes, downmixing, and routing
- Audio effects and transitions
- Working with audio transitions
- Apply effects to audio
- Measure audio using the Loudness Radar effect
- Recording audio mixes
- Editing audio in the timeline
- Audio channel mapping in Premiere Pro
- Use Adobe Stock audio in Premiere Pro
- Overview of audio in Premiere Pro
- Text-Based Editing
- Advanced editing
- Best Practices
- Video Effects and Transitions
- Overview of video effects and transitions
- Effects
- Types of effects in Premiere Pro
- Modern transitions, effects, and animations in Premiere Pro
- Apply and remove effects
- Use FX badges
- Effect presets
- Metadata effect in Premiere Pro
- Automatically reframe video for different social media channels
- Color correction effects
- Effects Manager
- Change duration and speed of clips
- Adjustment Layers
- Stabilize footage
- Transitions
- Titles, Graphics, and Captions
- Properties panel
- About Properties panel
- Edit text
- Edit shapes
- Change the appearance of text and shapes
- Apply gradients
- Linked and Track Styles
- Working with style browser
- Draw with the Pen tool
- Align objects
- Add Responsive Design features to your graphics
- Edit audio
- Edit video
- Mask with shape
- Create reveal animations using masking techniques
- Create, apply, and redefine text styles
- Add Responsive Design features to your graphics
- Captions
- Motion Graphics Templates
- Best Practices: Faster graphics workflows
- Retiring the Legacy Titler FAQs
- Upgrade Legacy titles to Source Graphics
- Properties panel
- Fonts and emojis
- Animation and Keyframing
- Compositing
- Color Correction and Grading
- Overview: Color workflows in Premiere Pro
- Color Settings
- Auto Color
- Get creative with color using Lumetri looks
- Adjust color using RGB and Hue Saturation Curves
- Correct and match colors between shots
- Using HSL Secondary controls in the Lumetri Color panel
- Create vignettes
- Looks and LUTs
- Lumetri scopes
- Timeline tone mapping
- HDR for broadcasters
- Enable DirectX HDR support
- Color management
- About color management
- How color management works
- Auto Detection of Log Camera Formats and Raw Media
- Disable color management
- Manage source media colors in the Program Monitor
- Configure clips for color management using Clip Modify
- Configure sequence color management
- Customize color presets for new or existing sequences
- Configure a sequence’s output color space
- Color management options
- Color management and Lumetri Color
- Premiere Pro and After Effects color management compatibility
- Working with color managed iPhone media
- Frequently asked questions
- Color management and new version compatibility FAQ
- Exporting media
- Export video
- Export Preset Manager
- Workflow and overview for exporting
- Quick export
- Exporting for the Web and mobile devices
- Export a still image
- Content Credentials in Premiere Pro and Adobe Media Encoder
- Exporting projects for other applications
- Exporting OMF files for Pro Tools
- Export to Panasonic P2 format
- Create and export HDR videos for YouTube on Macintosh
- Export settings
- Best Practices: Export faster
- Collaborative editing
- Collaboration in Premiere Pro
- Get started with collaborative video editing
- Create Team Projects
- Add and manage media in Team Projects
- Invite and manage collaborators
- Share and manage changes with collaborators
- View auto saves and versions of Team Projects
- Manage Team Projects
- Linked Team Projects
- Frequently asked questions
- Long form and Episodic workflows
- Working with other Adobe applications
- Organizing and Managing Assets
- Improving Performance and Troubleshooting
- Set preferences
- Reset and restore preferences
- Recovery Mode
- Working with Proxies
- Check if your system is compatible with Premiere Pro
- Premiere Pro for Apple silicon
- Eliminate flicker
- Interlacing and field order
- Smart rendering
- Control surface support
- Best Practices: Working with native formats
- Removal of software rendering options
- Knowledge Base
- Known issues
- Fixed issues
- Fix Premiere Pro crash issues
- Why do my Premiere Pro exports look washed out?
- Unable to migrate settings after updating Premiere Pro
- Green and pink video in Premiere Pro or Premiere Rush
- How do I manage the Media Cache in Premiere Pro?
- Fix errors when rendering or exporting
- Troubleshoot issues related to playback and performance in Premiere Pro
- Set preferences
- Extensions and plugins
- Video and audio streaming
- Monitoring Assets and Offline Media
Learn how to balance and pan audio for stereo and 5.1 in your Premiere Pro projects using the Audio Mixer.
By default, all audio tracks output to the sequence master audio track. However, you can also create submix tracks. You can output audio from any track to a submix track. You can then out put audio from a submix track to a Master Track. You can use an audio track as an input for a submix track or for the Master Track. You can use a submix track as an output for an audio track and as an input for a Master Track. Different tracks in the same sequence can have different numbers of channels. For example, you can send the output from a monaural audio track to a stereo submix track, and then send the output from the stereo submix track to a 5.1-channel Master Track.
If the number of channels differs between an input track and its output track, you determine how much each of the channels in the input track feeds each of the channels in its output track. For example, you can send 80 percent of the signal from a monaural audio track to the left channel of a stereo submix track, and 20 percent to the right channel. This is balancing. You balance the audio to a stereo output track with Left/Right Pan dials in the Audio Track Mixer. You balance the audio to a 5.1 output track with 5.1 Panner controls in the Audio Track Mixer.
In the Audio Track Mixer, a Left/Right Pan dial appears in a track only when you select a stereo track as the output for the track. A 5.1 Panner control appears in a track only when you select a 5.1-channel track as the output for the track. The relation between the number of channels in an audio track and the number of channels in the output track (often the master track) determines whether the pan and balance options are available for an audio track.
Panning is the moving of audio from one output channel to another, over time. For example, if a car drives from the right side of a video frame to the left, you can pan the channel containing the car audio so that it begins on the right side of the screen and ends on the left.
If necessary, you can balance a clip by applying the Balance audio effect. Do so only after you determine that track balancing isn’t sufficient.
In the Audio Track Mixer, the number of level meters in a track indicates the number of channels for that track. The output track is displayed in the Track Output Assignment menu at the bottom of each track. The following rules determine whether a track’s audio can be panned or balanced in its output track:
When you output a mono track to a stereo or 5.1 surround track, you can pan it.
When you output a stereo track to a stereo or 5.1 surround track, you can balance it.
When the output track contains fewer channels than in the other audio tracks, Premiere Pro downmixes the audio to the number of channels in the output track.
When an audio track and the output track are mono or when both tracks are 5.1 surround, panning and balancing aren’t available. The channels of both tracks correspond directly.
While the master audio track is the default output track, a sequence can also include submix tracks. Submix tracks can be both an output destination of other audio tracks and an audio source to the master track (or other submix tracks). Therefore, the number of channels in a submix track affects the pan or balance controls available in tracks that output to it, and the number of channels in the submix output track affect whether panning or balancing is available for that submix track.
Panning and balancing in the Audio Track Mixer
The Audio Track Mixer provides controls for panning and balancing. A round knob appears when a mono or stereo track outputs to a stereo track. You rotate the knob to pan or balance audio between the left and right output track channels. A square tray appears when a mono or stereo track outputs to a 5.1 surround track. The tray depicts the two-dimensional audio field created by 5.1 surround audio. You slide a puck within the tray to pan or balance audio among the five speakers, which are represented by pockets around the edge of the tray. The tray also includes controls for adjusting a 5.1 surround audio track’s center channel percentage and subwoofer volume. No pan control appears if a track outputs to a submix or master track that contains the same number of channels or fewer; therefore, a pan or balance control is never available for a 5.1 surround track. A master track doesn’t contain a pan or balance control because it’s never routed to another track. However, panning or balancing an entire sequence is possible when you use the sequence as a track in another sequence.
You can vary the pan setting over time in the Audio Track Mixer, or in a Timeline panel by applying keyframes to a track’s Pan options.
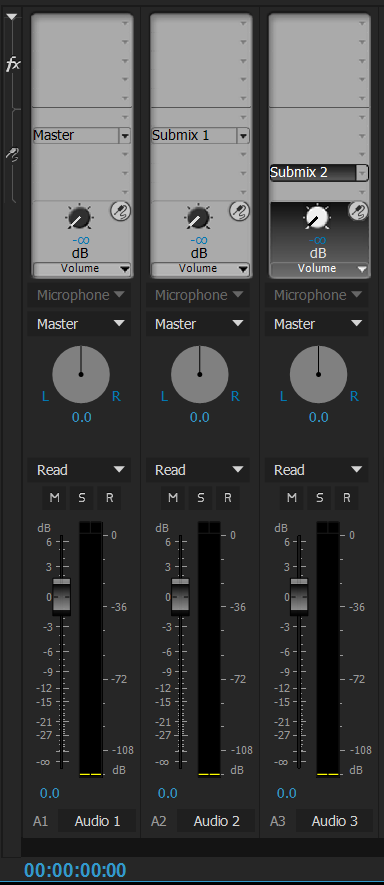

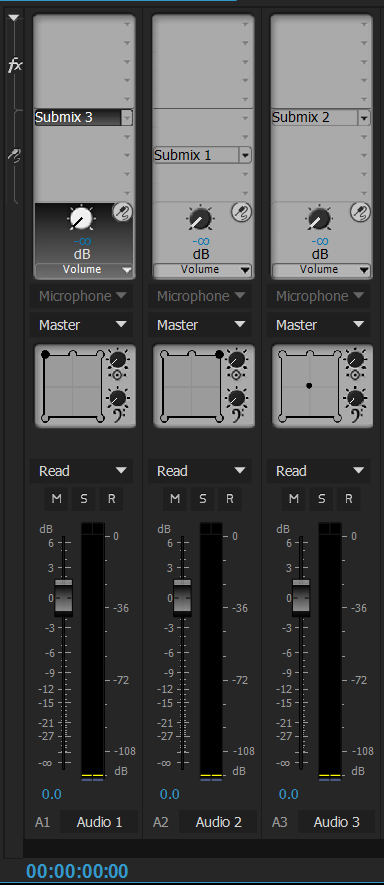

For best results monitoring pan or balance settings, make sure that each of the computer or audio card’s outputs is connected to the correct speaker, and make sure that positive and negative wires are connected consistently across all speakers.
Pan or balance a stereo track
-
In the Audio Track Mixer, do one of the following:
Drag the pan control knob or the value below the knob.
Click the value below the pan control knob, type a new value, and press Enter (Windows) or Return (Mac OS).
Pan or balance a 5.1 surround track
-
In the Audio Track Mixer, click and drag the puck anywhere within the tray. To snap the puck to a left, right, or center channel, drag the puck to a pocket along the edge of the tray.
-
Adjust the center channel percentage by dragging the center percentage knob.
-
If needed, adjust the LFE (subwoofer) channel level by dragging the knob above the Bass Clef icon
 .
.
Pan or balance an Adaptive (Multichannel) track
When you work with a sequence that contains an adaptive/multichannel master audio track, you can either click the Set Track Output Channel Assignments button or right-click the track header and select the Track Output Assignment option to assign output channels. The Track Assignment dialog box that appears allows you to mark your mapping on the matrix.
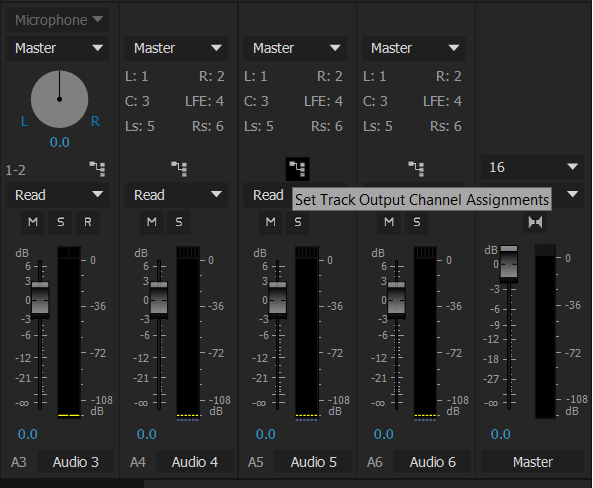

Direct Output Assignment button allows you to mark your mapping on the matrix and the labels right next to it lets you do a quick inspection of the mappings.
-
If the Audio Track Mixer is not open, select Window > Audio Track Mixer, and select the desired multichannel sequence.
The labels next to the Direct Output Assignment button shows to which Master track channel Premiere Pro automatically assigned the channels of the initial tracks. As you create additional tracks, Premiere Pro automatically assigns their channels to channel 1, 1-2, or 1-6 in a multichannel Master track, depending on the number of channels within the new track. You can click the Direct Output Assignment button to change the assignments.
-
In the Audio Track Mixer, click the Direct Output Assignment button, and select one of the channels in the Master track as the destination for that channel.
Huomautus:You cannot assign track sends to the Master track in a multichannel sequence.
Pan or balance a track in a Timeline panel
-
In a Timeline panel, if necessary, expand a track’s view by clicking the triangle next to the track name.
-
Click the Show Keyframes button
 , and
choose Show Track Keyframes from the menu.
-
Click Track:Volume at the top left of the track and then choose Panner > Balance or Panner > Pan from the menu. (For 5.1 surround audio, choose the dimension you want to edit from the Panner menu.)
-
(Optional) If you want to adjust the pan or balance effect over time, move the current-time indicator and click the Add/Remove Keyframe icon
 .
.
-
Use the Selection tool or the Pen tool to adjust the level.
-
(Optional) If you’re adjusting the pan or balance effect over time, repeat steps 4 and 5 as necessary.