
某些 Creative Cloud 应用程序、服务和功能在中国不可用。

-
To duplicate and rename the layer, choose Layer > Duplicate Layer, or choose Duplicate Layer from the Layers panel More menu. Name the duplicate layer, and click OK.
To duplicate without naming, select the layer and drag it to the New Layer button in the Layers panel.
Cmd-click the layer name or thumbnail, and choose Duplicate Layer.
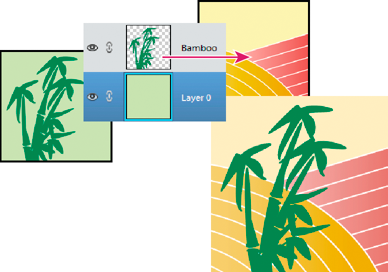
You can take any layer, including the Background layer, from one image and duplicate it in another. Keep in mind that the pixel dimensions of the destination image determine how large the printed copy of the duplicated layer can be. Also, if the pixel dimensions of the two images are not the same, the duplicated layer may appear smaller or larger than you’d expect.
You can copy any layer, including the Background layer, from one image to another. Keep in mind that the resolution of the destination image determines how large the printed copy of the layer can be. Also, if the pixel dimensions of the two images are not the same, the copied layer may appear smaller or larger than you’d expect.
-
Choose Select > All to select all of the pixels in the layer, and choose Edit > Copy. Then make the destination image active, and choose Edit > Paste.
[For floating documents] Use the Move tool (Select section of the toolbox), to drag the layer from the source image to the destination image.
The copied layer appears in the destination image, above the active layer in the Layers panel. If the layer you’re dragging is larger than the destination image, only part of the layer is visible. You can use the Move tool to drag other sections of the layer into view.
Note
Hold down Shift as you drag a layer to copy it to the same position it occupied in the source image (if the source and destination images have the same pixel dimensions) or to the center of the destination image (if the source and destination images have different pixel dimensions).
Layers are like stacked images on panes of glass. You can “slide” a layer in a stack to change what portion of its content is visible in relation to the layers above and below.
-
Drag within the image to slide the selected layer or layers to the desired position.
Press the arrow keys on your keyboard to move the layer or layers in 1‑pixel increments, or press Shift and an arrow key to move the layer in 10‑pixel increments.
Hold down Shift as you drag to move the layer or layers directly up or down, directly to either side, or on a 45° diagonal.
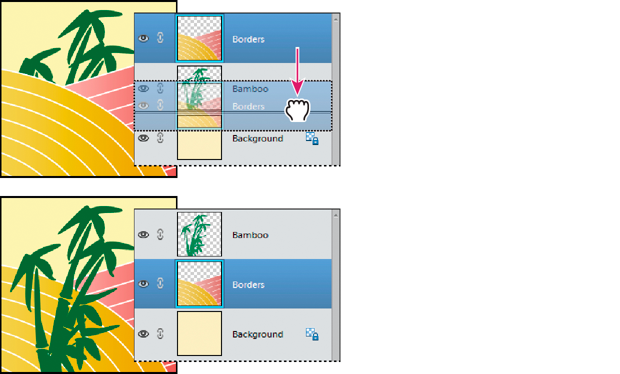
The stacking order determines whether a layer appears in front of or behind other layers.
By default, the Background layer must remain at the bottom of the stack. To move the Background layer, you need to convert it into a regular layer first.
When layers are linked, you can move their contents together. You can also copy, paste, merge, and apply transformations to all linked layers simultaneously. At some point, you may want to edit or move one linked layer. You can simply unlink the layers to work on one layer at a time
-
With one layer selected, click the link icon of another layer.
Select the layers you would like to link. To select more than one layer, hold down Command and click the layers you want to select. Click the link icon of any one layer.
With multiple layers selected, cmd click and select the Link Layers option.
Layers can greatly increase the file size of an image. Merging layers in an image reduces file size. You should merge layers only after you have finished manipulating them to create the image you want.
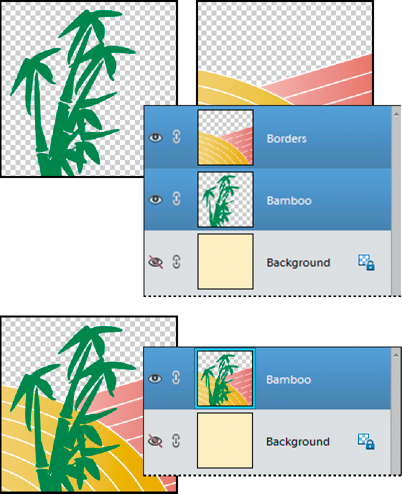
You can choose to merge only the linked layers, only the visible layers, only a layer with the layer below it, or only selected layers. You can also merge the contents of all visible layers into a selected layer, yet not delete the other visible layers (in this case, there is no reduction in file size).
When you complete work on an image, you can flatten it. Flattening merges all visible layers, discards all hidden layers, and fills transparent areas with white.
-
To merge selected layers, select more than one layer by holding down the Command key and clicking each layer. Cmd click and choose Merge Layers.
To merge a layer with the one below, select the top layer of the pair and choose Merge Down from either the Layer menu or the Layers panel flyout menu.
Note
If the bottom layer in the pair is a shape, type, or fill layer, you must simplify the layer. If the bottom layer in the pair is an adjustment layer, you can’t choose Merge Down.
- To merge all visible layers, hide any layers you don’t want to merge and choose Merge Visible from the Layer menu or Layers panel flyout menu.
- To merge all visible linked layers, select one of the linked layers and choose Merge Linked from the Layer menu or Layers panel flyout menu.
Note
If the bottom-most merged layer is a type, shape, solid color fill, gradient fill, or pattern fill layer, you must first simplify the layer.
Use this procedure when you want to keep the layers you are merging intact. The result is a new merged layer plus all the original layers.
When you flatten an image, Photoshop Elements merges all visible layers into the background, greatly reducing the file size. Flattening an image discards all hidden layers, and fills any transparent areas with white. In most cases, you won’t want to flatten a file until you’ve finished editing individual layers.