Do one of the following:
- Audition User Guide
- Introduction
- Workspace and setup
- Digital audio fundamentals
- Importing, recording, and playing
- Multichannel audio workflow
- Create, open, or import files in Adobe Audition
- Importing with the Files panel
- Extracting audio from CDs
- Supported import formats
- Navigate time and playing audio in Adobe Audition
- Recording audio
- Monitoring recording and playback levels
- Remove silences from your audio recordings
- Editing audio files
- Edit, repair, and improve audio using Essential Sound panel
- Session Markers and Clip Marker for Multitrack
- Generating text-to-speech
- Matching loudness across multiple audio files
- Displaying audio in the Waveform Editor
- Selecting audio
- How to copy, cut, paste, and delete audio in Audition
- Visually fading and changing amplitude
- Working with markers
- Inverting, reversing, and silencing audio
- How to automate common tasks in Audition
- Analyze phase, frequency, and amplitude with Audition
- Frequency Band Splitter
- Undo, redo, and history
- Converting sample types
- Creating podcasts using Audition
- Applying effects
- Enabling CEP extensions
- Effects controls
- Applying effects in the Waveform Editor
- Applying effects in the Multitrack Editor
- Adding third party plugins
- Notch Filter effect
- Fade and Gain Envelope effects (Waveform Editor only)
- Manual Pitch Correction effect (Waveform Editor only)
- Graphic Phase Shifter effect
- Doppler Shifter effect (Waveform Editor only)
- Effects reference
- Apply amplitude and compression effects to audio
- Delay and echo effects
- Diagnostics effects (Waveform Editor only) for Audition
- Filter and equalizer effects
- Modulation effects
- Reduce noise and restore audio
- Reverb effects
- How to use special effects with Audition
- Stereo imagery effects
- Time and pitch manipulation effects
- Generate tones and noise
- Mixing multitrack sessions
- Video and surround sound
- Keyboard shortcuts
- Saving and exporting
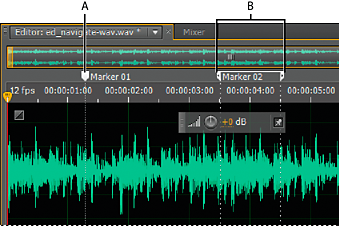
Markers (sometimes called cues) are locations that you define in a waveform. Markers make it easy to navigate within a waveform to make a selection, perform edits, or play back audio.
In Adobe Audition, a marker can be either a point or a range. A point refers to a specific time position within a waveform (for instance, 1:08.566 from the start of the file). A range has both a start time and an end time (for example, all of the waveform from 1:08.566 to 3:07.379). You can drag start and end markers for a range to different times.
In the timeline at the top of the Editor panel, markers have white handles you can select, drag, or right‑click to access additional commands.

A. Marker point B. Marker range

To preserve markers when you save a file, select Include Markers and Other Metadata.
Add, select, and rename markers
Though you can add markers directly in the Editor panel, you use the Markers panel (Windows > Markers) to define and select markers.
To hide or show information such as Duration
and Type, choose Markers Display from the panel menu ![]() .
.
Add a marker
-
Play audio.
Place the current-time indicator
 where
you want a marker point to be.
where
you want a marker point to be.Select the audio data you want to define as a marker range.
-
Either press the M key, or click the Add Marker button
 in
the Markers panel.
To automatically create markers where silence occurs, see Delete Silence and Mark Audio options.
Select markers
Click a marker in the Editor or Markers panel. Or double-click to move the current-time indicator
 to
that location and select the area for range markers.
to
that location and select the area for range markers.To select adjacent markers, click the first marker you want to select in the Markers panel, and then Shift‑click the last.
To select nonadjacent markers, Ctrl‑click (Windows) or Command-click (Mac OS) them in the Markers panel.
To move the current-time indicator to the nearest marker, choose Edit > Marker > Move CTI to Next or Previous.
Rename a marker
-
In the Markers panel, select the marker.
-
Click the marker name, and enter a new name.
Adjust, merge, convert, or delete markers
After creating markers, you can fine-tune them to best address the needs of an audio project.
Reposition markers
In the Editor panel, drag marker handles to a new location.
In the Markers panel, select the marker, and enter new Start values for point markers, or Start, End, and Duration values for range markers.
Merge individual markers
-
In the Markers panel, select the markers you want to merge, and click the Merge button
 .
. The new merged marker inherits its name from the first marker. Merged point markers become range markers.
Convert a point marker to a range marker
-
Right‑click the marker handle, and choose Convert to Range.
The marker handle splits into two handles.
Convert a range marker to a point marker
-
Right‑click a marker handle, and choose Convert to Point.
The two parts of the range marker handle merge into a single handle, with the start time of the range becoming the time for the point marker.
Delete markers
Select one or more markers, and click the Delete button
 in
the Markers panel.
 Right‑click the marker handle in the Editor panel, and choose Delete Marker.
Save audio between markers to new files
-
In the Waveform Editor, choose Window > Markers.
-
Select one or more marker ranges. (See Working with markers .)
-
Click the Export Audio button
 in
the Markers panel.
 -
Set the following options:
Use Marker Names In Filename
Uses the marker name as the prefix for the filename.
Prefix
Specifies a filename prefix for the new files.
Postfix Starting #
Specifies the number to begin with when adding numbers to the filename prefix. Adobe Audition automatically adds numbers after the prefix (for example, prefix02, prefix03) to distinguish saved files.
Location
Specifies the destination folder for saved files. Click Browse to specify a different folder.
Format
Specifies the file format. The Format Settings area below indicates and data compression and storage modes; to adjust these, click Change. (See Audio format settings.)
Sample Type
Indicates the sample rate and bit depth. To adjust these options, click Change. (See Convert the sample rate of a file.)
Include Markers and Other Metadata
Includes audio markers and information from the Metadata panel in processed files. (See Viewing and editing XMP metadata.)
Creating playlists
A playlist is an arrangement of marker ranges that you can play back in any order and loop a specified number of times. A playlist lets you try different versions of an arrangement before you commit to edits. You create playlists in the Playlist panel (Window > Playlist).
To store a playlist with a file, you must save in WAV format. (See Save audio files.)
Create a playlist
-
In the Playlist panel, click the Open Markers Panel button
 .
. -
In the Markers panel, select marker ranges you want to add to the playlist. Then click the Insert Selected Range Markers Into Playlist button
 , or
drag the range markers to the Playlist panel.
Change the order of items in a playlist
-
Drag the item up or down.
Play items in a playlist
To play all or part of the list, select the first item you want to play. Then click the Play button
 at
the top of the panel.
at
the top of the panel.To play a specific item, click the Play button to the left of the item name.
Loop an item in a playlist
-
Select an item, and enter a number in the Loops column. Each item can loop a different number of times.
Delete items from a playlist
-
Select the items, and click the Remove button
 .
.