Create either a paragraph or point-text type layer.
- Photoshop User Guide
- Introduction to Photoshop
- Photoshop and other Adobe products and services
- Photoshop on mobile (not available in mainland China)
- Photoshop on the iPad (not available in mainland China)
- Photoshop on the iPad | Common questions
- Get to know the workspace
- System requirements | Photoshop on the iPad
- Create, open, and export documents
- Add photos
- Work with layers
- Draw and paint with brushes
- Make selections and add masks
- Retouch your composites
- Work with adjustment layers
- Adjust the tonality of your composite with Curves
- Apply transform operations
- Crop and rotate your composites
- Rotate, pan, zoom, and reset the canvas
- Work with Type layers
- Work with Photoshop and Lightroom
- Get missing fonts in Photoshop on the iPad
- Japanese Text in Photoshop on the iPad
- Manage app settings
- Touch shortcuts and gestures
- Keyboard shortcuts
- Edit your image size
- Livestream as you create in Photoshop on the iPad
- Correct imperfections with the Healing Brush
- Create brushes in Capture and use them in Photoshop on the iPad
- Work with Camera Raw files
- Create and work with Smart Objects
- Adjust exposure in your images with Dodge and Burn
- Auto adjustment commands in Photoshop on the iPad
- Smudge areas in your images with Photoshop on the iPad
- Saturate or desaturate your images using Sponge tool
- Content aware fill for iPad
- Photoshop on the web (not available in mainland China)
- Photoshop (beta) (not available in mainland China)
- Generative AI (not available in mainland China)
- Common questions on generative AI in Photoshop
- Generative Fill in Photoshop on the desktop
- Generate Image with descriptive text prompts
- Generative Expand in Photoshop on the desktop
- Replace background with Generate background
- Get new variations with Generate Similar
- Select an AI model for generative control
- Generative Fill in Photoshop on the iPad
- Generative Expand in Photoshop on the iPad
- Generative AI features in Photoshop on the web
- Content authenticity (not available in mainland China)
- Cloud documents (not available in mainland China)
- Photoshop cloud documents | Common questions
- Photoshop cloud documents | Workflow questions
- Manage and work with cloud documents in Photoshop
- Upgrade cloud storage for Photoshop
- Unable to create or save a cloud document
- Solve Photoshop cloud document errors
- Collect cloud document sync logs
- Invite others to edit your cloud documents
- Share documents for review
- Workspace
- Workspace basics
- Preferences
- Learn faster with the Photoshop Discover Panel
- Create documents
- Place files
- Default keyboard shortcuts
- Customize keyboard shortcuts
- Tool galleries
- Performance preferences
- Contextual Task Bar
- Use tools
- Presets
- Grid and guides
- Touch gestures
- Use the Touch Bar with Photoshop
- Touch capabilities and customizable workspaces
- Technology previews
- Metadata and notes
- Place Photoshop images in other applications
- Rulers
- Show or hide non-printing Extras
- Specify columns for an image
- Undo and history
- Panels and menus
- Position elements with snapping
- Position with the Ruler tool
- Organize, share, and collaborate with Projects
- Refine Adobe Firefly generations
- Image and color basics
- How to resize images
- Work with raster and vector images
- Image size and resolution
- Acquire images from cameras and scanners
- Create, open, and import images
- View images
- Invalid JPEG Marker error | Opening images
- Viewing multiple images
- Customize color pickers and swatches
- High dynamic range images
- Match colors in your image
- Convert between color modes
- Color modes
- Erase parts of an image
- Blending modes
- Choose colors
- Customize indexed color tables
- Image information
- Distort filters are unavailable
- About color
- Color and monochrome adjustments using channels
- Choose colors in the Color and Swatches panels
- Sample
- Color mode or Image mode
- Color cast
- Add a conditional mode change to an action
- Add swatches from HTML CSS and SVG
- Bit depth and preferences
- Layers
- Layer basics
- Nondestructive editing
- Create and manage layers and groups
- Select, group, and link layers
- Place images into frames
- Layer opacity and blending
- Mask layers
- Apply Smart Filters
- Layer comps
- Move, stack, and lock layers
- Mask layers with vector masks
- Manage layers and groups
- Layer effects and styles
- Edit layer masks
- Extract assets
- Reveal layers with clipping masks
- Generate image assets from layers
- Work with Smart Objects
- Blending modes
- Combine multiple images into a group portrait
- Combine images with Auto-Blend Layers
- Align and distribute layers
- Copy CSS from layers
- Load selections from a layer or layer mask's boundaries
- Knockout to reveal content from other layers
- Selections
- Get started with selections
- Make selections in your composite
- Select and Mask workspace
- Select with the marquee tools
- Select with the lasso tools
- Adjust pixel selections
- Move, copy, and delete selected pixels
- Create a temporary quick mask
- Select a color range in an image
- Convert between paths and selection borders
- Channel basics
- Save selections and alpha channel masks
- Select the image areas in focus
- Duplicate, split, and merge channels
- Channel calculations
- Get started with selections
- Image adjustments
- Replace object colors
- Perspective warp
- Reduce camera shake blurring
- Healing brush examples
- Export color lookup tables
- Adjust image sharpness and blur
- Understand color adjustments
- Apply a Brightness/Contrast adjustment
- Adjust shadow and highlight detail
- Levels adjustment
- Adjust hue and saturation
- Adjust vibrance
- Adjust color saturation in image areas
- Make quick tonal adjustments
- Apply special color effects to images
- Enhance your image with color balance adjustments
- High dynamic range images
- View histograms and pixel values
- Match colors in your image
- Crop and straighten photos
- Convert a color image to black and white
- Adjustment and fill layers
- Curves adjustment
- Blending modes
- Target images for press
- Adjust color and tone with Levels and Curves eyedroppers
- Adjust HDR exposure and toning
- Dodge or burn image areas
- Make selective color adjustments
- Image repair and restoration
- Image enhancement and transformation
- Drawing and painting
- Paint symmetrical patterns
- Draw rectangles and modify stroke options
- About drawing
- Draw and edit shapes
- Create star or any other pointed shape
- Painting tools
- Create and modify brushes
- Blending modes
- Add color to paths
- Edit paths
- Paint with the Mixer Brush
- Brush presets
- Gradients
- Gradient interpolation
- Fill and stroke selections, layers, and paths
- Draw with the Pen tools
- Create patterns
- Generate a pattern using the Pattern Maker
- Manage paths
- Manage pattern libraries and presets
- Draw or paint with a graphics tablet
- Create textured brushes
- Add dynamic elements to brushes
- Gradient
- Paint stylized strokes with the Art History Brush
- Paint with a pattern
- Sync presets on multiple devices
- Migrate presets, actions, and settings
- Text
- Filters and effects
- Saving and exporting
- Color Management
- Web, screen, and app design
- Video and animation
- Printing
- Automation
- Troubleshooting
OpenType SVG fonts, including emojis, are here in Photoshop. Learn how to use them...
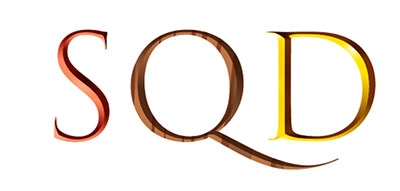
Photoshop supports OpenType SVG fonts and ships with the Trajan Color Concept and the EmojiOne font. OpenType SVG fonts provide multiple colors and gradients in a single glyph. On the Mac OS platform, the Apple Color Emoji font is supported to a limited extent, even though it is not an OpenType SVG font.


To use OpenType SVG fonts follow these steps:
-
-
Set the font to an OpenType SVG font. These fonts are marked with
 in the font list.
 -
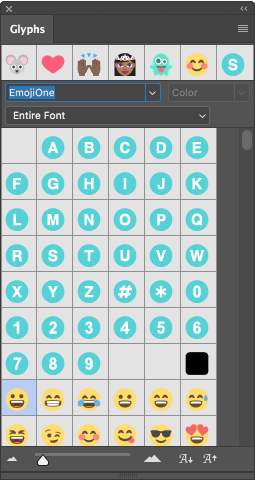
Type using the keyboard or select specific glyphs using the Glyphs Panel. To view the Glyphs Panel, select Window > Glyphs. Alternatively you can open the Glyphs panel by selecting Window > Workspace > Graphic and Web and then clicking the Glyphs tab.
While you can simply type letters using OpenType SVG fonts, the full range of most fonts is available only through the Glyphs Panel. Trajan Color Concept, for instance, includes 20 different stylistic sets for each character, such as Silver, Copper, Steel Blue, and Marble which require the Glyphs panel for access.
Emoji fonts
Emoji fonts are an example of OpenType SVG fonts. Using Emoji fonts, you can include various colorful and graphical characters, such as smileys, flags, street signs, animals, people, food, and landmarks in your documents. OpenType SVG emoji fonts, such as the EmojiOne font, let you create certain composite glyphs from one or more other glyphs. For example, you can create the flags of countries or change the skin color of certain glyphs depicting people and body parts such as hands and nose.


Recently used emojis appear in the top row of the Glyphs panel.
Create composite glyphs
For the purpose of illustration, let's consider EmojiOne, an OpenType SVG emoji font. You can composite several EmojiOne OpenType SVG font characters to create glyphs.
For example, you can create the flags of countries or change the skin color of single-person or body part default characters usually colored  ,
,  , or
, or  .
.
Glyphs in an emoji font, such as the EmojiOne, are distinct from the letters on your keyboard. These glyphs are treated as distinct characters and are available only through the Glyphs Panel rather than the keyboard.
Create flags of countries
The "letters” (A, B, C, D, and so on) in EmojiOne do not correspond to the corresponding keys on the keyboard. When you combine these characters in the Glyphs Panel to make up a country’s ISO code, the two characters form the flag of that country. For example, US gives the American flag, GB gives the British flag, AR gives the Argentine flag, and IN gives the Indian flag.


Create character variants
Combine single-person default characters; usually colored  ,
,  , or
, or  ; or body parts with any of the five available skin colors (GIDs 356 through 360). The original default character is recolored to match the selected skin color. Such composites currently do not generally work with glyphs having more than one person.


Notes:
- The single-person characters or body parts emojis can be matched with any of the skin colored characters only once.
- Composite glyphs are a font feature. Not all OpenType SVG fonts let you combine characters to create composite glyphs.
- You can decompose some EmojiOne composites into their constituent characters.