Position the pointer over the document, object, or panel.
This document provides instructions for Acrobat 2017 and Acrobat Classic (2015). If you're using Acrobat, see Workspace basics | Acrobat.
Workspace overview
Adobe Acrobat user interface has three views - Home, Tools, and Document.
Further, the Document view can have one of the two interfaces - Single Document Interface (view one document at a time) or Multiple Document Interface (tabbed interface for multiple PDFs viewing).
Home
This is the gateway or the landing page when you don’t have a PDF opened in Acrobat.
Tools
This is the go to place to discover the tools that’s available in Acrobat. All Acrobat tools are shown in this view.
Document
This is the default view whenever a document is opened in Acrobat. When you open multiple documents, each document opens as a tab in the same application window.
Home view
This is the gateway or the landing page when you don’t have a PDF opened in Acrobat. When you launch Acrobat or Reader, you see a welcome message with the Learn More button pointing to a quick introduction document.
The Home view displays file lists and storage accounts.
- File Lists: Shows Recent and Sent files views. All your recently accessed files are displayed in the Recent files view, and all the files that you sent using Adobe Send & Track and Send for Signature are displayed in the Sent files view.
- Storage: It lists various places or accounts from which you can open and work on files from within Acrobat or Reader - My Computer, Document Cloud, and Add Account (a SharePoint or Dropbox account).
Recent files view
In the Recent files view, you can see your recently used files. For a selected file, a details panel appears on the right showing a thumbnail preview of the file, and a list of frequently used tools.


For local files, you can click the location in the details panel to open the folder in Explorer. However, you cannot open the location if it’s Adobe Document Cloud or Dropbox.
The Remove from Recent option in the details panel allows you to selectively remove files from the Recent files list.
Sent files view
In the Sent files view, you can track and manage your sent files online. The available options are displayed when you choose a file in the right pane. You can also manage your files sent for signature using the Manage Document Sent for Signature link at the bottom in the right pane.
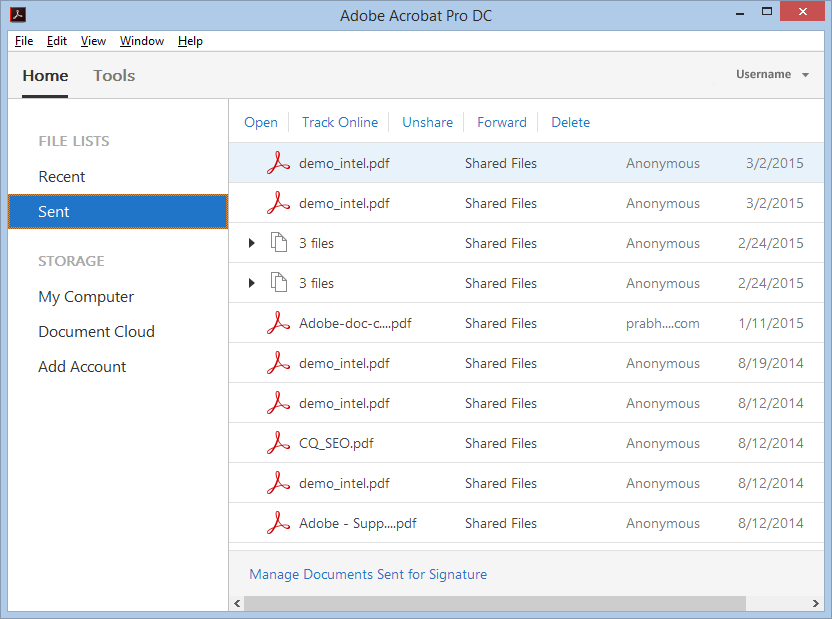

Online storage account
Storage lists offline and online places from where you can access your files. Apart from your local computer, you can access files:
- Stored securely in Adobe Document Cloud using the Document Cloud link in the left pane.
- From your online accounts, such as Dropbox and Microsoft SharePoint. You can add SharePoint or Dropbox accounts using the Add Account link in the left pane. For more information, see Working with online accounts.
Tools center
This is the go to place to navigate and discover tools available in Acrobat/Reader. All the tools are listed by categories. When you choose a tool, the tool-specific commands or toolbar appears in the document view if a file is opened.
You can also open some tools even without opening a document. If the tool requires a document to be open, choosing a tool prompts you to select a document.
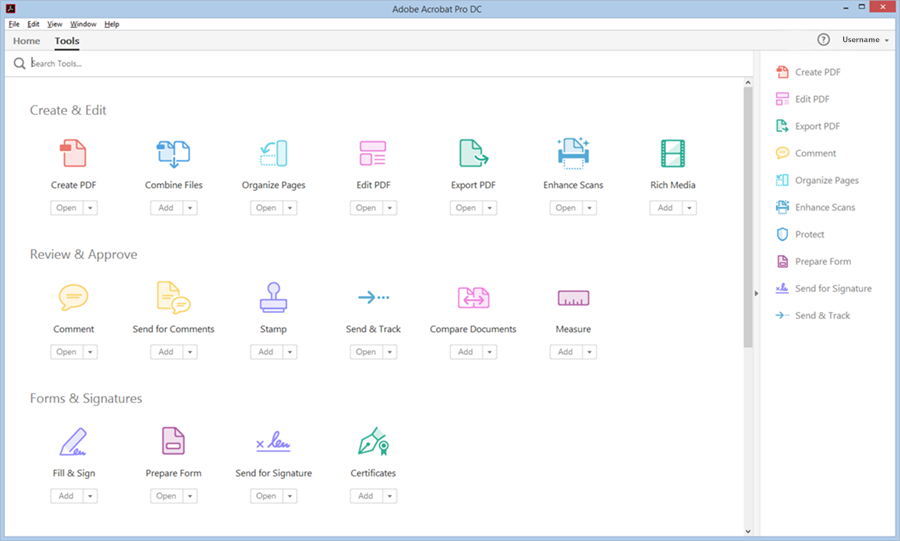

A new custom tool is displayed in the Customize category. All third-party plug-ins are displayed in a new category named Add-ons.
Add or remove shortcuts of tools in the right pane
To add a shortcut of a tool in the right pane, click the Add button below the tool name.
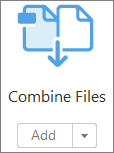

Alternatively, to add the tool, drag the tool to the right pane.
To remove the shortcut of a tool from the right pane, click the Down Arrow button next to Open below the tool name, and then choose Remove Shortcut.
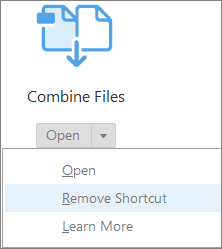

Alternatively, to remove the shortcut, click the cross button for the shortcut in the right pane.


Document view
By default, you see tabbed interface for multiple PDFs viewing. When you open multiple PDFs, each PDF opens as a tab in the same application window. You can switch among the tabs from the top – tab name shows the name of the file opened in the tab. A previous button and a next button are displayed towards right to navigate through document tabs when the number of documents are high and don’t fit the document view.
The menu bar and the toolbar are visible at the top of the work area. The work area for the stand-alone application includes a document pane in the middle, a navigation pane on the left, and tools or task pane on the right side. The document pane displays PDFs. The navigation pane on the left side helps you browse through the PDF and perform other options on PDF files. Toolbars near the top of the window provide other controls that you can use to work with PDFs.


If you want to switch off the tabbed view and go back to the single document view, go to Edit > Preferences > General, and then clear the check box for the preference - Open documents as new tabs in the same window (requires relaunch). Restart Acrobat.
Menus and context menus
Ordinarily, it’s a good idea to keep the Acrobat menus visible so that they are available as you work. It is possible to hide them, using the View > Show/Hide > Menu Bar command. However, the only way to display and use them again is by pressing F9 (Windows) or Shift+Command+M (Mac OS).
Unlike the menus that appear at the top of your screen, context-sensitive menus display commands related to the active tool or selection. You can use context menus as a quick way to choose commonly used commands. For example, when you right-click the toolbar area, that context menu displays the same commands as the View > Show/Hide > Toolbar Items menu.
-
-
Click the right mouse button.
(Mac OS) If you don’t have a two-button mouse, you can display a context menu by pressing the Control key as you click with the mouse.
Toolbars
Initially, you may not see various tools in the toolbar. You can add tools to the toolbar for easy access.
To add tools in the toolbar, right-click an empty space in the toolbar and choose the tools that you want to appear in the toolbar.
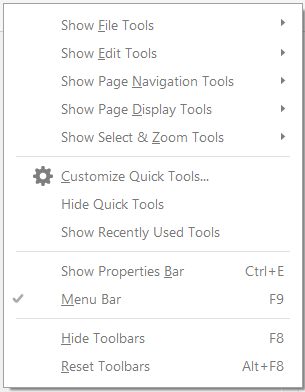

Quick tools
You can add tools you use frequently from the Tools to the Quick Tools toolbar.
-
Right-click an empty space in the toolbar and choose Customize Quick Tools.
-
In the Customize Quick Tools dialog box, do any of the following:
To add a tool, select it in the left pane and click the Up Arrow
 icon.
icon.To remove a tool, select its icon and click the Delete
 icon.
icon.To change a tool’s position in the toolbar, select its icon and click either
 or
or  .
.To add a vertical line to separate groups of tools in the toolbar, click
 .
.
Common Tools
You can add tools to the Common Tools toolbar.
-
Right-click an empty space in the toolbar.
-
Select a tool from the menu.
-
To remove a tool from the toolbar, right-click the tool and deselect it from the menu.
Hide and show toolbars
When your work does not involve using the tools in a toolbar, you can close the toolbar to tidy up the work area. If several PDFs are open, you can customize the toolbars for each PDF independently. The different customized states persist as you switch between PDFs.
- To hide all toolbars, choose View > Show/Hide > Toolbar Items > Hide Toolbars.
- To return toolbars to their default configuration, choose View > Show/Hide > Toolbar Items > Reset Toolbars.
If you have hidden all the toolbars, you can show them again by pressing F8.
Select a tool
By default, the Select tool is active when Acrobat opens, because it is the most versatile tool.
-
Do one of the following:
Select a tool in a toolbar.
Choose View > Show/Hide > Toolbar Items > [toolbar name] > [tool].
Create custom tools
You can assemble your own customized collection of Acrobat features, then save it and share with others. It allows you to quickly access the tools and commands you use the most.
-
Choose Tools > Create Custom Tool.
-
To customize the Toolbar, do any of the following:
To add a tool to the toolbar, click the panel on the left, select the tool, and click the Add To Toolbar
 icon.
icon.To remove a tool from the toolbar set, select its icon, and click the Delete
 icon.
icon.To change a tool’s position in the toolbar, select its icon, and click either the move left
 or move right
  icon.
icon.To add a vertical line to separate groups of tools in the toolbar, click the Add Vertical Line
 icon.
icon.

Create Custom Tool dialog box A. Arrange or delete tools in the Tool's Toolbar B. Add custom panels, instructions, or divider line between tools C. Rename, arrange, or delete tools D. Add to Tool's Toolbar above or Custom Tools set on the right

Create Custom Tool dialog box -
To customize tools in the Custom set, do any of the following:
To add a tool in the Custom set, click the panel on the left, and then click the Add To Custom set
 icon.
icon.To create your own panel, click the Add Section
 icon on the right. Give the panel a name, and click Save.
To add a tool to a panel, select the panel on the right, select the tool on the left, and click the Add To Custom set
 icon.
icon.To remove a tool from the set, select its icon and click the Delete
 icon.
icon.To change the position of a tool, select it on the right, and click the Up
 or Down
  Arrow icons.
To add a horizontal line to separate groups of tools, click the Add Divider
 icon.
icon.To edit instructions or section name, select it, and click the Edit
 icon.
icon.
-
When your tool set is complete, click Save, type its name, and click Save again.
The created custom tool is added to the Tools center. To open the tool, choose Tools > [custom tool name].
Edit, delete, rename, or share a custom tool
You can edit, rename, copy, delete, rearrange, or share tool sets. You can specify the order the tool sets appear in the Customize menu by moving them up or down in the list. You can share tool sets with your workgroup using the Import and Export options.
- Choose Tools > [custom tool name] > click the Down Arrow button and then choose an appropriate option.


Navigation pane
The navigation pane is an area of the workspace that can display different navigation panels. Various functional tools can appear in the navigation pane. For example, the Page Thumbnails panel contains thumbnail images of each page; clicking a thumbnail opens that page in the document.
When you open a PDF, the navigation pane is closed by default. Buttons along the left side of the work area provide easy access to various panels, such as the Page Thumbnails button ![]() and the Bookmarks panel button
and the Bookmarks panel button ![]() . When Acrobat is open but empty (no PDF is open), the navigation pane is unavailable.
. When Acrobat is open but empty (no PDF is open), the navigation pane is unavailable.
Show or hide the navigation pane
-
To open the navigation pane, do one of the following:
Click any panel button on the left side of the work area to open that panel.
Choose View > Show/Hide > Navigation Panes > Show Navigation Pane.
-
To close the navigation pane, do one of the following:
Click the button for the currently open panel in the navigation pane.
Choose View > Show/Hide > Navigation Panes > Hide Navigation Pane.
The creator of the PDF can control the contents of some navigation panels and may make them empty.
Change the display area for navigation panels
All navigation panels, such as Bookmarks, appear in a column on the left side of the work area.
To change the width of the navigation pane, drag its right border.
To view a different panel, on the left side of the navigation pane, select the button for the panel
Options in a navigation panel
All navigation panels have an options menu ![]() in the upper-left corner. The commands available in these menus vary.
in the upper-left corner. The commands available in these menus vary.
Some panels also contain other buttons that affect the items in the panel. Again, these buttons vary among the different panels, and some panels have none.
Set preferences
Many program settings are specified in the Preferences dialog box, including settings for display, tools, conversion, signatures, and performance. Once you set preferences, they remain in effect until you change them.
-
Choose Edit > Preferences (Windows) or Acrobat / Adobe Acrobat Reader > Preferences (Mac OS).
-
Under Categories, select the type of preference you want to change.
Restore (re-create) preferences
Restore the Acrobat Preferences folder (Windows)
Restore the Acrobat Preferences folder to eliminate problems that damaged preferences cause. Most preference problems are caused by these file-based preferences, although most Acrobat preferences are stored within the registry.
This solution removes custom settings for Collaboration, JavaScripts, Security, Stamps, Color Management, Auto Fill, Web Capture, and Updater.
-
Quit Acrobat.
-
In Windows Explorer, go to the Preferences folder:
(Windows 10, 8, or 7) C:\Users\[username]\AppData\Roaming\Adobe\Acrobat\[version]
NoteIn Windows 10 or 8, if you cannot see the AppData folder, click the View menu on the ribbon in Windows Explorer and select the Hidden items check box under Show/Hide.
-
Move the Preferences folder to another location (for example, C:\Temp).
-
Restart Acrobat.
If the problem recurs after you restore the Acrobat Preferences folder, then the problem isn’t related to the Preferences folder. To restore custom settings, drag the folder you moved in step 2 back to its original location. Then click Yes To All to replace the new Preferences folder.
Restore the Acrobat preferences files (Mac OS)
Restore the Acrobat preferences files to eliminate problems caused by a damaged preferences file.
Re-creating the Acrobat preferences files restores settings to their defaults.
-
Quit Acrobat.
-
Drag the following files from the Users/[Username]/Library/Preferences folder to the Desktop:
Acrobat WebCapture Cookies
com.adobe.Acrobat.Pro.plist or com.adobe.Acrobat.Pro_x86_9.0.plist
Acrobat Distiller Prefs and com.adobe.Acrobat.Pro.plist (if you are troubleshooting an issue with Distiller)
The Acrobat folder, which contains preferences for forms (MRUFormsList), collaboration (OfflineDocs), and color settings (AcrobatColor Settings.csf)
-
Restart Acrobat
If the problem recurs after you restore the Acrobat preferences files, then the problem isn’t related to preferences files. To restore custom settings, drag the files you moved in step 2 back to their original location. Then click OK to the alert “A newer item named ‘[filename]’ already exists in this location. Do you want to replace it with the older one you're moving?”
Choose Edit > Preferences (Windows) or Acrobat / Adobe Acrobat Reader > Preferences (Mac OS).
Try these online PDF tools: convert Word to PDF, convert Excel to PDF, convert PowerPoint to PDF, convert JPG to PDF
