Place a frame at the location where you want to place the form field.
- InDesign User Guide
- Get to know InDesign
- Introduction to InDesign
- Workspace
- Generative AI (Not available in mainland China)
- Introduction to InDesign
- Create and layout documents
- Documents and pages
- Create documents
- Work with parent pages
- Work with document pages
- Set page size, margins, and bleed
- Work with files and templates
- Convert PDFs to InDesign Documents
- Create book files
- Add basic page numbering
- Number pages, chapters, and sections
- Convert QuarkXPress and PageMaker documents
- Share content
- Understand a basic managed-file workflow
- Save documents
- Grids
- Flex Layout
- Layout aids
- Documents and pages
- Add content
- Text
- Add text to frames
- Threading text
- South-East Asian Scripts
- Arabic and Hebrew features in InDesign
- Create type on a path
- Bullets and numbering
- Create math expressions
- Glyphs and special characters
- Text composition
- Composing CJK characters
- Text variables
- Generate QR codes
- Edit text
- Align text
- Wrap text around objects
- Anchored objects
- Linked content
- Format paragraphs
- Format characters
- Typography
- Format text
- Review text
- Spell check and language dictionaries
- Add references
- Styles
- Tables
- Interactivity
- Graphics
- Color and transparency
- Text
- Find and replace
- Share
- Export, import, and publish
- Place, export, and publish
- Publish online
- Publish online dashboard
- Place Firefly assets
- Copy, insert graphics
- Export to Adobe Express
- Export content for EPUB
- Accessibility enhancements for Indexes
- Adjust text resizing options
- Create accessible glossaries
- ARIA role and label support
- Adobe PDF options
- Export to HTML5
- Export content to HTML (Legacy)
- Export to Adobe PDF
- Export to JPEG or PNG format
- Import SVG files
- Supported File Formats
- Export and import User Settings
- Printing
- Place, export, and publish
- Extend InDesign
- Automation
- Troubleshooting
Forms workflow
Using InDesign you can create simple forms within InDesign, without needing to touch up the PDF document in Acrobat after publishing. You can add simple form elements within the document pages. Common field types such as text fields, radio buttons, check boxes, or signatures are supported. You can also add actions to submit the form by email or to print it.
In addition to the basic design, you can also use creative capabilities in InDesign to add a designer touch to your form:.
- Add solid strokes and fills to the PDF form fields.
- Add custom On, Off, and Hover states for buttons, check boxes, and radio buttons.
- Specify font size for text input fields.
For example, to collect credit card information, you could use credit card icons as radio buttons, with a different image for the selected state.
For advanced form workflows, you can export the basic form and then continue editing it in Adobe Acrobat.
Add a form field
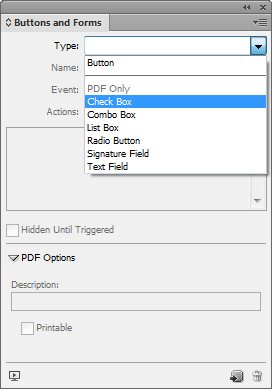
Use the Buttons and Forms panel to add form fields to the layout. The procedures to add interactive form fields are the same as adding buttons so that you don't have to learn new procedures. You can create a form that works with Adobe Reader or Adobe Acrobat. Using InDesign, you can create some cool forms that you can’t ordinarily using Acrobat.


-
-
Open the Buttons and Forms panel (Window > Interactive > Buttons and Forms)
-
Select the frame and choose a form element type from the Type list. Alternatively, right-click a frame and choose Interactive > Convert to [...].
-
Enter a name for the form field. To create a radio button group, all the individual buttons must have the same name.
-
Choose an event and add actions to associate with it. Actions such as Clear Form, Print Form, and Submit Form have been added. In the Submit Form action specify the URL as "mailto:xyz@example.com.
-
For a radio button, check box, or buttons: set appearance attributes for different states. InDesign adds default graphics for the various states, but you can add your own.
-
For a list box, combo box, or text field: select font family, font type, and font size.
-
Specify PDF options:
- Description - Entered value is displayed as the tool tip and is used for creating accessible forms
- Button Value - this value corresponds to the export value in Acrobat and can also be used to identify a radio button in a group in an accessible form.
Specify tab order
To create user-friendly and accessible forms, it is necessary to assign a usable tab order. Users can navigate through the form fields without using a pointing device. Pressing the Tab key shifts the focus to the next logical field.
There are two methods of specifying a tab order in a tagged PDF:
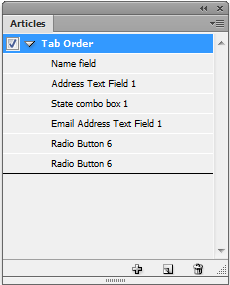
- Use the Articles panel (Window > Articles) to specify a custom tab order
- Choose Object > Interactive > Set Tab Order.
Use Articles to specify tab order


-
Open the Articles panel (Window > Articles).
-
Drag the form fields to the Articles panel.
-
In the articles panel, drag to reorder the fields in the required order.
To enable screen readers to use the specified order, from the Articles panel menu, enable Use for Reading Order in Tagged PDFs. Remember to enable the Create Tagged PDF option while exporting the PDF.
Use Structure to specify tab order
-
Choose Object > Interactive > Set Tab Order.
-
Click Move Up or Move Down to arrange the items in the desired tab order.
While exporting to interactive PDF, enable Use Structure for Tab Order in the PDF Export dialog box.