Användarhandbok Avbryt

Correct and match colors between shots

  1. Adobe Premiere Pro User Guide
  2. Beta releases
    1. Beta Program Overview
    2. Premiere Pro Beta Home
    3. Beta features
      1. New Spectrum UI
      2. Color management system
  3. Getting started
    1. Get started with Adobe Premiere Pro
    2. What's new in Premiere Pro
    3. Best practices for updating Premiere Pro
    4. Keyboard shortcuts in Premiere Pro
    5. Accessibility in Premiere Pro
    6. Frequently asked questions
    7. Release notes
  4. Hardware and operating system requirements
    1. Hardware recommendations
    2. System requirements
    3. GPU and GPU Driver requirements
    4. GPU Accelerated Rendering & Hardware Encoding/Decoding
  5. Creating projects
    1. Start a new project
    2. Open projects
    3. Move and delete projects
    4. Work with multiple open projects
    5. Work with Project Shortcuts
    6. Backward compatibility of Premiere Pro projects
    7. Open and edit Premiere Rush projects in Premiere Pro
    8. Best Practices: Create your own project templates
  6. Workspaces and workflows
    1. Workspaces
    2. Import and export FAQs
    3. Working with Panels
    4. Windows touch and gesture controls
    5. Use Premiere Pro in a dual-monitor setup
  7. Frame.io
    1. Install and activate Frame.io
    2. Use Frame.io with Premiere Pro and After Effects
    3. Integrate Adobe Workfront and Frame.io
    4. Share for review with Frame.io
    5. Invite collaborators to co-edit a project
    6. Frequently asked questions
  8. Import media
    1. Importing
      1. Transfer files
      2. Importing still images
      3. Importing digital audio
    2. Importing from Avid or Final Cut
      1. Importing AAF project files from Avid Media Composer
      2. Importing XML project files from Final Cut Pro 7 and Final Cut Pro X
    3. File formats
      1. Supported file formats
      2. Support for Blackmagic RAW
    4. Working with timecode
  9. Editing
    1. Edit video
    2. Sequences
      1. Create and change sequences
      2. Set In and Out points in the Source Monitor
      3. Add clips to sequences
      4. Rearrange and move clips
      5. Find, select, and group clips in a sequence
      6. Remove clips from a sequence
      7. Change sequence settings
      8. Edit from sequences loaded into the Source Monitor
      9. Simplify sequences
      10. Rendering and previewing sequences
      11. Working with markers
      12. Add markers to clips
      13. Create markers in Effect Controls panel
      14. Set default marker colors
      15. Find, move, and delete markers
      16. Show or hide markers by color
      17. View marker comments
      18. Copy and paste sequence markers
      19. Sharing markers with After Effects
      20. Source patching and track targeting
      21. Scene edit detection
    3. Cut and trim clips
      1. Split or cut clips
      2. Trim clips
      3. Edit in Trim mode
      4. Perform J cuts and L cuts
      5. Create and play clips
      6. Adjust Trimming and Playback preferences
    4. Video
      1. Synchronizing audio and video with Merge Clips
      2. Render and replace media
      3. Undo, history, and events
      4. Freeze and hold frames
      5. Working with aspect ratios
    5. Audio
      1. Overview of audio in Premiere Pro
      2. Edit audio clips in the Source Monitor
      3. Audio Track Mixer
      4. Adjusting volume levels
      5. Edit, repair, and improve audio using Essential Sound panel
      6. Enhance Speech
      7. Enhance Speech FAQs
      8. Audio Category Tagging
      9. Automatically duck audio
      10. Remix audio
      11. Monitor clip volume and pan using Audio Clip Mixer
      12. Audio balancing and panning
      13. Advanced Audio - Submixes, downmixing, and routing
      14. Audio effects and transitions
      15. Working with audio transitions
      16. Apply effects to audio
      17. Measure audio using the Loudness Radar effect
      18. Recording audio mixes
      19. Editing audio in the timeline
      20. Audio channel mapping in Premiere Pro
      21. Use Adobe Stock audio in Premiere Pro
    6. Text-Based Editing
      1. Text-Based Editing
      2. Text-Based Editing FAQs
    7. Advanced editing
      1. Multi-camera editing workflow
      2. Editing VR
    8. Best Practices
      1. Best Practices: Mix audio faster
      2. Best Practices: Editing efficiently
      3. Editing workflows for feature films
  10. Video Effects and Transitions
    1. Overview of video effects and transitions
    2. Effects
      1. Types of effects in Premiere Pro
      2. Apply and remove effects
      3. Use FX badges
      4. Effect presets
      5. Metadata effect in Premiere Pro
      6. Automatically reframe video for different social media channels
      7. Color correction effects
      8. Effects Manager
      9. Change duration and speed of clips
      10. Adjustment Layers
      11. Stabilize footage
    3. Transitions
      1. Applying transitions in Premiere Pro
      2. Modifying and customizing transitions
      3. Morph Cut
  11. Titles, Graphics, and Captions    
    1. Overview of the Essential Graphics panel
    2. Graphics and Titles
      1. Create a title
      2. Linked and Track Styles
      3. Working with style browser
    3. Graphics
      1. Create a shape
      2. Draw with the Pen tool
      3. Align and distribute objects
      4. Change the appearance of text and shapes
      5. Apply gradients
      6. Add Responsive Design features to your graphics
      7. Install and use Motion Graphics templates
      8. Replace images or videos in Motion Graphics templates
      9. Use data-driven Motion Graphics templates
    4. Captions
      1. Speech to Text
      2. Download language packs for transcription
      3. Working with captions
      4. Check spelling and Find and Replace
      5. Export text
      6. Speech to Text FAQs
    5. Best Practices: Faster graphics workflows
    6. Retiring the Legacy Titler FAQs
    7. Upgrade Legacy titles to Source Graphics
  12. Fonts and emojis
    1. Color fonts
    2. Emojis
  13. Animation and Keyframing
    1. Adding, navigating, and setting keyframes
    2. Animating effects
    3. Use Motion effect to edit and animate clips
    4. Optimize keyframe automation
    5. Moving and copying keyframes
    6. Viewing and adjusting effects and keyframes
  14. Compositing
    1. Compositing, alpha channels, and adjusting clip opacity
    2. Masking and tracking
    3. Blending modes
  15. Color Correction and Grading
    1. Overview: Color workflows in Premiere Pro
    2. Color Settings
    3. Auto Color
    4. Get creative with color using Lumetri looks
    5. Adjust color using RGB and Hue Saturation Curves
    6. Correct and match colors between shots
    7. Using HSL Secondary controls in the Lumetri Color panel
    8. Create vignettes
    9. Looks and LUTs
    10. Lumetri scopes
    11. Display Color Management
    12. Timeline tone mapping
    13. HDR for broadcasters
    14. Enable DirectX HDR support
  16. Exporting media
    1. Export video
    2. Export Preset Manager
    3. Workflow and overview for exporting
    4. Quick export
    5. Exporting for the Web and mobile devices
    6. Export a still image
    7. Exporting projects for other applications
    8. Exporting OMF files for Pro Tools
    9. Export to Panasonic P2 format
    10. Export settings
      1. Export settings reference
      2. Basic Video Settings
      3. Encoding Settings
    11. Best Practices: Export faster
  17. Collaborative editing
    1. Collaboration in Premiere Pro
    2. Get started with collaborative video editing
    3. Create Team Projects
    4. Add and manage media in Team Projects
    5. Invite and manage collaborators
    6. Share and manage changes with collaborators
    7. View auto saves and versions of Team Projects
    8. Manage Team Projects
    9. Linked Team Projects
    10. Frequently asked questions
  18. Long form and Episodic workflows
    1. Long Form and Episodic Workflow Guide
    2. Using Productions
    3. How clips work across projects in a Production
    4. Best Practices: Working with Productions
  19. Working with other Adobe applications
    1. After Effects and Photoshop
    2. Dynamic Link
    3. Audition
    4. Prelude
  20. Organizing and Managing Assets
    1. Working in the Project panel
    2. Organize assets in the Project panel
    3. Playing assets
    4. Search assets
    5. Creative Cloud Libraries
    6. Sync Settings in Premiere Pro
    7. Consolidate, transcode, and archive projects
    8. Managing metadata
    9. Best Practices
      1. Best Practices: Learning from broadcast production
      2. Best Practices: Working with native formats
  21. Improving Performance and Troubleshooting
    1. Set preferences
    2. Reset and restore preferences
    3. Recovery Mode
    4. Working with Proxies
      1. Proxy overview
      2. Ingest and Proxy Workflow
    5. Check if your system is compatible with Premiere Pro
    6. Premiere Pro for Apple silicon
    7. Eliminate flicker
    8. Interlacing and field order
    9. Smart rendering
    10. Control surface support
    11. Best Practices: Working with native formats
    12. Knowledge Base
      1. Known issues
      2. Fixed issues
      3. Fix Premiere Pro crash issues
      4. Unable to migrate settings after updating Premiere Pro
      5. Green and pink video in Premiere Pro or Premiere Rush
      6. How do I manage the Media Cache in Premiere Pro?
      7. Fix errors when rendering or exporting
      8. Troubleshoot issues related to playback and performance in Premiere Pro
  22. Extensions and plugins
    1. Installing plugins and extensions in Premiere Pro
    2. Latest plugins from third-party developers
  23. Video and audio streaming
    1. Secure Reliable Transport (SRT)
  24. Monitoring Assets and Offline Media
    1. Monitoring assets
      1. Using the Source Monitor and Program Monitor
      2. Using the Reference Monitor
    2. Offline media
      1. Working with offline clips
      2. Creating clips for offline editing
      3. Relinking offline media

Use the color wheels in the Lumetri color panel to make subtle color corrections in your shot. You can also quickly match color between different shots to make the overall look of your video consistent.

Three way color correction using the Color Wheel

Parts of the color wheel

A. Midtones color wheel B. Cursor or color puck C. Highlights color wheel D. Slider E. Shadows color wheel 

Color wheels allow you to make color adjustments to just the dark or light areas of a shot. The extra control can help you fix subtle problems in clips and add nuance to a look you are creating.

Premiere Pro offers three color wheels - to adjust midtones, shadows, and highlights. With the three-way color correction, you can adjust the brightness, hue, and saturation for shadows, midtones, and highlights independently.

You can adjust the shadow or highlight detail to brighten or darken areas in an otherwise well-lit clip. You can isolate the regions that need correction and apply these adjustments. Use the Midtone color wheel to adjust the overall contrast of the clip.

Another option is to use the accompanying sliders instead of the wheels to make these adjustments.
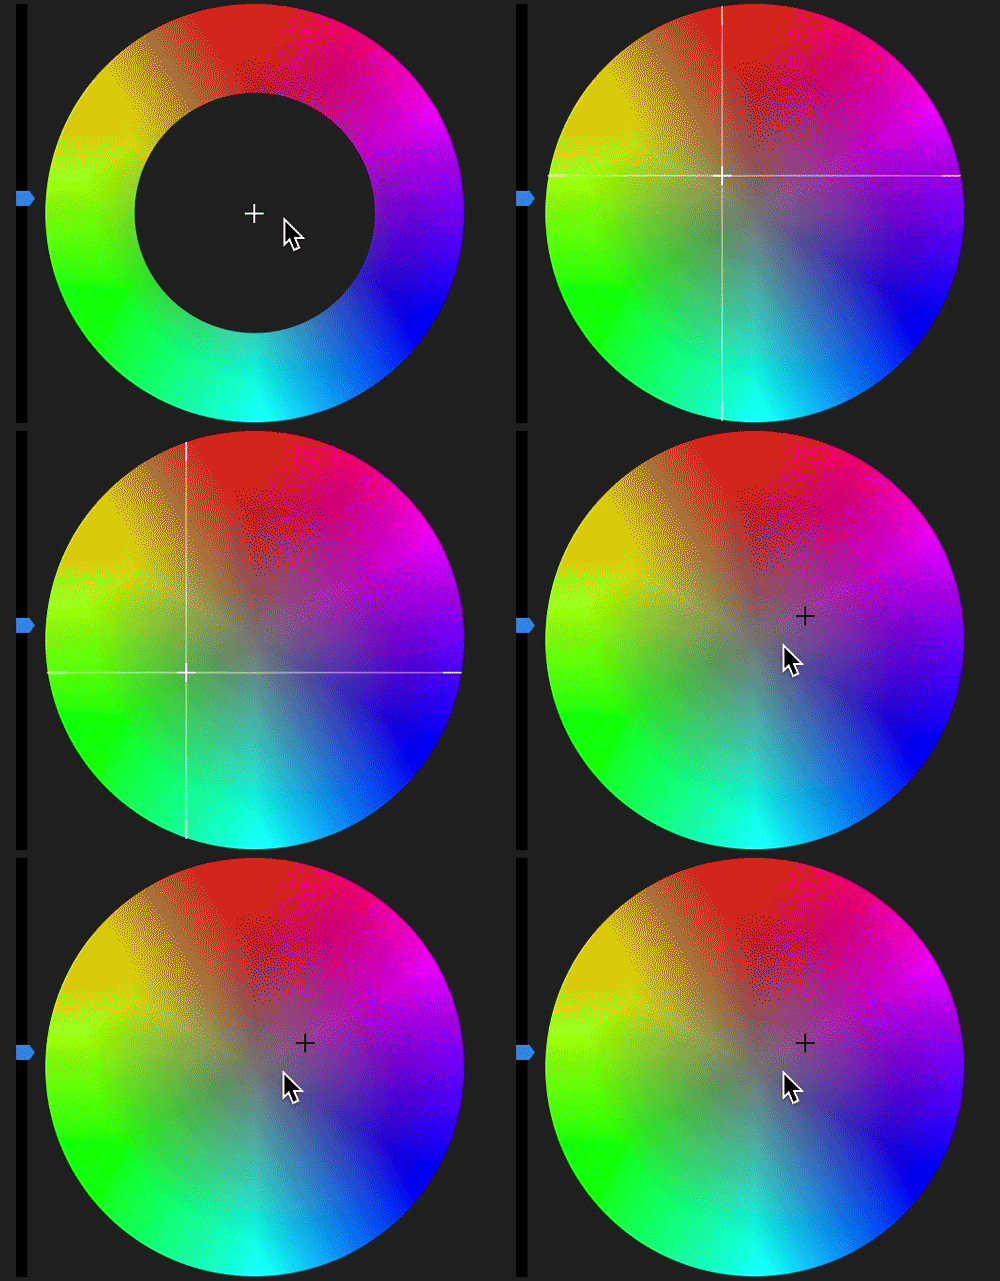
Click the wheel to add color.

Wheels with empty centers indicate that no adjustments have been made. Click in the middle of the wheel and drag the cursor to fill in the wheels and make adjustments as required.
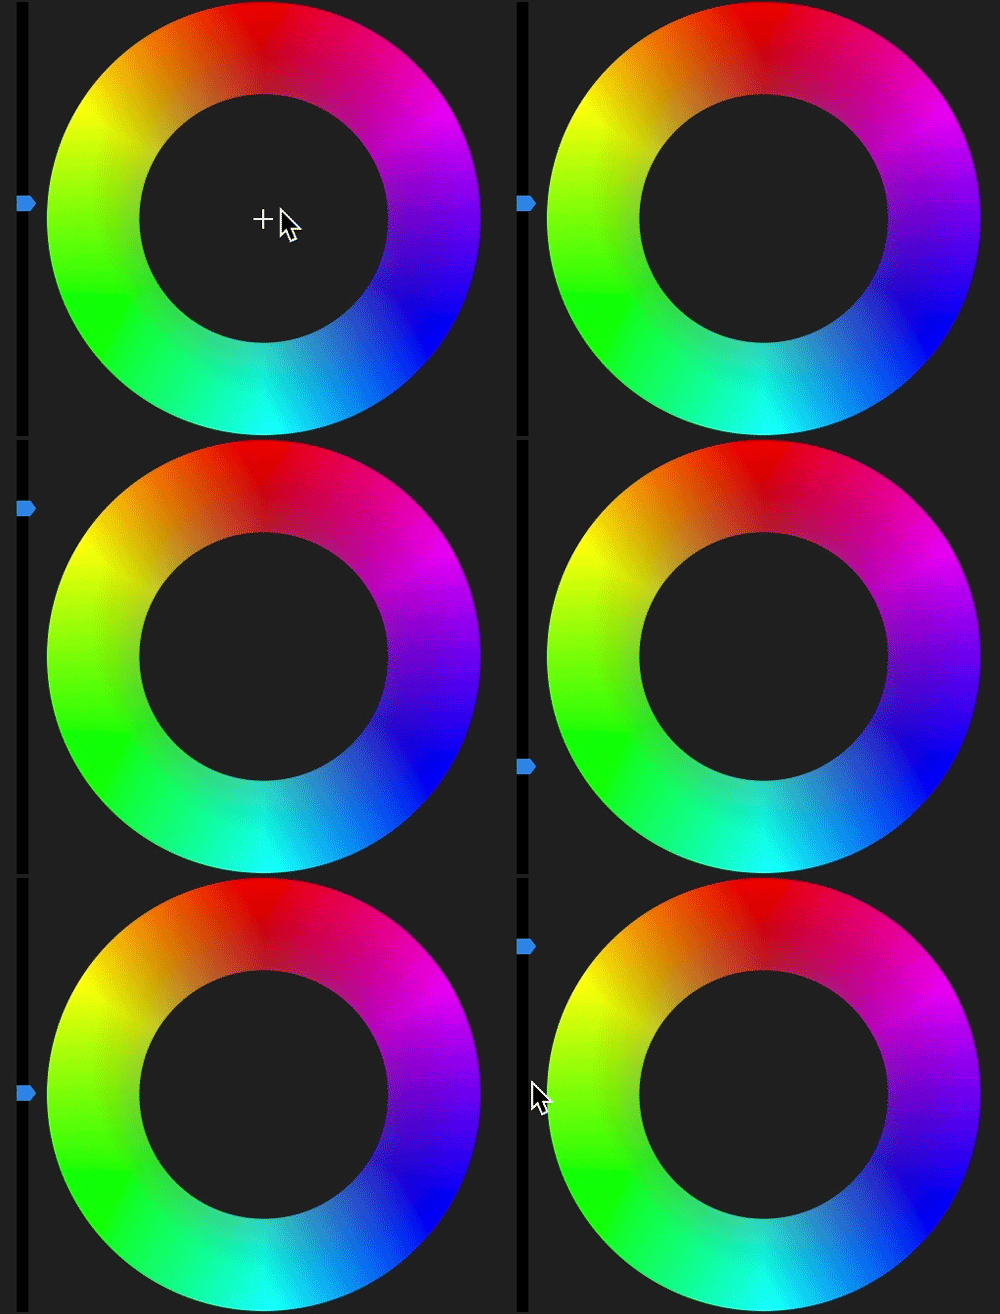
Drag the slider to adjust color.

To use the slider control, drag the slider up to increase the value or drag the slider down to decrease the value. For example, drag the Shadow slider up to lighten shadows, and drag the Highlights shadow down to darken highlights.

Match color between shots

Color Matching allows you to compare looks of two different shots across an entire sequence to ensure color and light appearances match within a scene or across multiple scenes.

To match the "current shot" (the selected clip under the playhead):

  1. Switch to Comparison View.

    Click the Comparison View button in the Program Monitor or in the Lumetri Color panel. This view allows you to select and display a reference frame, and compare colors across shots.
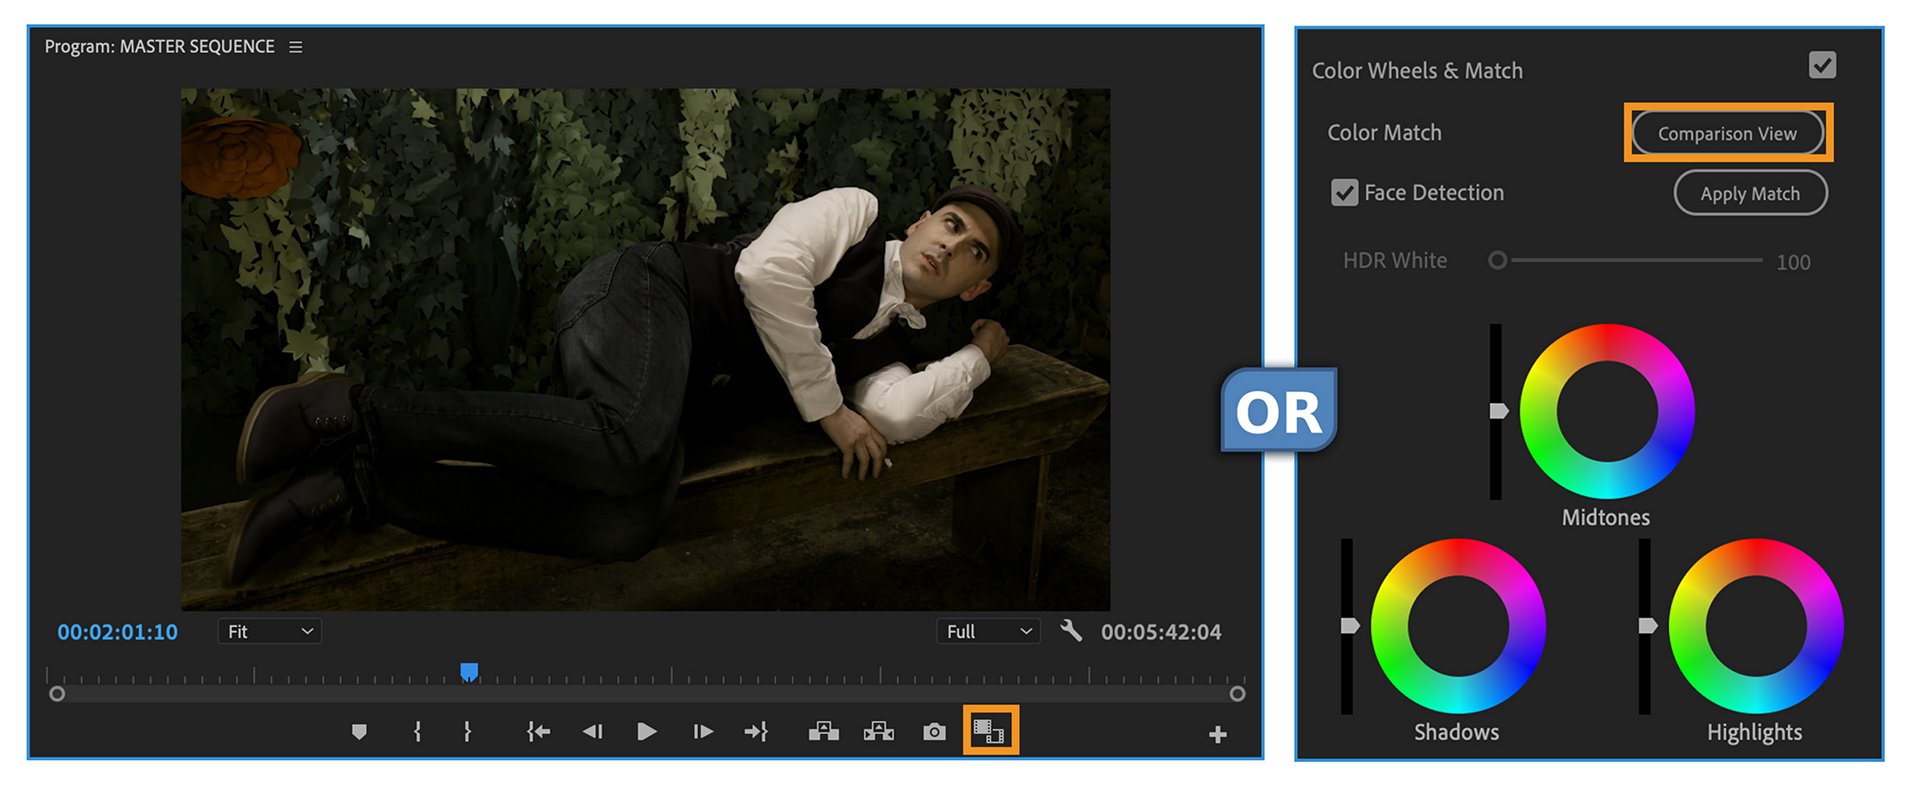
    Switching to Comparison View
    Use one of these options to switch to Comparison View

  2. Choose a reference frame.

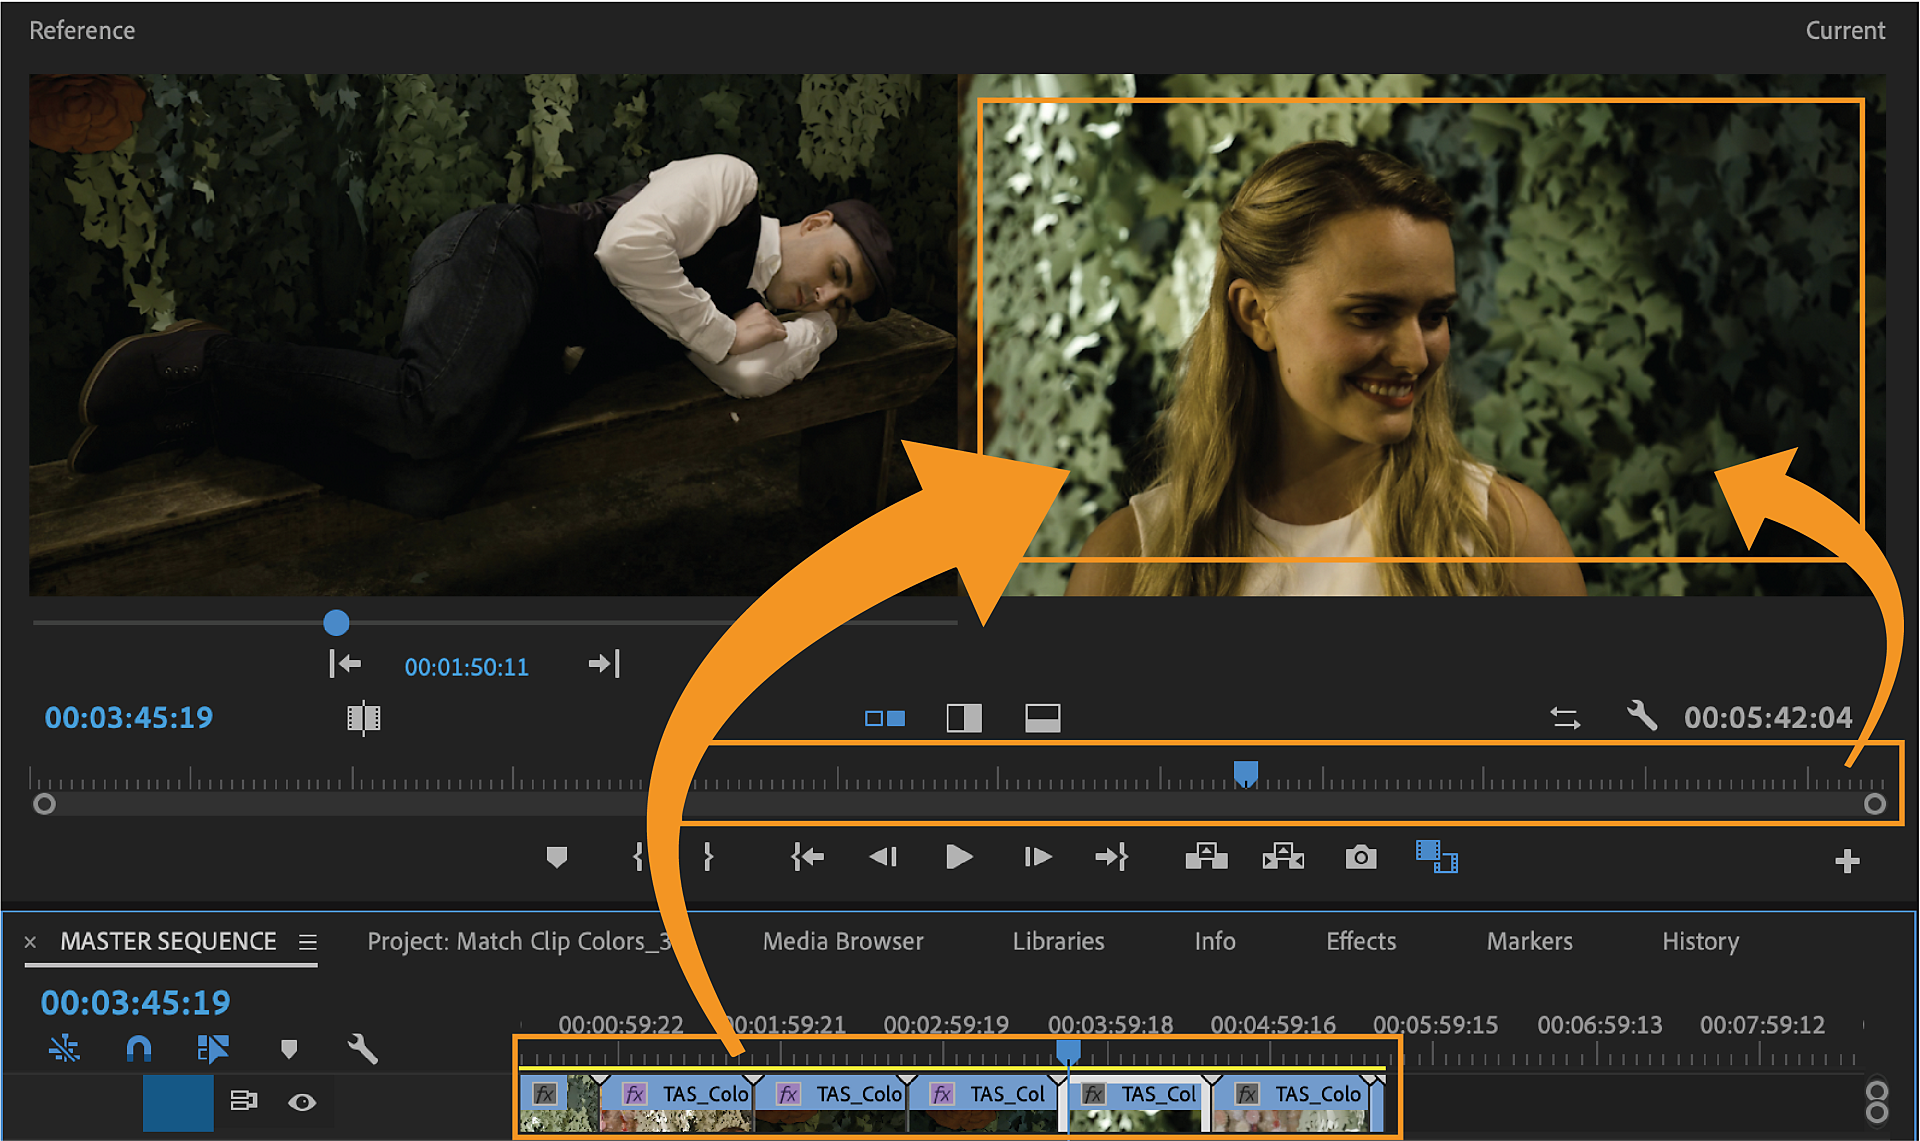
    Select the reference position via a slider bar, timecode, or by jumping between edit points with arrows. Select the target location by simply positioning the playhead over the desired clip. Once you have both the reference and target locations set, you can adjust the comparison view to the desired display. Choose either a side-by-side or a vertical/horizontal split display. In split mode, you can drag the location of the split to view a specific area of the screen.

    Choose a reference frame
    Choose a reference frame

  3. Choose a target clip. 

    1. Position the timeline playhead over a clip you want to match to the reference frame. 
    2. Make sure the clip is selected.
    Choose a target clip
    Choose a target clip

     The current frame is matched to the reference frame, so if the content changes over time, choose a part of the clip that is a good indication of the overall color and brightness of the clip.

  4. (Optional) Disable Face Detection.

    If you have faces in the shots, leave this option enabled.

    Obs!

    Face Detection is on by default, and if Auto Color detects faces in either the reference or current frame it gives higher weight to the colors in the facial region. 

    This feature yields higher quality matches of skin tone especially when there are distracting colors in the background, but you can disable it for situations where you want or need the whole frame to be evaluated equally. 

    If you use face detection, there is a slight increase in the amount of time it takes to calculate the match.  If you are working with footage that does not contain any faces, disable face detection to speed up the color matching.

  5. Click Apply Match.

    Premiere Pro automatically applies Lumetri settings using the Color Wheels and Saturation control to match the colors in the current frame to the colors in the reference frame.

    The Color Wheels (and Saturation slider if necessary) update to reflect the adjustment that the automatic color matching algorithm has applied.

  6. If you are not satisfied with the results, you can use another shot as a reference, and match the colors again. Premiere Pro overrides the previous changes, and matches the color with the new reference shot.

Obs!

If there is an existing Lumeti effect on the clip with altered parameters, some of those settings can be reset.

 Adobe

Få hjälp snabbare och enklare

Ny användare?

Adobe MAX 2024

Adobe MAX
Kreativitetskonferensen

14–16 okt i Miami Beach och online

Adobe MAX

Kreativitetskonferensen

14–16 okt i Miami Beach och online

Adobe MAX 2024

Adobe MAX
Kreativitetskonferensen

14–16 okt i Miami Beach och online

Adobe MAX

Kreativitetskonferensen

14–16 okt i Miami Beach och online