Before you begin
We're rolling out a new, more intuitive product experience. If the screen shown here doesn’t match your product interface, select help for your current experience.
Before you begin
We're rolling out a new, more intuitive product experience. If the screen shown here doesn’t match your product interface, select help for your current experience.
To speed up the search process of a lengthy PDF file, you can include an index of the words in the document. This index can be searched much faster by Acrobat than by searching the actual document. The index is included in all copies of the PDF file. Users can search through PDFs with indexes just as they would with PDFs that don't have an embedded index.
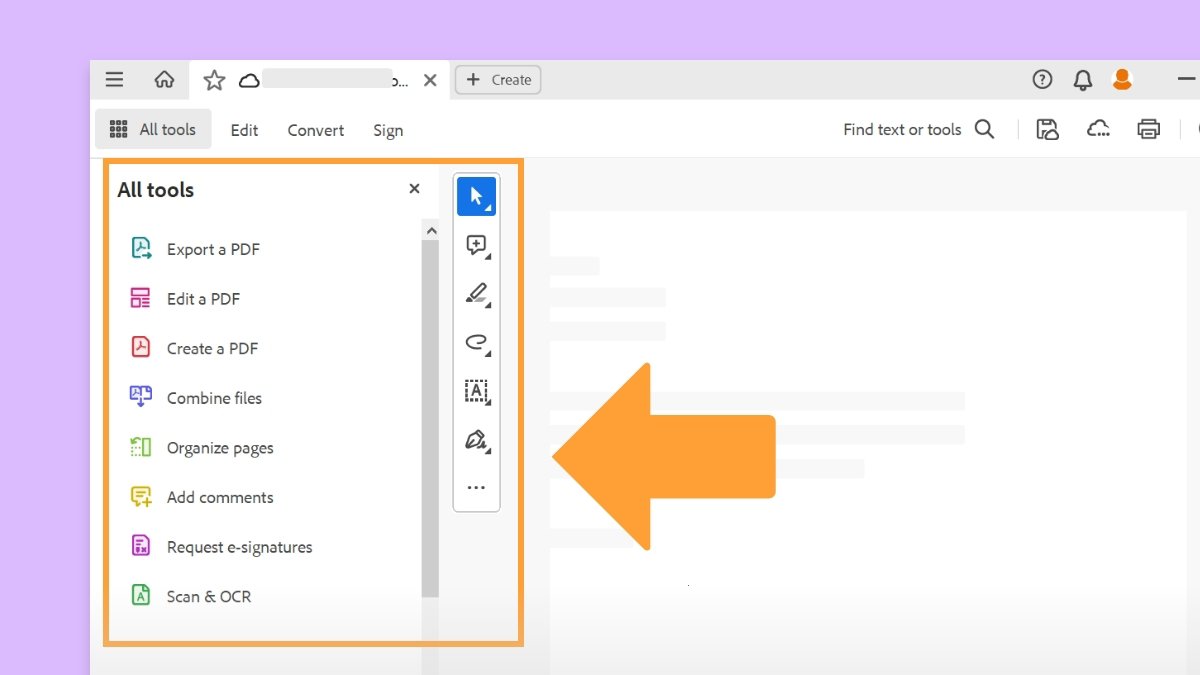
From the All tools menu, select Add search index.
It displays the Index toolset in the left panel.
From the Index tool panel, select Manage embedded index.
In the Manage embedded index dialog box, click Embed Index.
Read the messages that appear and select OK.
In Outlook and Lotus notes, you have the option of embedding an index when you convert email messages or folders to PDF. This is especially recommended for folders containing many email messages.
From the All tools menu, select Add search index.
It displays the Index toolset in the left panel.
From the Index tool panel, select Manage embedded index.
Select Update Index or Remove Index, as required.
You can define a specific group of PDFs as a catalog and create a unified index for that entire collection of documents. When users search the cataloged PDFs for specific information, the index makes the search process much faster.
When you distribute the collection on a CD, you can include the index with the PDFs.
You can catalog documents written in Roman, Chinese, Japanese, or Korean characters. The items you can catalog include the document text, comments, bookmarks, form fields, tags, object and document metadata, attachments, document information, digital signatures, image XIF (extended image file format) metadata, and custom document properties.
To index PDFs, start by creating a folder that contains complete PDFs with electronic features like links, bookmarks, and searchable text. For scanned documents, ensure that the text is searchable. It's better to break longer documents into smaller chapter-sized files to enhance search performance. Adding information to the document properties also improves searchability.
Before indexing a document collection, set up the document structure on the disk drive or network server volume and verify cross-platform filenames. Cross-platform filenames may be truncated, making them difficult to retrieve in a search. Follow these guidelines to prevent this problem:
To make a PDF easier to search, you can add file information, called metadata, to the document properties. (You can see the properties of the currently open PDF by choosing File > Properties, and clicking the Description tab.)
When adding data for document properties, consider the following Adobe Recommendations:
When you build a new index, Acrobat creates a file with the . Pdx extension and a new support folder, which contains one or more files with .idx extensions. The IDX files contain the index entries. All of these files must be available to users who want to search the index.
From the All tools menu, select Add search index.
It displays the Index toolset in the left panel.
From the Index panel, select Full text index with catalog.
In the Catalog dialog box, select New Index.
The New Index Definition dialog box is displayed.

In Index Title, type a name for the index file.
In Index Description, type a few words about the type of index or its purpose.
Select Options and then select any advanced options you want to apply to your index. Once done, select OK.

Under Include These Directories, click Add, select a folder containing some or all of the PDF files to be indexed, and click OK. To add more folders, repeat this step.
Any folder nested under an included folder will also be included in the indexing process. You can add folders from multiple servers or disk drives, as long as you don’t plan to move the index or any items in the document collection.
Under Exclude These Subdirectories, click Add, and select any nested folder that contains PDF files you don’t want to be indexed. Click OK and repeat, as needed.
Review your selections. To edit the list of folders to be included or excluded, select the folder you want to change and click Remove.
Click Build, and then specify the location for the index file. Click Save, and then:
Click Close when the indexing finishes.
Click Stop to cancel the indexing process.
If you stop the indexing process, you can’t resume the same indexing session, but you don’t have to redo the work. The options and folder selections remain intact. You can click Open Index select the partially finished index, and revise it.
If long paths are truncated in the Include these directories and exclude these Subdirectories options, hold the pointer over each ellipsis (...) until a tool tip appears, displaying the complete path of the included or excluded folder.
When you create custom fields in a Microsoft® office application in which the convert document information option is selected in the PDFMaker application, the fields transfer over to any PDFs you create.
To prevent users from trying to search phrases that contain these words, list words that aren’t indexed in the Catalog ReadMe file.
The custom properties, Stop words, and Tags settings apply to the current index only. To apply these settings globally to any index you create, you can change the default settings for custom fields, stop words, and tags in the Catalog panel of the Preferences dialog box.
It’s often a good idea to create a separate ReadMe file and put it in the folder with the index. This ReadMe file can give people details about your index, such as:
The kind of documents indexed.
The search options supported.
The person to contact or a phone number to call with questions.
A list of numbers or words that are excluded from the index.
A list of the folders containing documents included in a LAN-based index, or a list of the documents included in a disk-based index. You might also include a brief description of the contents of each folder or document.
A list of the values for each document if you assign document info field values.
If a catalog has an especially large number of documents, consider including a table that shows the values assigned to each document. The table can be part of your ReadMe file or a separate document. While you’re developing the index, you can use the table to maintain consistency.
You can update, rebuild, or purge an existing index.
From the All tools menu, select Add search index.
It displays the Index toolset in the left panel.
From the Index panel, select Full text index with catalog.
The Catalog dialog box is displayed.
In the Catalog dialog box, select Open Index.
Locate and select the index definition file (PDX) for the index, and then select Open.
In the Index definition dialog box, make desired changes and then select the function you want Acrobat to perform:
You can set preferences for indexing that apply globally to all subsequent indexes you build. You can override some of these preferences for an individual index by selecting new options during the index-building process.
In the Preferences dialog box under Categories, select Catalog. Many of the options are identical to those described for the index-building process.
The Force ISO 9660 compatibility on folders option is useful when you don’t want to change long PDF filenames to MS-DOS® filenames as you prepare documents for indexing. However, you must still use MS-DOS® file-naming conventions for the folder names (eight characters or fewer) even though this isn’t necessary for the filenames.
To automate the process of building, rebuilding, updating, and purging an index, you can use the Catalog feature along with a catalog batch PDX file (.Bpdx). This file contains a list of catalog index file paths and flags. You can schedule when and how often to automatically perform these tasks using a scheduling application like Windows® scheduler. To do this, you simply display the BPDX file in Acrobat, and Acrobat will re-create the index according to the flags in the BPDX file.
To use BPDX files, go to Preferences > Catalog and then select the check box for Allow Catalog Batch Files (. Bpdx) to re run.
You can develop and test an indexed document collection on a local hard drive and then move the finished document collection to a network server or disk. An index definition contains relative paths between the index definition file (PDX) and the folders containing the indexed documents. If these relative paths are unchanged, you don’t have to rebuild the index after moving the indexed document collection. If the PDX file and the folders containing the indexed documents are in the same folder, you can maintain the relative path simply by moving that folder.
If the relative path changes, you must create an index after you move the indexed document collection. However, you can still use the original PDX file. To use the original PDX file, first move the indexed documents. Then copy the PDX file to the folder where you want to create the index, and edit the include and exclude lists of directories and subdirectories, as necessary.
If the index resides on a drive or server volume separate from any part of the collection it applies to, moving either the collection or the index breaks the index. If you intend to move a document collection either to another network location or onto a CD, create and build the index in the same location as the collection.

Work smarter with Acrobat on your desktop
Create, edit, and organize PDFs with powerful tools that help you stay productive anywhere.