Term
- Install and configure ColdFusion User Guide
- Install ColdFusion
- ColdFusion server profiles
- Install ColdFusion
- Configure your system
- ColdFusion licensing and activation
- About Named User Licensing and Feature Restricted Licensing in ColdFusion
- Glossary of terms in ColdFusion licensing and activation
- Named User License (NUL) in ColdFusion
- Feature Restricted Licensing (FRL)- Isolated in ColdFusion
- Feature Restricted Licensing (FRL)- Online in ColdFusion
- Feature Restricted Licensing (FRL)- Offline in ColdFusion
- Troubleshoot ColdFusion licensing errors
- ColdFusion Licensing and Activation in ColdFusion (2023 release) and earlier
- Install ColdFusion configuration
- Install ColdFusion on Ansible
- Install integrated technologies
- Configure ColdFusion
- JVM arguments in 2023 and 2021 updates of ColdFusion
- JVM arguments in ColdFusion (2025 release)
- CFSetup configuration tool
- Command Line Interface (CLI)
- Central Config Server (CCS) in ColdFusion
- Administer ColdFusion
- Use the ColdFusion administrator
- Data Source Management for ColdFusion
- Connect to web servers
- Deploy ColdFusion applications
- Administer ColdFusion security
- Use multiple server instances
- ColdFusion Administrator API Reference
The CFSetup confuguration tool is NOT supported on ColdFusion (2018 release).
Overview
ColdFusion offers both Administrator interface to view and change server settings, and a car wizard to bundle settings from one instance and then deploy in another instance after logging into its admin.
CFSetup is a command line utility to manage ColdFusion settings. You can use CFSetup, among others, to:
- Configure (read/write) ColdFusion Settings in ColdFusion Administrator
- Export and import settings from/to different ColdFusion instances.*
* You can however use the CAR wizard to migrate the settings and the relevant files.
In CFSetup, settings are grouped into relevant categories. The categories are listed below:
- Caching
- Chart
- Cloudconfiguration
- Cloudcredential
- Customtag
- Datasource
- Debug
- Document
- Dotnet
- Eventgatewayinstance
- Eventgatewaysetting
- Eventgatewaytype
- Idpconfiguration
- Logging
- Mapping
- Metric
- NoSQL
- Pdfservice
- Probe
- Probeconfig
- Rest
- Runtime
- Sandbox
- Scheduletask
- Security
- Server
- Solr
- Spconfiguration
- User management
- Watch
- Webservice
- Websocket
Since CFSetup interacts directly with the config files, you need not have ColdFusion server up and running.
Restart ColdFusion server after changing a setting to get the setting reflected in the Administrator.
Terminology
|
|
Description |
|---|---|
|
Alias |
An alias is shortcut or a substitute for the path of a ColdFusion instance. For example, instanceOne for C:\ColdFusion2021\cfusion is the alias for the instance C:\ColdFusion2021\cfusion. |
|
Setting key |
In CFSetup, all settings are assigned a unique key, which is called a setting key. Every setting belongs to a particular category. |
|
Setting value |
Denotes the value of the setting key. |
|
Service |
There are categories where every setting key-setting value pair belongs to a specific service. For example, in the category datasource, the service name id datasource name. There could be multiple datasource names in the category with each datasource name having its own host, port, etc. |
Get started with CFSetup
The CFSetup tool is located in /coldfusion/config/cfsetup.
Start CFSetup
The CFSetup tool is located in /coldfusion/config/cfsetup.
You can start CFSetup using one of the following three ways:
Terminal mode
To start CFSetup, execute cfsetup.bat/cfsetup.sh in the command line:
<CF_HOME>/config/cfsetup>cfsetup.bat
After you hit Enter, the CFSetup tool starts.
In a JEE setup, CFSetup is located in cfusion.war\WEB-INF\config\cfsetup.
Help command
The Help command retrieves help for any category. For example,
- List all commands using help.
- View the usage of a command for a category. For example, help add datasource.
Enter help in the prompt and see the syntax for all commands in CFSetup.
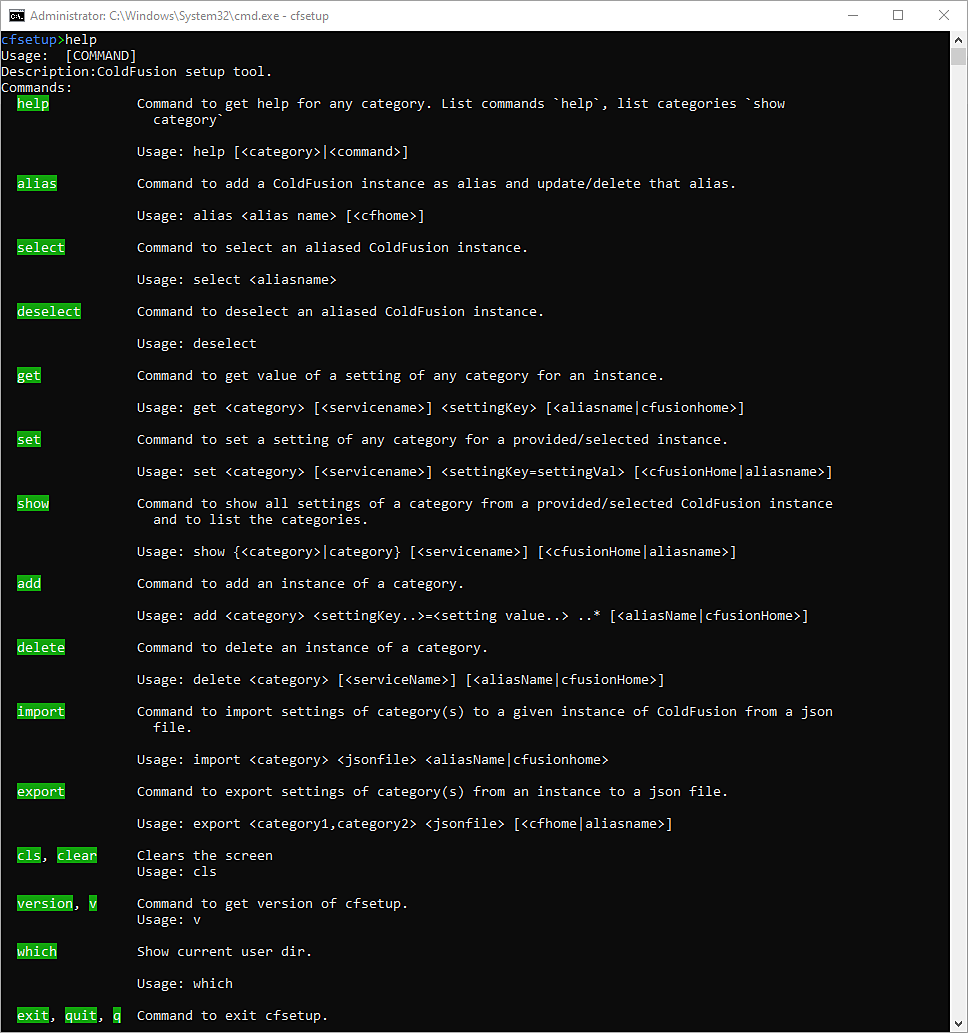

Usage
|
Action |
Command |
|
See usage of any command |
help <command> |
|
Get information about setting key of any category |
help <category> |
|
Get information of any setting key of a category |
help <category> <keyName> |
|
Get help on adding an instance of any category |
help add <category> |
|
List attributes of a category |
help <category> |
Alias
An alias is shortcut or a substiture for the path of a ColdFusion instance.
Create an alias
cfsetup>alias <alias_name> <ColdFusion_Home>
For example,
cfsetup>alias firstAlias C:\ColdFusion2021\cfusion
Delete an alias
cfsetup>alias -d <alias_name>
For example,
cfsetup> alias -d firstAlias
Use an alias
You can use an alias in the following ways:
- Use the alias as suffix. For example, cfsetup>show chart firstAlias
- Select an alias. For example, cfsetup>select <alias_name>
After selecting alias, if you do not specify the the alias suffix in the command, it will be executed for the selected alias.
For example, cfsetup>show chart
You can select the alias that you'd created so that you need not specify the cfusion path in each command.
Usage
|
Command type |
Command |
|---|---|
|
Register an alias |
cfsetup>alias <alias_name> <ColdFusion_Home> |
|
Delete an alias |
cfsetup>alias <alias_name> -d |
|
Select an alias |
cfsetup>select <alias_name> |
|
Deselect an alias |
cfsetup>deselect <alias_name> If you are already using an alias, then use the command: cfsetup:alias_name>deselect |
|
Show all aliases |
cfsetup>show alias |


Alias as suffix
You can also specify an alias as suffix to accomplish a task. For example,
show <setting> <alias_name>
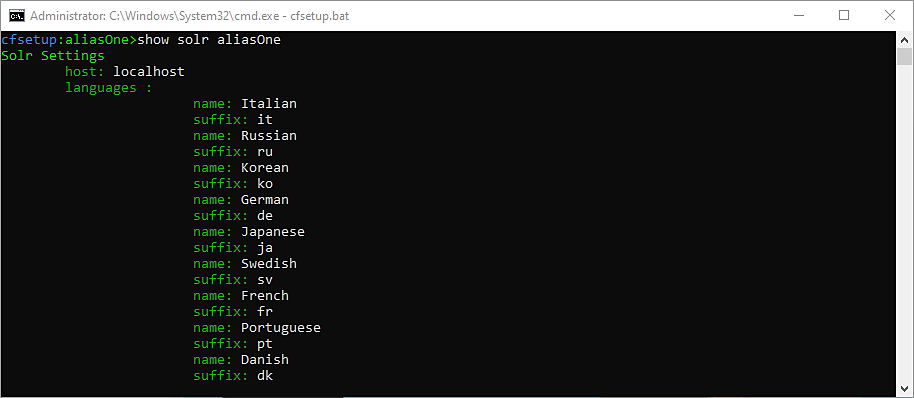

Manage ColdFusion settings
Show all settings
Show all settings of a category for an instance. Also use the show command to list all categories.
cfsetup>show category
Show settings of a category
Show all settings of a category of an instance.
cfsetup>show <category_name> <alias>
For example,
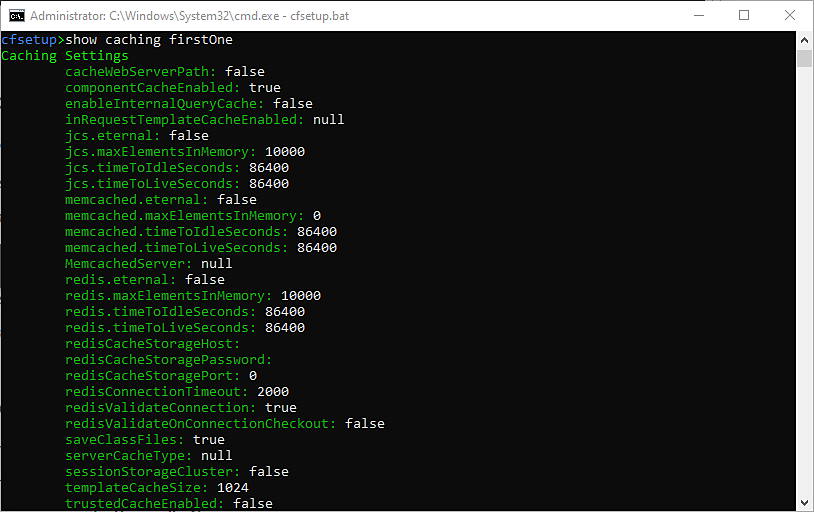

The CFSetup tool displays the settings you can view in the ColdFusion Administrator.
Get settings of a category
Use this get command to get the value of a settting of any category for an instance.
To retrieve a configuration setting, use the command:
cfsetup>get <category> <settingKey> <aliasName>
For example,
cfsetup:aliasOne>get runtime sessionStorage sessionStorageHost sessionStoragePort sessionStoragePassword sessionStorageTimeout aliasOne


Charting
cfsetup:myalias>get chart diskCacheLocation will display the location for charting.
Similarly, cfsetup:myalias>show chart will display the diskCacheLocation along with the other properties.
Set settings of a category
To set a configuration of a category, use the command:
cfsetup>set category <settingKey=settingValue> <aliasName>
For example,
cfsetup:aliasOne>set watch extensions=xml interval=120 watchenabled=false aliasOne


Add an instance of a category
You can add instances of a category.
cfsetup>add <category> setting1=<value> setting2=<value>.....settingn=<value>
For example, to add values to the category pdfservice, enter the command. Replace the requiter values.
cfsetup>add pdfservice hostname=<host> isenabled=<true|false> ishttps= <true|false> islocal= <true|false> name=<host> port=<port> weight=<weight>
Delete an instance of a category
You can delete instances of a category.
cfsetup>delete <category> setting1 <value> setting2 <value>.....settingn <value>
For example, to add the Service Configuration name to the category spconfiguration, enter the command.
cfsetup>delete spconfiguration spName
Export a category to json file
Export a single category
To export settings of a category, use the command:
cfsetup>export <category> <json_file> <cf_home>|<alias>
For example,
cfsetup>export websocket ws.json
If the json already exists, you can replace the old file.
While exporting, you must also password protect the file. You will be asked to provide a passphrase.


cfsetup>export clientvariable test.json to export client variable.
Export multiple categories


Export all categories
Export all categories and their properties to a json file.
cfsetup>export all <json_file> <alias>|<cf_home>
For example,
cfsetup>export all all-cat.json
While exporting, you must also password protect the file. You will be asked to provide a passphrase.
Note: When migrating settings from one machine to another, install the tools first, like, OpenOffice, before exporting all settings of categories, for example, dotnet,solr, document, and so on. Export the settings first and then the tool will ingest the settings. Update the path as required.
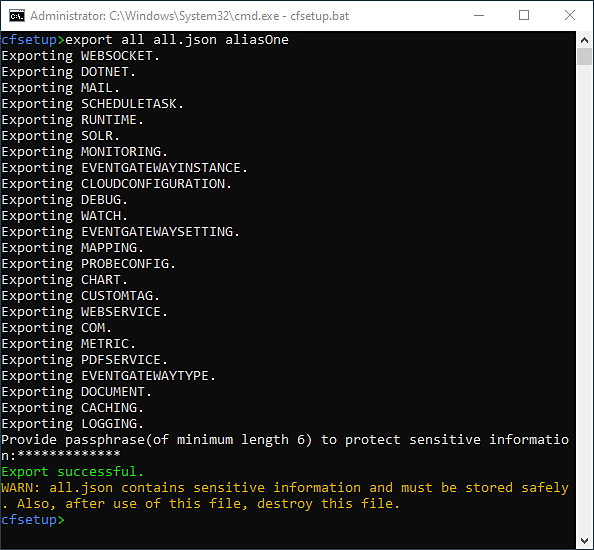

Password
When exporting a category, you can use a password, as shown below:
export mail m.json cfusion -p=testPassword
Import a category from a json file
While performing import operations for the categories that include file paths, you may have to update the file paths in the exported json file. The file paths must be relative to the server on which you want to perform the import operation.
Import a single category
To import settings of a category from a json file, use the command:
cfsetup>import <category> <jsonfile> <cfhome>|<alias>
For example,
cfsetup>import websocket ws.json aliasOne
While importing, you must provide the passphrase, which you'd set earlier.


Import multiple categories


The backup files, during importing, are located in the server you'd performed the import command. The location is:
ColdFusion_Home/cfusion/lib/cfsetup_backup
Import all categories
Import all categories and their properties to a json file.
cfsetup>import all <json_file> <alias>|<cf_home>
For example,
cfsetup>import all all-cat.json
While importing, you must also specify the passphrase that you'd set earlier while exporting.
Password
When importing a category, you can use a password, as shown below:
import mail m.json inst1 -p=testPassword
Docker
To import a setting into a ColdFusion Docker image, you can specify the exported json.
importCFSettings=all_doc.json importCFSettingsPassphrase=testpassword
Where,
- importCFSettings=<A JSON file containing the CF Settings to be imported . Must be present in the webroot, /app>
- importCFSettingsPassphrase=<Passphrase to import CF settings from an encrypted JSON file.>
User management settings
Using cfsetup, you can add and manage users. Users can also be granted access to roles and sandboxes. See the commands below to add or delete a user, and also import or export users.
If an alias has already been selected, then it is not necessary to provide the alias name at the end of the command.
Show help
cfsetup>help user


Add a user
To add a user, use the syntax below.
cfsetup>add user <name> <password> <description> <datasources> <roles> <sandboxfile> <services>
For example, select the alias, and then enter:
cfsetup>add user name=johnadams password=johnadams description=developer


Add a user with access
To add a user with access controls, use the syntax below.
cfsetup>add user <name> <password> <description> <datasources> <roles> <sandboxfile> <services>
For example, select the alias, and then enter:
cfsetup:cfusion>add user name=johnadams password=johnadams description=developer roles=coldfusion.rds,coldfusion.administrator,coldfusion.adminapi,coldfusion.collections,coldfusion.scheduledtasks,coldfusion.datasources,coldfusion.debugging sandboxfile=rwxd:C:/ColdFusion2021/cfusion/ services=pop,image,htmltopdf datasources=cfcodeexplorer,cfartgallery cfusion
In the command above, you've:
- Allowed the roles to the user, for example, coldfusion.rds, coldfusion.admin, coldfusion.api, etc. The user will only have access to the specified roles.
- Specified the sandbox, which is the file name appended to permissions, for example, rwxd:C:\coldfusion\app1\ (rwxd stands for read, write, execute, and delete permissions. Any combination of rwxd is allowed.
- Listed the services which are exposed to the user. For example, image, htmltopdf, and so on.
- Allowed the datasource access to the user. For example, cfartgallery, cfcodeexplorer, and so on.
Show users
To display a list of all users in an alias, enter the command:
cfsetup:cfusion>show user
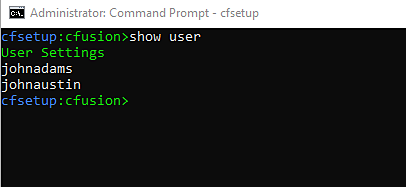

Display user settings
To display the details of a user in an alias, enter the command:
cfsetup:cfusion>show user <username>
For example,
cfsetup:cfusion>show user johnadams
The command returns the datasources to which the user has access, the description, name, encrypted password, roles, sandbox, and services to which the user has access.
Add role to existing user
To add a role to an existing user, enter the command:
cfsetup>add user <username> roles=<list of roles> <alias>
For example, if you want to add the role coldfusion.serversettingssummary, enter the command:
cfsetup:cfusion>add user johnadams roles=coldfusion.serversettingssummary
Delete role from an existing user
To remove a role from an existing user, enter the command:
cfsetup>delete user <username> roles=<list of roles> <alias>
For example, if you want to remove the role coldfusion.serversettingssummary from the user, enter the command:
cfsetup:cfusion>delete user johnadams roles=coldfusion.serversettingssummary
Add service to existing user
To add a service to an existing user, enter the command:
cfsetup>add user <username> services=<list of services> <alias>
For example, if you want to add the services mail and upload, enter the command:
cfsetup:cfusion>add user johnadams services=mail, upload
Delete service from existing user
To remove services from an existing user, enter the command:
cfsetup>delete <username> services=<list of services> <alias>
For example, if you want to remove the services mail and upload, enter the command:
cfsetup:cfusion>delete user johnadams services=mail, upload
You can also delete all roles or services. For example,
- cfsetup:cfusion>delete user johnadams roles
- cfsetup:cfusion>delete user johnadams services
Set user settings
After adding roles or services to a user, you can update or override the roles or services using the set command.
cfsetup>set user <username> roles=<list of roles to set> services=<list of services to set> datasources=<list of datasources to set and allow access> <alias>
For example, to set a few roles for a user, enter the command:
cfsetup:cfusion>set user johnadams roles=coldfusion.administrator,coldfusion.adminapi,coldfusion.collections,coldfusion.scheduledtasks
After setting the role, you can display the roles of the user using the command below:
cfsetup:cfusion>get user johnadams roles
Delete a user
To delete a user, use the syntax below:
cfsetup>delete user <username> <alias>
For example, enter the command:
cfsetup:cfusion>delete user johnaustin
Export user details
To export details of all users, use the syntax:
cfsetup>export user <filename>
For example, cfsetup:cfusion>export user user.json
Import user details
To import details of all users, use the syntax:
cfsetup>import user <filename>
For example, cfsetup:cfusion>import user user.json
Security settings
Using cfsetup, you can restrict access to the ColdFusion Administrator, services, and internal directories by IP address.
In the security category, the following attributes are renamed:
|
Old attribute name |
New attribute name |
|---|---|
|
admin |
adminPassword |
|
jetty |
adminComponentPassword |
|
rds |
rdsPassword |
Show help
cfsetup>help security <alias>


Add allowed IP addresses
Specify IP addresses that should be allowed to invoke exposed services or access the ColdFusion Administrator. Here's the syntax:
cfsetup>add security allowedIPForAdmin <Comma separated list of IP addresses> <alias>
For example,
cfsetup:cfusion>add security allowedIPForAdmin=10.192.216.xx,10.192.216.xx,10.192.216.xx,10.192.216.xx
Show security settings
Use the syntax below:
cfsetup>show security <alias>
For example,
cfusion:cfusion>show security
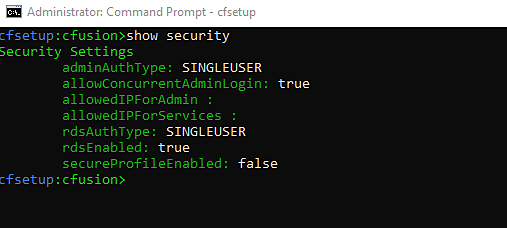

Delete allowed IP addresses
Specify IP addresses that should be blocked when accessing services or the ColdFusion Administrator. Here's the syntax:
cfsetup>delete security allowedIPForAdmin <Comma separated list of IP addresses> <alias>
There are two types of IPs:
- AllowedIPForAdmin: Allows access to coldfusion administrator and internal directories.
- AllowedIpForServices: IPs that are allowed to invoke exposed services.
For example,
- cfsetup:cfusion>delete security allowedIPForAdmin=10.192.216.xx,10.192.216.xx,10.192.216.xx,10.192.216.xx
- cfsetup:cfusion>delete security allowedIPForServices=10.192.216.xx (This command will delete the specified IP)
- cfsetup:cfusion>delete security allowedIPForServices (This command will delete all allowedIPForServices)
Set security settings
After, for example, allowing access to IP addresses, you can update the IP addresses using the set command. The syntax is below:
cfsetup>set security allowedIPForAdmin=<comma separated list of IP address> <alias>
For example,
cfsetup:cfusion>set security allowedIPForAdmin=10.192.216.21,10.192.216.22,10.192.216.23
The command overwrites the already defined allowable IP addresses.
Here's another example, cfsetup:cfusion>set security adminAuthType=NONE rdsAuthType=MULTIUSER, which sets the values of adminAuthType and rdsAuthType.
Get security settings
Retrieve security settings by using the get command. The syntax is below:
cfsetup>get security <setting> <alias>
For example,
- cfsetup:cfusion>get security adminAuthType
- cfsetup:cfusion>get security allowedIPForAdmin
Export security details
To export security settings, use the syntax:
cfsetup>export security <filename> <alias>
For example, cfsetup:cfusion>export security sec.json
Export user details
To import security settings, use the syntax:
cfsetup>import security <filename> <alias>
For example, cfsetup:cfusion>import security sec.json
Sandbox settings
ColdFusion's sandbox security uses the location of your ColdFusion pages to control access to ColdFusion resources. A sandbox is a designated area (files or directories) of your site to which you apply security restrictions.
The following sandbox commands let you add or remove sandbox, set security, block IPs, grant runtime permissions, or block operations.
Show help
cfsetup>help sandbox <alias>
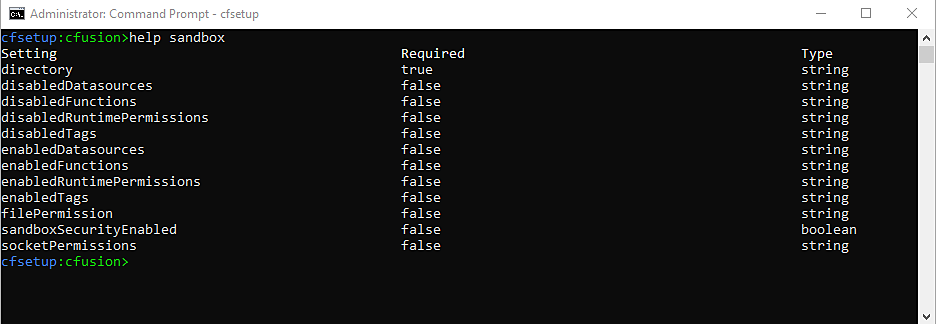

Add sandbox
Sandbox security uses the location of your ColdFusion pages to control access to ColdFusion resources. Sandbox security lets you specify which tags, functions, and resources (for example, files, directories, and data sources) can be used by ColdFusion pages located in and under the designated directory.
To add a sandbox using cfsetup, use the syntax below:
cfsetup>add sandbox directory=<sandbox location> filePermission=<rwxd:tags and functions in the sandbox to access files and directories outside the sandbox> enabledDatasources=<allow the use of ColdFusion data sources> disabledFunctions=<disallow the use of listed functions> disabledTags=<disallow the use of listed tags> socketPermissions=<Controls access from ColdFusion to IP addresses and port numbers. You can specify host names or numeric addresses, and you can specify individual ports and port ranges> disabledRuntimePermissions <disallow access to ColdFusion runtime services> <alias>
Note: Only directory is a required field. Everything else is optional.
For example, to add a sandbox,
cfsetup:cfusion>add sandbox "C:\ColdFusion\cfusion\wwwroot\sandbox"
For the changes to take effect, restart ColdFusion.
Add file permissions to existing sandbox
Add the option filePermission to the command. In the example below, you have granted read, write, execute, and delete permissions to the folder cfdirectory in the sandbox.
cfsetup:cfusion>add sandbox directory="C:/ColdFusion/cfusion/wwwroot/sandbox/" filePermission=rwxd:C:/ColdFusion/cfusion/wwwroot/sandbox/cfdirectory/
Add other options to existing sandbox
Add the options enabledDatasources, disabledTags, and disabledFunctions to the command. In the example below, you have enabled access to the datasource cfartgallery, disabled the usage of the tag cffile, and disabled the usage of the function fileRead in the specified sandbox.
cfsetup:cfusion>add sandbox directory="C:/ColdFusion/cfusion/wwwroot/sandbox/" filePermission=rwxd:C:/ColdFusion/cfusion/wwwroot/sandbox/cfdirectory/ enabledDatasources=cfartgallery disabledTags=cffile disabledFunctions=fileread
The values added during modifying a sandbox will add to the original values that are used when creating the sandbox.
Display sandbox details
To display the details of a sandbox, use the syntax below:
cfsetup>show sandbox <alias>
If you want to display the the available permissions of a sandbox, for example, enabled functions and tags, disabled runtime permissions, and so on, use the syntax:
cfsetup>show sandbox * <alias>
For example, if you want to see the details of the sandbox that you've created, enter the command:
cfsetup:cfusion>show sandbox C:/ColdFusion/cfusion/wwwroot/sandbox/
Set sandbox setting
To set a sandbox setting, use the syntax:
cfsetup>set sandbox <setting>=<value> <alias>
For example,
cfsetup:cfusion>set sandbox sandboxSecurityEnabled=true
Restart ColdFusion for the changes to take effect.
The values specified in the set command will replace the original values for the attributes, which were provided while creating the sandbox.
Get sandbox setting
To retrieve a sandbox setting, use the syntax:
cfsetup>get sandbox <list of setting> <alias>
For example,
cfsetup:cfusion>set sandbox C:/ColdFusion/cfusion/wwwroot/sandbox/ enabledDatasources=* (access to all datasources)
cfsetup:cfusion>get sandbox C:/ColdFusion2021/cfusion/wwwroot/sandbox/ enabledDatasources
Delete a sandbox
There are three ways in which you can delete a sandbox:
- delete sandbox <sandboxed directory> This will delete the sandbox.
- delete sandbox <sandboxed directory> filePermission This will delete all the file permissions from the sandbox. All other permissions will be retained.
- delete sandbox <sandboxed directory> enabledDatasources=cfartgallery This will remove the datasource cfartgallery from enabledDatasources attribute from the sandbox. All other settings will be retained.
The example below deletes a sandbox:
cfsetup:cfusion>delete sandbox C:/ColdFusion/cfusion/wwwroot/sandbox/
If you want to delete a particular setting from a sandbox, then:
cfsetup:cfusion>delete sandbox C:/ColdFusion/cfusion/wwwroot/sandbox/ filePermission
The command deletes all file permissions from the sandboxed folder.
Similarly, cfsetup:cfusion>delete sandbox C:/ColdFusion/cfusion/wwwroot/sandbox/ enabledDatasources
Export a sandbox
To export a sandbox, use the syntax:
cfsetup>export sandbox <filename> <alias>
For example, cfsetup:cfusion>export sandbox sb.json
Import a sandbox
To import a sandbox, use the syntax:
cfsetup>import sandbox <filename> <alias>
For example, cfsetup:cfusion>import sandbox sb.json
Configure JEE in Sandbox
Wildfly
cfsetup>set sandbox sandboxSecurityEnabled=true /opt/Software/wildfly-20.0.0.Final/standalone/deployments/cfusion.war/WEB-INF/cfusion
Note: To enable the sandbox security in the JEE editions, you must define the JVM arguments.
-Djava.security.manager -Djava.security.policy=/opt/Software/wildfly-20.0.0.Final/standalone/deployments/cfusion.war/WEB-INF/cfusion/lib/coldfusion.policy -Djava.security.auth.policy=/opt/Software/wildfly-20.0.0.Final/standalone/deployments/cfusion.war/WEB-INF/cfusion/lib/neo_jaas.policy
Tomcat
cfsetup>set sandbox sandboxSecurityEnabled=true C:\software\Tomcat\apache-tomcat-9.0.40\apache-tomcat-9.0.40\webapps\cfusion\WEB-INF\cfusion
Note: To enable the sandbox security in the JEE editions, you must define the JVM arguments.
-Djava.security.manager -Djava.security.policy=C:\software\Tomcat\apache-tomcat-9.0.40\apache-tomcat-9.0.40\webapps\cfusion\WEB-INF\cfusion\lib\coldfusion.policy -Djava.security.auth.policy=C:\software\Tomcat\apache-tomcat-9.0.40\apache-tomcat-9.0.40\webapps\cfusion\WEB-INF\cfusion\lib\neo_jaas.policy
Non-interactive mode
Using the non-interactive mode, you can perform all configuration-related functions without entering the CFSetup environment explicitly.
To use the non-interactive mode, go to the location /ColdFusion/config/cfsetup, and start a command or terminal mode.
Then run any command using the syntax below:
/ColdFusion/config/setup>cfsetup.bat <command>
For example, to display chart settings in an alias,


To modify a setting, use the command, as shown below:


To view the modified settings, use the command below:


Script mode
In addition to the non-interactive mode, you can define a sequence of commands in a batch file. With this approach, you can set up your automation pipeline, and manage configuration settings in a more structured manner.
For example, create a batch file, mycommands.bat, that contains the following commands:
@echo off
call cfsetup.bat show chart C:\cf09Sep\ColdFusion\cfusion
call cfsetup.bat set chart maximumCachedImages=40 C:\cf09Sep\ColdFusion\cfusion
call cfsetup.bat get chart maximumCachedImages C:\cf09Sep\ColdFusion\cfusion
Then, on the console, run the command as shown below:
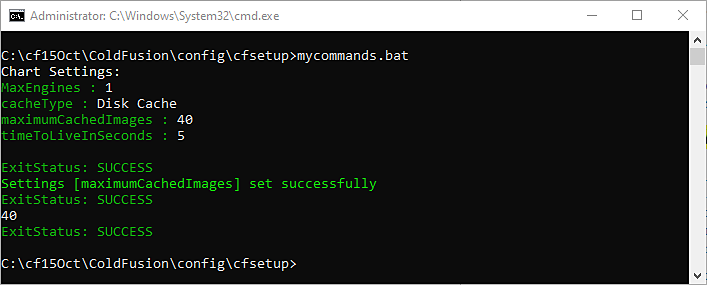

Change password
For changing the password for admin/rds/jetty, enter the following command:
set security admin=testpassword jetty=testpassword rds=testpassword cfusion
The password will be effective once you restart the server.
CFSetup in standalone mode
You can use CFSetup in the standalone mode as well, which works in the same way as CFSetup in the modes explained above. Download cfsetup-standalone.zip and unzip its contents.
The ColdFusion server need not be up and running.
Note: On non-Windows platforms, in cfsetup.sh file, you must specify the runtime user manually.
The runtime user must always be the same as the ColdFusion runtime user.


Uncomment the line and specify the runtime user manually. For example, RUNTIME_USER="john"
The cfsetup folder and its sub-folders need to have the same file permissions as the runtime user.
Exit status of command
You can get the exit status of a cfsetup command without parsing the entire error message. This is helpful in cases when you need to parse the text output of a command to know whether the command executed successfully.
You can simply get the status of the command without parsing the body of text. A zero in output means that the last command executed successfully.
Non-Windows
In a shell script, then $? stores the status of the last executed cfsetup command. If the output is zero, the command executed successfully. A non-zero output means that the command did not execute successfully.
Write these commands in a .sh file.
Example- Commands execute successfully
./cfsetup.sh show chart cfusion
echo $?
./cfsetup.sh set chart maximumCachedImages=60 cfusion
echo $?
Example- Commands execute unsuccessfully
./cfsetup.sh show chart cfusion
echo $?
./cfsetup.sh show abc
echo $?
./cfsetup.sh set maximumCachedImages=abc
echo $?
Windows
In a batch script, then %ERRORLEVEL% stores the status of the last executed cfsetup command. A non-zero output means that the command did not execute successfully.
Write these commands in a .bat file.
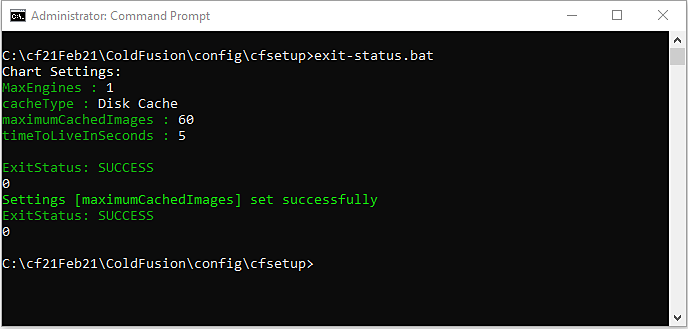
Example- Commands execute successfully
@echo off
call cfsetup.bat show chart cfusion
echo %ERRORLEVEL%
call cfsetup.bat set chart maximumCachedImages=60 cfusion
echo %ERRORLEVEL%

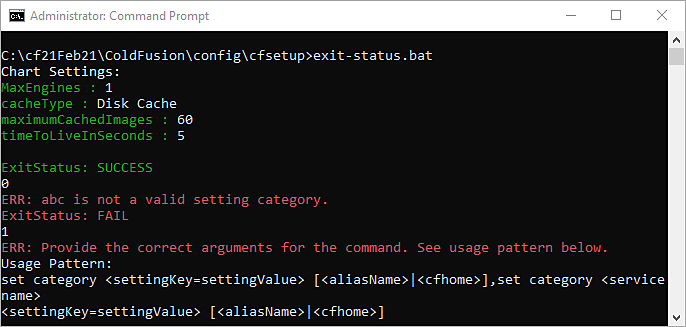
Example- Commands execute unsuccessfully
@echo off
call cfsetup.bat show chart cfusion
echo %ERRORLEVEL%
call cfsetup.bat show abc
echo %ERRORLEVEL%
call cfsetup.bat set maximumCachedImages=abc
echo %ERRORLEVEL%

Display and set client variables using CFSetup. ColdFusion supports the following settings in client variables:
Client settings
- Default Storage for Client sessions (clientStore)
- PurgeInterval (purgeIntervalInMinutes)
Client stores
Registry |
|
JDBC |
|
Cookie |
|
Examples
Add configuration settings
Here are a few examples.
| Category | Command |
|---|---|
| Webservice | add webservice name=ws authtype=<authtype> url=<url_wsdl> |
| EventGatewayType | add eventgatewaytype type=<type> class=<class> description=<description> startTimeout=<timeOut> killOnTimeout=<true|false> |
| EventGatewayInstance |
add eventgatewayinstance configurationpath=<path> cfcpath=<cfc_path> type=<type> gatewayid=<id> mode=<mode> |
| Solr | add solr language name=<name> suffix=<suffix> |
| REST | add rest mapping=<mapping> isdefault=<false|true> host=<host> rootpath=<rootpath> |
| PDFService |
add pdfservice hostname=<host> isenabled=<true|false> ishttps= <true|false> islocal= <true|false> name=<host> port=<port> weight=<weight> |
| JVM | add jvm jvmargs="--add-opens=java.base/java.nio=ALL-UNNAMED" |
| Clientvariable | add clientvariable name=cfartgallery description="JDBC-based client store" purgeDataUnvisitedForDays=91 disableGlobalClientVariableUpdates=false |
| Cloud credentials | add cloudcredential vendorName=AWS|AZURE accessKeyId=SomeAccessKeyId secretAccessKey=SomeSecretKey region=SomeRegion alias=myAliasForCloudCredential |
| Cloud configuration |
|
| SAML SP |
|
| SAML IDP |
|
NoSQL datasource
SQL datasource |
|
| Probe | add probe url="http://localhost/hellocf.cfm" start_time="08:00:00 AM" interval=3000 name="probe1" |
Set a configuration setting
Here are a few exmples.
| Category | Command |
|---|---|
| Webservice | set webservice ws ntlmdomain=<ntlmdomain> password=<password> proxyport=80 proxyusername=<proxyusername> workstation=<workstationname> url=http://host:port/basic.cfc?wsdl proxyserver=<proxyserver> proxypassword=<proxypassword> timeout=0.0 username=<username> authtype=ntlm |
| EventGatewayType |
set eventgatewaytype CFML type=<type> class= <description> description=<description> startTimeout=<timeOut> killOnTimeout= <true|false> |
| EventGatewaySetting |
set eventgatewaysetting jigid=<jigid> maxqueuesize=<queue_size> threadPoolsize=1.0 enableeventgatewayservice=false |
| EventGatewayInstance |
|
| Solr | set solr solrwebapp=<app> port=<port> host=<localhost> solrbuffersize=<buffer_size> solrhome=<SOLR_home> multicore httpsenabled=<true|false> username=<admin> password=<admin> |
| Server | set server http redirectport=8588 |
| REST | set rest <app_path> isdefault=<false|true> host=<localhost> rootpath= <rootpath> |
| Document |
|
| PDFService | set pdfservice hostname= <host> isenabled=<true|false> ishttps= <true|false> islocal= <true|false> name=<host> port=<port> weight=<weight> |
| Websocket |
|
| JVM | set jvm maxheapsize=1024m minheapsize=512m |
| Clientvariable |
|
| Caching | Redis
Memcached
JCS
Other settings
|
| Runtime |
|
| Cloud credentials |
|
| Cloud configuration |
|
| SAML SP |
|
| SAML IDP | set idpconfiguration idpName metadataurl="https://metadata-url/sso/saml" |
| NoSQL Datasource | set nosql testcfsetup mongoPort=27001 |
| Probe | set probe <probename> enabled=0 file="checkbak.log" overwrite=false |
Get a configuration setting
Here are a few settings.
| Category | Command |
|---|---|
| Webservice |
|
| EventGatewayType |
|
| EventGatewayInstance |
|
Solr |
|
| REST |
|
| Document |
|
| PDFService |
|
| Websocket | get websocket websocket_clustered |
| Runtime |
|
| Clientvariable |
|
| Cloud credentials |
|
| Cloud configuration |
Note: You must specify the timeout values suffixed with the appropriate unit when configuring a cloud configuration. |
| SAML SP |
|
SAML IDP |
|
| NoSQL Datasource |
|
Delete an instance of a category
Here are a few examples.
To specify values separated by space, pass the value inside quotes.
| Category | Command |
| Webservice | delete webservice test |
| EventGatewayType |
delete eventgatewaytype CFML |
| EventGatewayInstance | delete eventgatewayinstance test |
| Solr | delete solr language <instance> For example, cfsetup>delete solr language name=Italian,Russian cfusion |
| REST | delete rest <app_path> |
| JVM | delete jvm "--add-opens=java.base/java.nio=ALL-UNNAMED" |
| Clientvariable | delete clientvariable cfartgallery |
| Cloud credentials | delete cloudcredential myAliasForCloudCredential |
| Cloud configuration | delete cloudconfiguration configAlias |
| SAML SP | delete spconfiguration spName |
| SAML IDP | delete idpconfiguration idpName |
| NoSQL Datasource | delete nosql mongo2 |
Display a configuration setting
| Category | Command |
|---|---|
| Webservice |
|
| EventGatewayType |
|
| EventGatewayInstance |
|
| EventGatewaySetting |
show eventgatewaysetting |
| Solr | show solr |
| REST |
|
| PDFService |
|
| Document | show document |
| Websocket | show websocket |
| Clientvariable |
|
| Caching | show caching |
| Cloud credentials |
|
| Cloud configuration |
|
| SAML SP |
|
| SAML IDP |
|
| Server | show server |
| NoSQL datasource |
|
| Probe |
|
Limitations
In this version of CFSetup, you cannot add these cloud configuration settings- apiCallTimeout, retry conditions, and Proxy settings.