
Tap and hold the brush ![]() icon from the toolbar to bring up the Brushes panel.
icon from the toolbar to bring up the Brushes panel.
อัปเดตครั้งล่าสุดเมื่อ
21 ธ.ค. 2021
- คู่มือผู้ใช้ Photoshop
- บทนำสู่ Photoshop
- Photoshop และผลิตภัณฑ์และบริการอื่นๆ ของ Adobe
- Photoshop บนมือถือ (ไม่พร้อมใช้งานในจีนแผ่นดินใหญ่)
- Photoshop บน iPad (ไม่พร้อมใช้งานในจีนแผ่นดินใหญ่)
- Photoshop บน iPad | คำถามทั่วไป
- ทำความรู้จักกับพื้นที่ทำงาน
- ความต้องการของระบบ | Photoshop บน iPad
- สร้าง เปิด และส่งออกเอกสาร
- เพิ่มภาพถ่าย
- ทำงานกับเลเยอร์
- วาดและระบายด้วยแปรง
- เลือกและเพิ่มมาสก์
- รีทัชองค์ประกอบภาพของคุณ
- ทำงานกับเลเยอร์การปรับแต่ง
- ปรับโทนสีขององค์ประกอบภาพด้วยเคิร์ฟ
- ใช้การแปลง
- ครอบตัดและหมุนองค์ประกอบภาพ
- หมุน แพน ซูม และรีเซ็ตผ้าใบ
- ทำงานกับเลเยอร์ตัวอักษร
- ทำงานกับ Photoshop และ Lightroom
- รับแบบอักษรที่สูญหายใน Photoshop บน iPad
- ข้อความภาษาญี่ปุ่นใน Photoshop บน iPad
- จัดการการตั้งค่าแอป
- ทางลัดระบบสัมผัสและท่าทางการสัมผัส
- ทางลัดแป้นพิมพ์
- แก้ไขขนาดภาพ
- ไลฟ์สตรีมเมื่อคุณสร้างสรรค์ใน Photoshop บน iPad
- แก้ไขข้อบกพร่องด้วยแปรงแก้ไข
- สร้างแปรงใน Capture และใช้ใน Photoshop บน iPad
- ทำงานกับไฟล์ Camera Raw
- สร้างและทำงานกับ Smart Object
- ปรับค่าการรับแสงในภาพด้วยปรับความสว่างและปรับให้มืด
- คำสั่งการปรับแต่งอัตโนมัติใน Photoshop บน iPad
- ทำรอยเปื้อนในภาพด้วย Photoshop บน iPad
- เพิ่มหรือลดความเข้มของภาพของคุณโดยใช้เครื่องมือฟองน้ำ
- การเติมแบบรับรู้เนื้อหาสำหรับ iPad
- Photoshop บนเว็บ (ไม่พร้อมใช้งานในจีนแผ่นดินใหญ่)
- Photoshop (beta) (ไม่พร้อมใช้งานในจีนแผ่นดินใหญ่)
- AI เชิงสร้างสรรค์ (ไม่พร้อมใช้งานในจีนแผ่นดินใหญ่)
- คำถามทั่วไปเกี่ยวกับ AI เชิงสร้างสรรค์ ใน Photoshop
- เติมโดย AI ใน Photoshop บนเดสก์ท็อป
- สร้างภาพด้วยพรอมต์ข้อความอธิบาย
- ขยายโดย AI ใน Photoshop บนเดสก์ท็อป
- แทนที่พื้นหลังด้วย สร้างพื้นหลัง
- รับรูปแบบใหม่ด้วย สร้างสิ่งที่คล้ายกัน
- เลือกโมเดล AI สำหรับการควบคุมการสร้าง
- เติมโดย AI ใน Photoshop บน iPad
- ขยายโดย AI ใน Photoshop บน iPad
- คุณสมบัติ AI เชิงสร้างสรรค์ ใน Photoshop บนเว็บ
- ความถูกต้องของเนื้อหา (ไม่พร้อมใช้งานในจีนแผ่นดินใหญ่)
- เอกสารระบบคลาวด์ (ไม่พร้อมใช้งานในจีนแผ่นดินใหญ่)
- เอกสารระบบคลาวด์ใน Photoshop | คำถามทั่วไป
- เอกสารระบบคลาวด์ใน Photoshop | คำถามเกี่ยวกับขั้นตอนการทำงาน
- จัดการและทำงานกับเอกสารระบบคลาวด์ใน Photoshop
- อัปเกรดพื้นที่เก็บข้อมูลบนระบบคลาวด์สำหรับ Photoshop
- ปิดใช้งานเพื่อสร้างหรือบันทกเอกสารระบบคลาวด์
- แก้ไขข้อผิดพลาดเกี่ยวกับเอกสารระบบคลาวด์ของ Photoshop
- รวบรวมบันทึกการซิงค์เอกสารระบบคลาวด์
- เชิญผู้อื่นให้แก้ไขเอกสารระบบคลาวด์ของคุณ
- แชร์เอกสารเพื่อตรวจทาน
- Workspace
- พื้นฐานเกี่ยวกับ Workspace
- การกำหนดค่า
- เรียนรู้ได้เร็วขึ้นด้วยแผงค้นหาของ Photoshop
- สร้างเอกสาร
- วางไฟล์
- ทางลัดแป้นพิมพ์เริ่มต้น
- กำหนดทางลัดแป้นพิมพ์เอง
- แกลเลอรีเครื่องมือ
- การกำหนดค่าประสิทธิภาพ
- แถบงานตามบริบท
- ใช้เครื่องมือ
- ค่าที่ตั้งไว้ล่วงหน้า
- กริดและแนวเส้น
- ท่าทางการสัมผัส
- ใช้แถบสัมผัสด้วย Photoshop
- ความสามารถสัมผัสและพื้นที่ทำงานแบบปรับแต่งได้
- ตัวอย่างเทคโนโลยี
- เมตาดาต้าและบันทึก
- วางภาพของ Photoshop ในแอปพลิเคชันอื่น
- ไม้บรรทัด
- แสดงหรือซ่อนรายการพิเศษที่ไม่ได้พิมพ์
- ระบุคอลัมน์สำหรับภาพ
- เลิกทำหรือประวัติ
- แผงและเมนู
- จัดตำแหน่งองค์ประกอบด้วยการสแนป
- จัดตำแหน่งด้วยเครื่องมือไม้บรรทัด
- จัดระเบียบ แชร์ และทำงานร่วมกันด้วยโปรเจค
- ปรับแต่งผลงานที่สร้างจาก Adobe Firefly
- พื้นฐานเกี่ยวกับภาพและสี
- วิธีการปรับขนาดภาพ
- ทำงานกับภาพราสเตอร์และเวกเตอร์
- ขนาดและความละเอียดของภาพ
- รับภาพจากกล้องและสแกนเนอร์
- สร้าง เปิด และนำเข้าภาพ
- ดูภาพ
- ข้อผิดพลาดมาร์กเกอร์ JPEG ไม่ถูกต้อง | การเปิดภาพ
- การดูภาพหลายภาพ
- กำหนดตัวเลือกสีและชุดสีเอง
- ภาพที่มีช่วงไดนามิกสูง
- จับคู่สีในภาพของคุณ
- แปลงระหว่างโหมดสี
- โหมดสี
- ลบส่วนต่างๆ ของภาพ
- โหมดการผสมผสาน
- เลือกสี
- กำหนดตารางสีตามดัชนี
- ข้อมูลภาพ
- ตัวกรองความบิดเบี้ยวไม่พร้อมใช้งาน
- เกี่ยวกับสี
- การปรับสีและโมโนโครมโดยใช้ช่องต่างๆ
- เลือกสีในแผงสีและชุดสี
- ตัวอย่าง
- โหมดสีหรือโหมดภาพ
- แสงทอด
- เพิ่มการเปลี่ยนโหมดแบบมีเงื่อนไขให้เป็นการดำเนินการ
- เพิ่มชุดสีจาก HTML CSS และ SVG
- ความลึกของบิตและการกำหนดค่า
- เลเยอร์
- พื้นฐานของเลเยอร์
- การตัดต่อที่ไม่ทำให้ภาพต้นฉบับเสียหาย
- สร้างและจัดการผู้ใช้และกลุ่ม
- เลือก จัดกลุ่ม และเชื่อมโยงเลเยอร์
- วางภาพลงในเฟรม
- ความเข้มและการผสมผสานเลเยอร์
- มาสก์เลเยอร์
- นำสมาร์ทฟิลเตอร์ไปใช้
- องค์ประกอบเลเยอร์
- ย้าย เรียงซ้อน และล็อคเลเยอร์
- มาสก์เลเยอร์ด้วยมาสก์เวกเตอร์
- จัดการเลเยอร์และกลุ่ม
- เอฟเฟ็กต์และสไตล์ของเลเยอร์
- แก้ไขมาสก์เลเยอร์
- แยกเนื้อหา
- แสดงเลเยอร์ด้วยมาสก์การตัด
- สร้างเนื้อหาภาพจากเลเยอร์
- ทำงานกับ Smart Object
- โหมดการผสมผสาน
- รวมภาพหลายๆ ให้เป็นภาพบุคคลกลุ่ม
- รวมภาพด้วยการผสมเลเยอร์อัตโนมัติ
- จัดเรียงและกระจายเลเยอร์
- คัดลอก CSS จากเลเยอร์
- โหลดส่วนที่เลือกจากเลเยอร์หรือขอบเขตของมาสก์เลเยอร์
- Knockout เพื่อแสดงเนื้อหาจากเลเยอร์อื่น
- การเลือก
- เริ่มต้นด้วยส่วนที่เลือก
- ทำการเลือกในองค์ประกอบภาพของคุณ
- เลือกและมาสก์พื้นที่ทำงาน
- เลือกด้วยเครื่องมือ Marquee
- เลือกด้วยเครื่องมือ Lasso
- ปรับการเลือกพิกเซล
- ย้าย คัดลอก และลบพิกเซลที่เลือก
- สร้างมาสก์ด่วนชั่วคราว
- เลือกช่วงสีในภาพ
- แปลงระหว่างเส้นทางและขอบเขตส่วนที่เลือก
- พื้นฐานเกี่ยวกับช่อง
- บันทึกส่วนที่เลือกและมาสก์ช่องอัลฟา
- เลือกพื้นที่ภาพที่อยู่ในโฟกัส
- ทำซ้ำ แยก และรวมช่อง
- การคำนวณช่อง
- เริ่มต้นด้วยส่วนที่เลือก
- การปรับภาพ
- แทนที่สีของวัตถุ
- การบิดตามมุมมอง
- ลดความเบลอจากการสั่นของกล้อง
- ตัวอย่างแปรงแก้ไข
- ส่งออกเทมเพลตปรับค่าสี
- ปรับความคมชัดและความเบลอของภาพ
- ทำความเข้าใจเกี่ยวกับการปรับแต่งสี
- นำการปรับแต่งความสว่าง/คอนทราสต์ไปใช้งาน
- ปรับรายละเอียดเงาและไฮไลต์
- การปรับระดับ
- ปรับสีสันและความเข้ม
- ปรับความสด
- ปรับความเข้มในพื้นที่ภาพ
- ทำการปรับโทนสีด่วน
- นำเอฟเฟ็กต์สีพิเศษไปใช้กับภาพ
- ปรับปรุงภาพด้วยการปรับสมดุลสี
- ภาพที่มีช่วงไดนามิกสูง
- ดูฮิสโตแกรมและค่าพิกเซล
- จับคู่สีในภาพของคุณ
- ครอบตัดและจัดภาพถ่ายให้ตรง
- แปลงภาพสีเป็นภาพขาวดำ
- เลเยอร์การปรับแต่งและเลเยอร์การเติม
- การปรับแต่งเคิร์ฟ
- โหมดการผสมผสาน
- กำหนดภาพต่างๆ สำหรับการพิมพ์
- ปรับแต่งสีและโทนสีด้วยหลอดดูดสีปรับระดับหรือเคิร์ฟ
- ปรับแต่งค่าการรับแสงและปรับโทนสี HDR
- ปรับให้พื้นที่ในภาพสว่างขึ้นหรือมืดลง
- ปรับสีที่เลือก
- ซ่อมแซมและฟื้นฟูภาพ
- การปรับแต่งและการแปลงภาพ
- การวาดและการระบาย
- ระบายรูปแบบแบบสมมาตร
- วาดสี่เหลี่ยมผืนผ้าและปรับเปลี่ยนตัวเลือกการลากเส้น
- เกี่ยวกับการวาด
- วาดและแก้ไขรูปร่าง
- สร้างรูปดาวหรือรูปร่างแหลมอื่นๆ
- เครื่องมือการระบายสี
- สร้างและปรับเปลี่ยนแปรง
- โหมดการผสมผสาน
- เพิ่มสีให้กับเส้นทาง
- แก้ไขเส้นทาง
- ระบายด้วยแปรงมิกเซอร์
- ค่าที่ตั้งไว้ล่วงหน้าของแปรง
- การไล่ระดับสี
- การประมาณค่าการไล่ระดับสี
- เติมและการลากเส้นส่วนที่เลือก เลเยอร์ และเส้นทาง
- วาดด้วยเครื่องมือปากกา
- สร้างรูปแบบ
- สร้างรูปแบบโดยใช้ตัวสร้างรูปแบบ
- จัดการเส้นทาง
- จัดการไลบรารีและค่าที่ตั้งไว้ล่วงหน้าของรูปแบบ
- วาดหรือระบายด้วยแท็บเล็ตกราฟิก
- สร้างแปรงที่มีพื้นผิว
- เพิ่มองค์ประกอบไดนามิกให้กับแปรง
- การไล่ระดับสี
- ระบายลายเส้นสไตล์ด้วยแปรงกลับคืนทางศิลปะ
- ระบายด้วยลวดลาย
- ซิงค์ค่าที่ตั้งไว้ล่วงหน้าบนหลายอุปกรณ์
- ย้ายค่าที่ตั้งไว้ล่วงหน้า การดำเนินการ และการตั้งค่า
- ข้อความ
- ตัวกรองและเอฟเฟ็กต์
- การบันทึกและการส่งออก
- การจัดการสี
- การออกแบบเว็บ หน้าจอ และแอป
- วิดีโอและภาพเคลื่อนไหว
- การตัดต่อวิดีโอใน Photoshop
- ตัดต่อเลเยอร์วิดีโอและภาพเคลื่อนไหว
- ภาพรวมวิดีโอและภาพเคลื่อนไหว
- ดูตัวอย่างวิดีโอและภาพเคลื่อนไหว
- ระบายเฟรมต่างๆ ในเลเยอร์วิดีโอ
- นำเข้าไฟล์และลำดับภาพ
- สร้างภาพเคลื่อนไหวของเฟรม
- ภาพเคลื่อนไหว 3D ของ Creative Cloud (ตัวอย่าง)
- สร้างภาพเคลื่อนไหวของไทม์ไลน์
- สร้างภาพสำหรับวิดีโอ
- การพิมพ์
- ทำให้เป็นอัตโนมัติ
- การดำเนินการการสร้าง
- สร้างกราฟิกที่มาจากข้อมูล
- การเขียนสคริปต์
- ประมวลผลชุดไฟล์
- เล่นและจัดการการดำเนินการ
- เพิ่มการดำเนินการแบบมีเงื่อนไข
- เกี่ยวกับการดำเนินการและแผงการดำเนินการ
- เครื่องมือบันทึกในการดำเนินการ
- เพิ่มการเปลี่ยนโหมดแบบมีเงื่อนไขให้เป็นการดำเนินการ
- ชุดเครื่องมือ UI ของ Photoshop สำหรับปลั๊กอินและสคริปต์
- การแก้ไขปัญหา
Learn how to use default brushes to draw and paint with Photoshop on the iPad.
With Photoshop on the iPad, you can draw and paint with brushes — whenever, wherever inspiration strikes.
Not sure where to begin? Start with selecting a brush type to create your composite.
How to choose a brush type
1. Tap ![]() from the toolbar to select the brush tool.
from the toolbar to select the brush tool.
2. A small triangle in the lower right corner of the brush icon represents hidden tool options. Long press the brush icon to reveal the Brushes panel.
3. In the Brushes panel that opens, you can scroll through a list of default brush types. Tap to select the desired brush type and apply to the canvas.
Note: The brush type used in your previous session remains selected when you use the brush tool again. You can always come back to the Brushes panel and change your brush.

Quickly adjust brush properties


You can adjust brush properties from the floating options panel to suit your creative work.
To bring up the tool options, simply tap the brush icon from the toolbar.
From the tool options, tap an icon to select the attribute and modify:
- Color chip: The color chip allows you to choose a color from the color picker, enter a hex color code, or enter numbers for HSB, RGB, Lab, or CMYK colors. You can swipe the color chip vertically to easily switch between the foreground and background colors.
- Brush size: The brush size option allows you to choose the diameter of your brush, which can vary in size from 1 to 1000 pixels. As you vary the brush size, you can also see the brush tip preview beside the tool options bar.
- Opacity: The opacity option sets the maximum transparency of the color you apply per brush stroke. 100% opacity represents opaqueness. As you paint over an area, the opacity doesn't exceed the set level until you complete the stroke (even when you paint over an area several times).
- Hardness: The hardness setting controls the size of the brush’s hard center. Select a value that is a percentage of the brush diameter.
- More brush settings: Tap the three dots icon to bring up the settings panel. To learn more about brush settings, see More brush settings.
Apply more brush settings
To access more Brush settings, tap the three dots (![]() ) icon at the bottom of the tool options bar. You can modify more brush settings as desired:
) icon at the bottom of the tool options bar. You can modify more brush settings as desired:
- Blend mode: The blend mode determines how the active layer blends with the layers below it. Tap the blend mode icon to see a list of available modes. For more information, see Blending modes.
- Roundness: The roundness setting specifies the ratio between the brush’s short and long axes. Select a percentage value. A value of 100% indicates a circular brush, a value of 0% indicates a linear brush, and intermediate values indicate elliptical brushes.
- Angle: The angle setting specifies the angle by which an elliptical or sampled brush’s long axis is rotated from horizontal. Select a value in degrees.
- Flow: Flow sets the rate at which color is applied on your canvas as you move your finger or stylus over an area in your document.
- Smoothing: Smoothing produces smoother curves in brush strokes. Higher values apply increasing amounts of intelligent smoothing to your strokes. This option is most effective when you are painting quickly with a stylus; however, it may produce a slight lag time in stroke rendering.
- Use pressure for size: Selecting Use pressure for size varies the diameter of the brush based on the brush pressure applied while painting.
- Use pressure for opacity: Selecting Use pressure for opacity varies the opacity of the brush based on the brush pressure applied while painting.

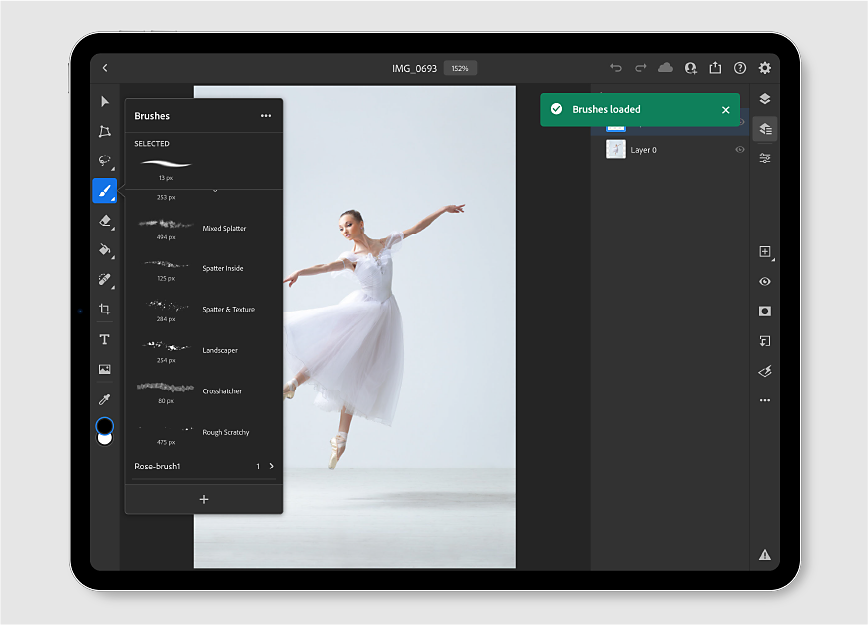
You can now bring all your custom brushes into Photoshop on the iPad. Follow these simple steps to load your favorite brushes in Photoshop on the iPad:
-
-
In the Brushes panel, tap the '+' icon at the bottom to load more custom brushes while you work:
Discover new brushes: Use this option to discover and download hundreds of free brushes to work with.
On selecting Discover new brushes, you are taken to the Kyle Webster page in your web browser. You need to be signed in to see the brushes. Once you download an ABR brush file, you can simply tap and open it in Photoshop on your iPad from the iOS files app directly. You can also add it by tapping the '+' icon from within the Photoshop app.

Import from files: Add any supported ABR brush file by tapping the brush file saved on your device.
-
In the Brushes panel, tap the three dots (
 ) icon at the upper right corner to manage your brushes:
Manage brushes: Opens the Manage brushes panel.
Reset to default brushes: Resets your Brushes panel to show the default brushes only.
Learn More: Leads you to the Helpx article that describes all of the features that are part of the Brushes panel in Photoshop on the iPad.
-
Additionally, in the Manage brushes panel:
- You can tap the three dots () icon at the upper right corner to Import from files and Reset to default brushes.
- You can tap the three dots () icon beside a brush category to see the following options — Rename brush group and Delete brush group. You can also rename or delete specific brushes within a category.
- You can control the visibility of your brushes with the hide/show toggle button, present beside a brush. Turn on the brushes that you want to view and use on the go. Disabling a brush doesn’t delete the brush but only turns off its visibility.
Tap Done to save your changes.
- You can tap the three dots (


You can now use a brush you wish in any of your Photoshop documents and unleash your creativity.
You can also create your own brush in Adobe Capture and import it in Photoshop on your iPad. To learn more, see Create brushes in Capture and use them in Photoshop.
Adjust Pencil pressure sensitivity
In Photoshop on the iPad, you can adjust the pressure sensitivity of your Apple Pencil for a more precise brushing experience while compositing. To manage Apple pencil settings, do the following:
- Tap the gear icon in the upper-right corner of the home screen.
- In the App settings dialog, choose Input > Apple Pencil.
- Under Apple Pencil, set the Pressure sensitivity slider to make your brushing experience perfect while working in Photoshop on the iPad.
At the Light end of the slider range, you get dense brush strokes with soft pressure applied on the Pencil, while at the Heavy end of the slider range you need to apply firm pressure on the Pencil to achieve dense brush strokes. It is easier to obtain fine brush strokes when the slider is set toward the Heavy end and bold brush strokes when the slider is set toward the Light end. - Choose the appropriate amount of sensitivity to get the desired effect. Close the App Settings dialog when done and start using brushes on your composite.

Use touch shortcuts

While using the Brush tool you can activate the primary touch shortcut to access the Eraser version of your Brush, and activate the secondary touch shortcut to switch to the Eyedropper tool.
To know more about how to use the touch shortcut, see Touch shortcuts and gestures.