
- Getting started
- Manage Users
- User basics
- User permissions overview
- Resolve user access issues
- Edit user information
- Edit user group membership
- Assign a user to a manager
- Edit team members
- View a user report
- Customize user profile fields
- Set login and password policies
- Configure single sign-on
- Create additional administrators
- Manage guests
- Bulk user import
- Manage groups
- Cost centers
- Audio providers
- Adobe Connect Central User Interface customization
- Compliance and control
- Administration dashboard
Admins can import large numbers of users via a comma-separated value (CSV) file. Your directory might have a utility for exporting users and groups to CSV files, or you can create CSV files yourself. Your CSV files must be in a specific format. You can modify the imported users and groups in the same way you would any user or group that was manually created.
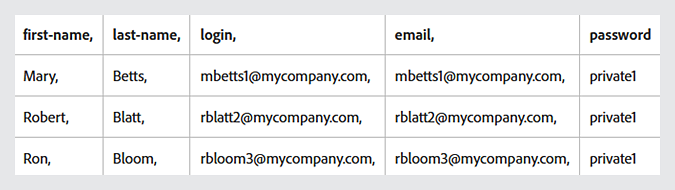
The CSV file field format should look like:
Additionally, the following best practices and requirements are advised:
- Because of browser limitations, you may need to create several smaller CSV files from large data sets.
- Blank lines are unsupported.
- Names that contain a comma must be in quotes. For example, the name John Doe, Jr., must appear in the CSV file as “John Doe, Jr.”.
- The user information in the CSV file must take login and password policies into consideration. For example, if an email address is used as the login name, the login and email values in the CSV file must be identical. Alternatively, if there are password policies (certain length, format, special characters, and so on) these policies must also be applied in the CSV file.
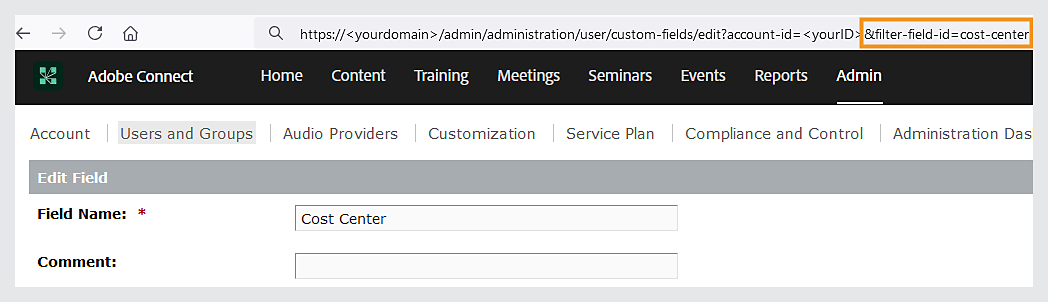
- Before you begin, determine the field ID>. The header format for custom fields is x‑field‑id (for example, x‑45704960).
- To determine the field ID, in Adobe Connect Central, select Admin > Users and Groups > Customize User Profile. Click the field name. In the browser address bar, locate the filter-field-id parameter in the URL. The filter-field-id value is the field‑id. For example, for the custom field Cost Center, filter-field-id=cost-center, and the header format is x-cost-center. For example:
Note: You can also obtain the field ID from the XML API calls custom-fields or acl-field-list.
To bulk import users:
- Create a CSV file.
- If your CSV file is UTF-8 encoded, continue. If it is not UTF-8 encoded, append ?encoding=<your encoding> to the end of the URL in the browser address bar. For example: http://<Adobe Connect Server>/admin/administration/user/import?encoding=euc_kr.
- Select Admin > Users and groups > Import.
- Select an import workflow:
- Create new users: Do not add users to a group.
- Create new users and add them to a group: Select a group from the drop-down list.
- Add existing users to a group: Select a group from the drop-down list.
- Browse to your CSV file and load it.
- Specify whether to send an email to users on import.
- Specify wither to prompt new users to change their password on log in.
- Select Upload.
If any errors occur, the first ten errors are displayed in red text. Errors for duplicate user logins and emails are not reported. Make any necessary corrections and reimport the file; then repeat steps in this procedure.
