- Substance 3D home
- Ecosystems and Plugins
- Home
- Game Engines
- Game Engines overview
- Unreal Engine
- Unreal Engine 5
- Unreal Engine 5 overview
- Unreal Engine 5 Release Notes
- Plugin Overview - UE5
- Plugin Settings - UE5
- Substance Input Image - UE5
- Material Instance Definition - UE5
- Material Template Usage - UE5
- Out-of-the-Box Material Templates
- Physical size - UE5
- Tiling Substance - UE5
- Substance 3D Plugin Default Templates
- Substance 3D Assets Library Usage - UE5
- Blueprints - UE5
- Unreal Engine 5 Scripting
- Installing to Source Builds
- Unreal Engine 5 overview
- Unreal Engine 4
- Unreal Engine 4 overview
- Unreal Engine 4 plugin release notes
- Unreal plugin 4.27.0.1
- Unreal plugin 4.26.0.21
- Unreal plugin 4.26.0.2
- Unreal plugin 4.26.0.1
- Unreal plugin 4.25.0.5
- Unreal plugin 4.25.0.4
- Unreal plugin 4.25.0.3
- Unreal plugin 4.24.0.3
- Unreal plugin 4.23.0.2
- Unreal plugin 4.23.0.1
- Unreal plugin 4.22.0.33
- Unreal plugin 4.22.0.32
- Unreal plugin 4.21.0.31
- Plugin Overview - UE4
- Plugin Settings - UE4
- Substance Input Image - UE4
- Material Instance Definition - UE4
- Tiling Substance - UE4
- Working with Bump Offset (Parallax) - UE4
- Working with Displacement - UE4
- Source in UE4
- Live Link in UE4
- Blueprints - UE4
- Unreal Engine 4 Scripting
- Unreal Engine 4 overview
- Unreal Engine 5
- Unity
- Unity overview
- Unity Release Notes
- Downloading Substance 3D Plugin in Unity
- Unity Plugin Overview
- Unity Preferences
- Optimization Guidelines
- Upgrading Projects/Known Issues
- Managing Substance Graphs
- Changing parameters
- Generated Textures (Packing)
- Rendering Color Space
- Using Image Inputs
- Publishing for Mobile
- Substance 3D for Unity Scripting
- API Overview
- Scripting API
- C# Example Script
- Substance 3D Assets Library Usage
- Removing Substance Plugin
- Substance 3D in Unity Tutorials
- Physical Size in Unity
- Sharing sbsar Files Between Projects
- Unity overview
- Lumberyard
- Roblox
- 3D Applications
- 3D Applications overview
- Maya
- 3ds Max
- MODO
- MODO overview
- Modo Plugin Release Notes
- Substance in MODO Overview
- Modo Installation
- Parameters
- Custom Materials
- Working with Normals
- Working with Emissive
- Bump and Displacement
- Working with References
- Animating Substances
- Copy/Duplicate Substance
- Environment and Rendering Setup
- Modo Switch Engine
- Tiling Modo textures
- MODO overview
- Cinema 4D
- Houdini
- Blender
- Blender overview
- Release Notes
- Substance in Blender Overview
- Downloading and Installing the Plugin
- Preferences
- The Substance 3D Panel
- Shortcuts and Navigation
- Workflows
- Physical size in Blender
- Substance 3D Assets Library
- Troubleshooting
- Uninstalling the Add-on
- Substance 3D Add-on for Blender Tutorials
- Blender overview
- Creative Cloud Applications
- Renderers
- Partnerships
Working with Bump Offset (Parallax) - UE4
Bump Offset mapping give a surface the illusion of depth by modifying the UV coordinates in a creative way to help further displace the texels from the surface of the object, giving the illusion that the surface has more details than it really does. In this How To example, we will be covering not only how you can find the Bump Offset Material Expression, we will also be covering how you can utilize the Bump Offset node in your Materials.
https://docs.unrealengine.com/latest/INT/Engine/Rendering/Materials/HowTo/BumpOffset/
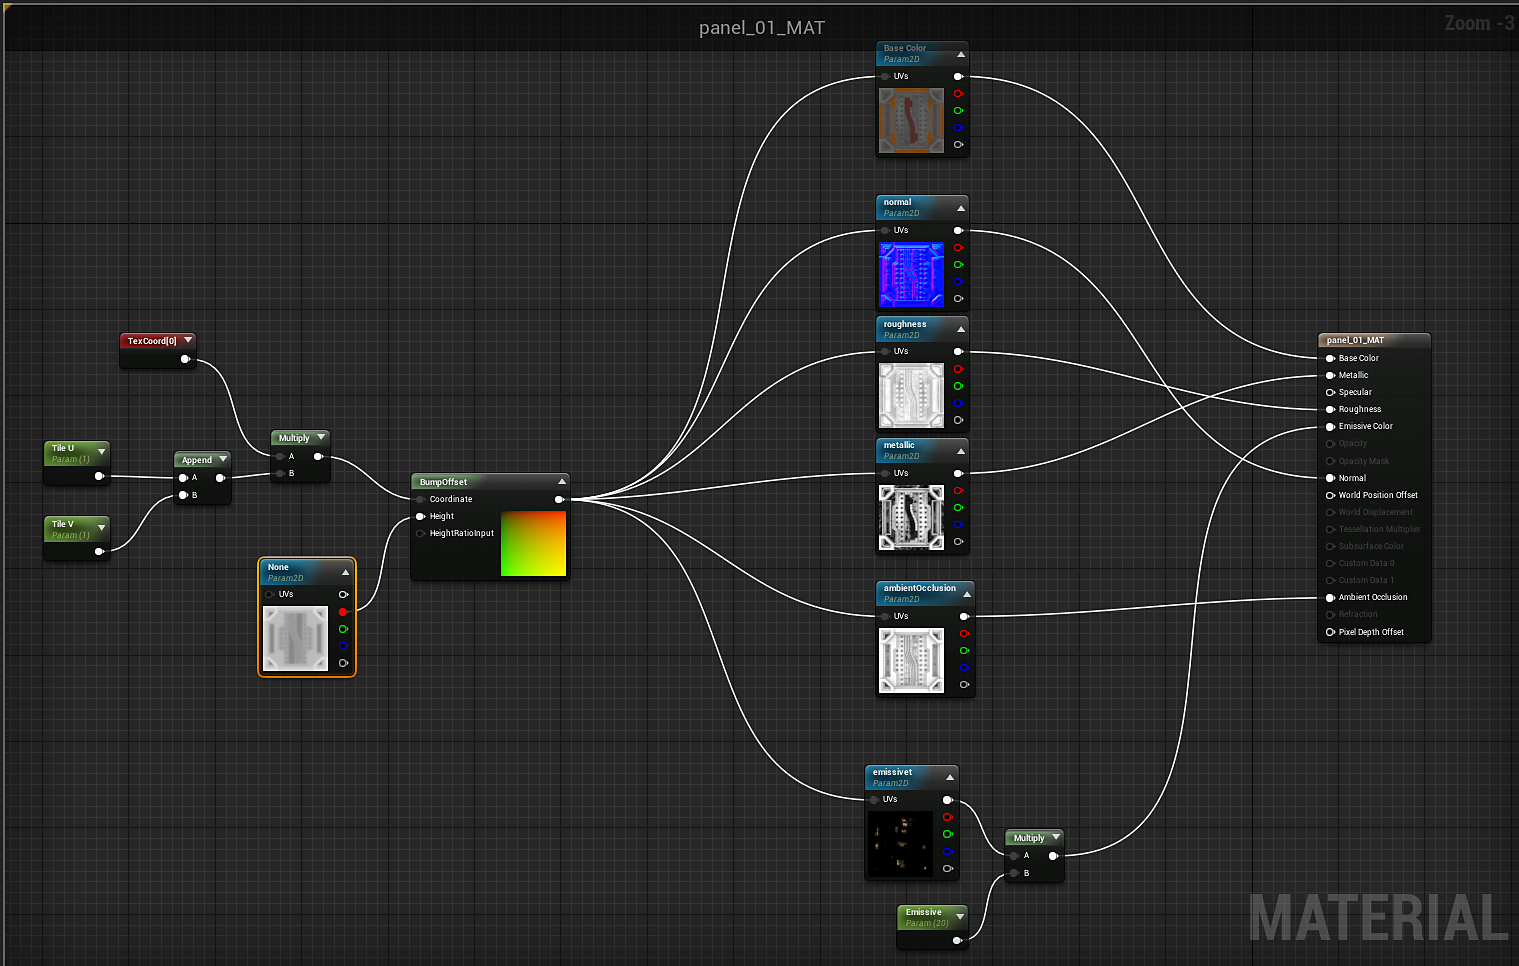
To use the height output, you need to double click the Output in the Substance Factory Instance to create height. Height is not enabled by default. You can then drag this height output into your material.


Create a bump offset node and then plug in the Red channel of the height into the Height. You can then feed in a TexCoord into the Coordinate input of the bump offset. Finally, the output of the bump offset is plugged into the UV input for all of the Substance textures.

