- Substance 3D home
- Home
- Getting Started
- Getting Started overview
- Activation and licenses
- System requirements
- Project creation
- Export
- Export overview
- Export window
- Output templates
- Export overview
- Glossary
- Getting Started overview
- Interface
- Interface overview
- Assets
- Substance 3D Assets
- Color picker
- Display settings
- History
- Layer stack
- Main menu
- Project configuration
- Properties
- Settings
- Shader settings
- Texture Set
- Toolbars
- Viewport
- Miscellaneous
- Painting
- Painting overview
- Paint tools
- Path tools
- Path tool overview
- Paint along path
- Ribbon path
- Filled path
- Erase along path
- Smudge along path
- Straight line
- Lazy mouse
- Symmetry
- Fill projections
- Presets
- Presets overview
- Creating and saving presets
- Creating particles presets
- Photoshop brush presets
- Dynamic strokes
- Advanced channel painting
- Vector graphic (.svg & .ai)
- Text resource
- Effects
- Baking
- Content
- Creating custom effects
- Importing assets
- Creating custom effects
- Features
- Automatic resource update
- Automatic UV Unwrapping
- Physical size
- Smart Materials and Masks
- Subsurface Scattering
- Dynamic Material Layering
- UV Reprojection
- UV Tiles
- Color Management
- Post Processing
- Iray Renderer
- Plugins
- Sparse Virtual Textures
- Custom Shaders
- SpaceMouse® by 3Dconnexion
- Universal Scene Description (USD)
- Send to
- Technical Support
- Performance Guidelines
- Configuring Pens and Tablets
- Exporting the log file
- Exporting a DXDiag
- Technical issues
- GPU Issues
- Crash when working with overclocked GPU
- Forcing the external GPU on Mac OS
- GPU drivers compatibility
- GPU drivers crash with long computations (TDR crash)
- GPU has outdated drivers
- GPU is not recognized
- GPU is not recognized and is mentionned as GDI Generic
- Issues with Nvidia GPUs on recent Mac OS versions
- Multi/Bi-GPU
- Running on integrated GPU
- Painter doesn't start on the right GPU
- Startup Issues
- Rendering Issues
- Stability Issues
- Miscellaneous Issues
- GPU Issues
- Workflow Issues
- Export Issues
- Tools Issues
- Project Issues
- Library Issues
- Viewport Issues
- Plugins Issues
- License Issues
- Pipeline and integration
- Installation and preferences
- Configuration
- Resource management
- Scripting and development
- Scripts and plugins
- Shader API Reference
- Shader API overview
- Changelog - Shader API
- Libraries - Shader API
- Lib Alpha - Shader API
- Lib Bayer - Shader API
- Lib Defines - Shader API
- Lib Emissive - Shader API
- Lib Env - Shader API
- Lib Normal - Shader API
- Lib PBR - Shader API
- Lib PBR Aniso - Shader API
- Lib Pom - Shader API
- Lib Random - Shader API
- Lib Sampler - Shader API
- Lib Sparse - Shader API
- Lib SSS - Shader API
- Lib Utils - Shader API
- Lib Vectors - Shader API
- Parameters - Shader API
- Shaders - Shader API
- Release notes
- Release notes overview
- All Changes
- Version 11.1
- Version 11.0
- Version 10.1
- Known issues
- Old versions
- Version 10.0
- Version 9.1
- Version 9.0
- Version 8.3
- Version 8.2
- Version 8.1
- Version 7.4
- Version 7.3
- Version 7.2
- Version 2021.1 (7.1.0)
- Version 2020.2 (6.2.0)
- Version 2020.1 (6.1.0)
- Version 2019.3
- Version 2019.2
- Version 2019.1
- Version 2018.3
- Version 2018.2
- Version 2018.1
- Version 2017.4
- Version 2017.3
- Version 2017.2
- Version 2017.1
- Version 2.6
- Version 2.5
- Version 2.4
- Version 2.3
- Version 2.2
Updating a shader
It can be necessary sometimes to update the shader used by a project in order to fix issues or take advantage of the latest features. This page describes how to do so.
Below is are two step by step method on how to update the shader of a project:
- Update a Shader via the Shader Window
- Update a Shader via the Resource Updater plugin
If a project use a custom shader (not shipped by default with Substance 3D Painter) refer to the Custom Shader page to get a guide on how to update it.
Update a Shader via the Shader Window
1 - Open the Shader Settings window
The Shader settings window is available on the right by default in the Dock toolbar.
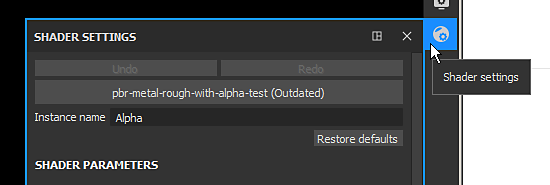
2 - Click on the shader button and select the updated shader
Click on the shader button (below the undo/redo button) and find the shader that match the one that was already used.
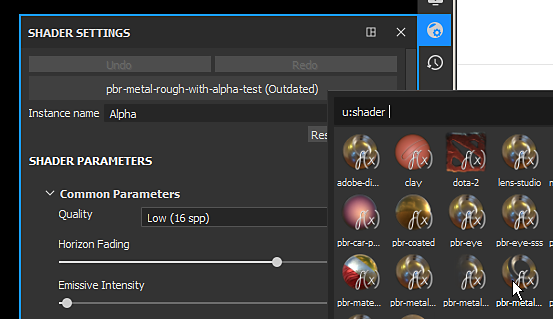
3 - Shader is updated
Once the new shader is loaded the mention outdated should be removed and the 3D model should appear normally in the viewport.

Update a Shader via the Resource Updater plugin
1 - Open the Resource Updater
Go toward the left of the interface to find the Plugins toolbar and click on the Resource Updater icon.

2 - Switch to the Shader Tab
In the new window that appeared, click on the "Shader" tab to display the shader present in the current project.

3 - Find the Shader and update it
In the Shader tab should appear a list of all the Shader resources user by the current project. Outdated Shader are visible with a red background . Click on the "update" button next to a resource to update it.