- What's new
-
Get started
- Technical requirements and installation
-
Learn the basics
- Adobe Photoshop on desktop FAQ
- Home screen overview
- Workspace overview
- Access the Discover panel
- Save custom workspaces
- Switch workspaces
- Delete workspaces
- Restore workspaces
- Boost workflows with the Contextual Task Bar
- Rearrange document windows
- Hide or show all panels
- Dock or undock panels
- Move panels
- Add and remove panels
- Stack floating panels
- Expand or collapse panel icons
- Change text size in panels and tooltips
- Use simple math in number fields
- High-density monitor support and per-monitor scaling
- Arrange and group panels
- Request access to test experimental features
-
Set up toolbars and panels
- Customize toolbar
- Tooltips overview
- Create tool presets
- Use spring-loaded shortcuts
- Use Undo and Redo commands
- History panel settings
- Set History Log preferences
- View history logs
- Use snapshots in the History panel
- Paint with image states from the History panel
- Manage image states
- Restore parts of an image to a previous state
- Edit images with AI Assistant
- View and synchronize multiple images
-
Settings and preferences
- Adjust preferences
- Backup and restore preferences
- Reset preferences
- View keyboard shortcuts
- Change tool pointers
- Change Photoshop language settings
- Connect social media accounts for Content Credentials (Beta)
- Display file information in the info panel and document status bar
- Photoshop preferences locations
- Generative AI in Photoshop
-
Create, open, and import images
- Import files
-
Create images
- Generate an image with descriptive text prompts
- Edit images with Generative Fill
- Generate sharper variations with Enhance Detail
- Explore beyond the canvas with Generative Expand
- Use reference images for consistent results
- Generate images guided by a reference image
- Edit images with Prompt to edit
- Use Markup for AI image generation
-
Create and manage layers
- Get started with layers
- Transform and manipulate layers
-
Color adjustment and fill layers
- Adjustment and fill layers overview
- Work with adjustment layers
- Use layer masks to target adjustment or fill layers
- Create adjustment layers
- Merging adjustment or fill layers
- Adjustment presets overview
- Create custom presets
- Correct color balance with Color and vibrance
- Create fill layers
- Adjustment layer options
- Change adjustment and fill layer options
- Adjust contrast with Clarity and Dehaze
- Adjust texture with Grain
- Adjust image lighting with Light
-
Apply layer effects
- Add layer styles
- Work with preset styles
- Layer style effects and options overview
- Manage preset styles
- Display or hide layer styles
- Copy and paste layer styles
- Import preset style libraries
- Manage contours
- Set a global lighting angle for all layers
- Scale layer effects
- Remove layer effects
- Work with layer styles
- Convert layer styles to image layers
-
Smart objects
- Smart Objects - overview and benefits
- Create embedded Smart Objects
- Create linked Smart Objects
- Update Linked Smart Objects
- View Linked Smart Object properties
- Embed Linked Smart Objects
- Package and locate linked Smart Objects
- Convert embedded Smart Objects to linked
- Filter the Layers panel by Smart Objects
- Duplicate an embedded Smart Object
- Edit the contents of a Smart Object
- Replace the contents of a Smart Object
- Convert Smart Objects to layers
- Rasterize Smart Objects
- Export the contents of an embedded Smart Object
- Reset Smart Object transforms
- Create layer compositions
- Layout and design tools
-
Crop, resize, and transform
-
Resize and adjust resolution
- Printed image resolution
- Set image size and resolution
- Resample option in the Image Size dialog
- Monitor resolution and image display size
- File size
- Printer resolution
- Resolution specs for printing images
- Preserve visual content when scaling images
- Specify content to protect when scaling
- Resize images
- Resampling options in Photoshop
- Change the pixel dimensions of images
- Change print dimensions and resolution
- Manage image file size
- Resizing parameters in Photoshop
- Crop and straighten
- Transform, manipulate, and reshape
-
Resize and adjust resolution
-
Make selections
- Get started with selections
-
Automatic and color-based selections
- Improve Select Subject and Remove Background results
- Make precise selections using Select People
- Remove objects with Delete and Fill Selection
- Improve hair selections with the Refine Hair tool
- Mask all objects in a layer
- Detect subject using Select Subject
- Paint a selection with Quick Selection tool
- Select areas by color with the Magic Wand tool
- Freehand selections
-
Refine and modify selections
- Move a selection or selection border
- Refine your selection and mask
- Hover layer bounds in the Move tool
- Copy and paste selections
- Create multiple copies of a selection within an image
- Paste one selection into or outside another
- Delete or cut selected pixels
- Control the movement of a selection
- Hide or show selection edges
- Inverse selection
- Adjust a selection manually
- Select only an area intersected by other selections
- Refine and soften selection edges
- Select pixels using anti-aliasing
- Define a feathered edge for a selection tool
- Create a selection around a selection border
- Expand or contract a selection
- Clean up stray pixels in a color-based selection
- Fringe pixels around a selection
- Decrease the fringe on a selection
- Remove a matte from a selection
- Use selections for generative editing
- Create masks
-
Repair and retouch
-
Remove objects and fill space
- Remove background in your images
- Replace background with Generate Background
- Retouch tools overview
- Blend objects and people into any background with Harmonize
- Remove objects and fill the area with Content-Aware Fill
- Adjust Content-Aware Fill settings
- Tools to fine-tune sampling and fill areas
- Apply or cancel Content-Aware fill changes
- View full-resolution preview in the Preview panel
- Remove objects from within the Contextual Task Bar
- Remove tool known issues and workarounds
- Remove tool minimum and recommended hardware requirements
- Remove objects
- Remove wires, people, and general distractions
- Review and refine general distractions
- Heal and clone
- Adjust light and tone
-
Clean and restore images
- Enhance image quality with Generative Upscale
- Define planes to adjust perspective
- Manipulate the planes to adjust perspective
- Edit different perspectives in the same image
- Keyboard shortcuts to adjust perspective
- Get started with Photomerge
- Create panoramic images with Photomerge
- Create 360-degree panoramas
- Remove imperfections with the Spot Healing Brush
- Retouch a large area with the Healing Brush tool
- Repair an area with the Patch tool
- Remove red eye in flash photos
- Define an image as a preset pattern
- Erase parts of an image with the Eraser tool
- Auto Erase with the Pencil tool
- Create smoother brush strokes using stroke smoothing
- Change pixels to transparent with the Background Eraser tool
- Remove similar pixels with the Magic Eraser tool
- Remove reflections
-
Remove objects and fill space
-
Adjust color
- Color profiles
- Choose colors
- Color modes
- Color corrections
- Selective color adjustments
- Color effects and techniques
-
Apply painting techniques
- Fill objects, selections, and layers
- Create and fill with patterns
-
Brushes and presets
- Get started with brush presets
- Display the Brush Settings panel and brush options
- Create a brush tip from an image
- Create a brush and set painting options
- Select a preset brush
- Create a new preset brush
- Create preset brush groups
- Rename preset brushes
- Delete preset brushes
- Import brushes and brush packs
-
Draw shapes and paths
- Create shapes
- Draw lines and curves
-
Text and typography
- Get started with text
- Select and manage fonts
- Type layers and creation
- Text on paths and shapes
- Characters and glyphs
- International text and languages
- Work with Dynamic Text
-
Effects and filters
- Get started with filters
- Smart filters
- Blur and sharpen filters
-
Artistic and stylize filters
- Reshape and distort images with Transform Warp
- Warp a Layer with Cylindrical Transform
- Get precise distortions with Split Warp
- Distort specific image areas with Puppet Warp
- Overview of Liquify filter
- Overview of distortion tools
- Use Liquify to distort an image
- Freeze or thaw areas
- Work with meshes
- Work with backdrops
- Reconstruct distortions
- Replace the sky in images
- Select and manage sky presets
- Enhance images with generative AI filters
- Neural filters
-
Use grids and measurement guides
- Alignment grids and guides
- Measure and scale
-
Add video and animation
-
Create animation frames
- Create frame-based animations
- Add frames to animations
- Select animation frames
- Edit animation frames
- Unify layer properties in animation frames
- Copy frames with layer properties
- Create frames using tweening
- Manage layer visibility in animation frames
- Specify a delay time in frame animations
- Choose a frame disposal method
- Specify looping in frame animations
- Delete animations
- Use keyframes
-
Create animation frames
-
Automate tasks
- Create and record actions
- Process a batch of files
- Automation settings and presets
-
Save and export
- Save files
-
Export files to different formats
- Video and animation export formats
- Enhance animation frames
- Flatten frames into layers
- Export video files or image sequences
- Photoshop file formats overview
- File compression in Photoshop
- Supported file formats in Photoshop
- Image file formats supported in Photoshop
- Export your work using the Quick Export as option
- Fine-tune export settings with Export As
- Export settings and export location preferences
- Export files in different sizes
- Export layers as files
- Export artboards as PDF
- Export artboards as files
- Save and export to cloud
- Metadata, CSS, and content credentials
-
Share and collaborate
- Collaborate and edit
- App integrations
-
Troubleshoot
- Tools and resources
- Performance and stability issues
- File and format issues
- Tool and feature issues
Understand raster and vector files
Learn how raster and vector graphics differ so you can choose the right approach for your Photoshop projects.
Photoshop supports two types of images: raster and vector. Raster images use pixels, while vector images use scalable shapes.
Raster images
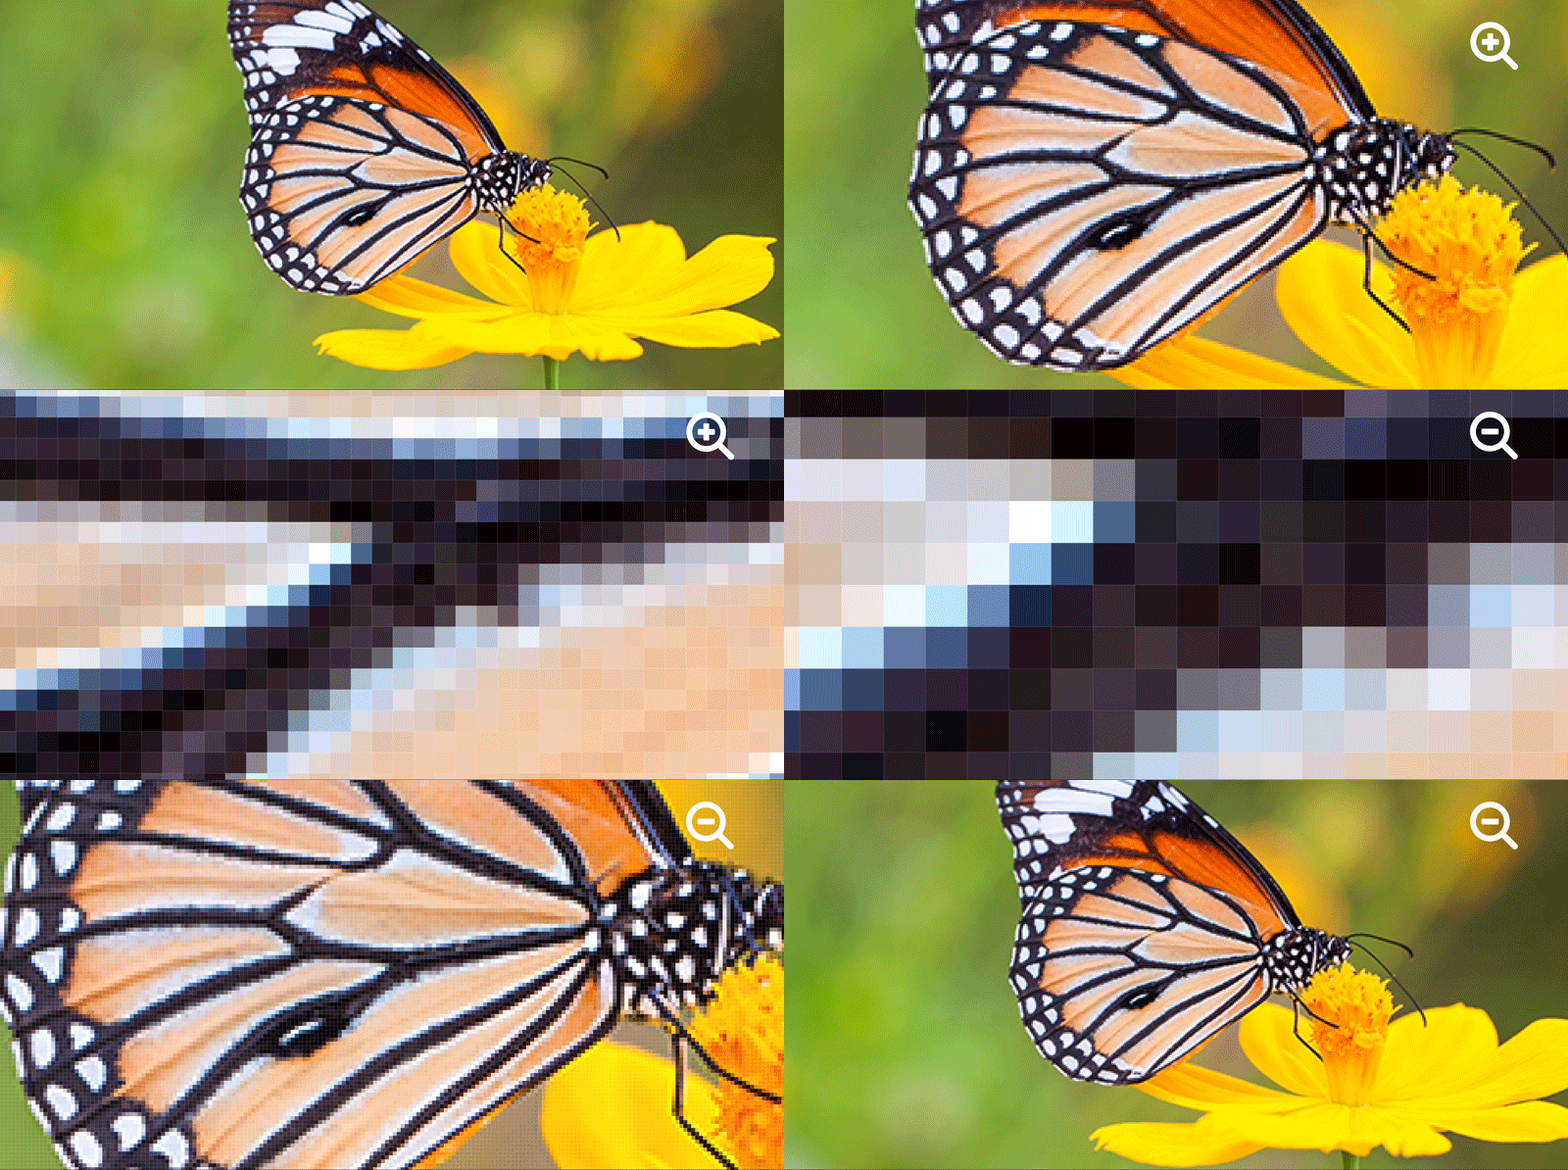
Raster images use a grid of tiny squares called pixels. Each pixel stores a color.
When you edit raster images, you modify individual pixels.
Resolution dependence
Raster images have a fixed number of pixels.
- Enlarging adds new pixels and can cause blur or pixelation.
- Reducing removes pixels and removes detail.
Plan your image size to avoid quality loss.
File size considerations
Raster images store color data for every pixel, which increases file size.
Compression reduces file size:
- JPEG (lossy): Removes some image data.
- PNG (lossless): Preserves all image data.
Choose a format based on quality and file size needs.
Common raster formats
Photoshop works with several raster file formats, each suited to different purposes:
- JPEG: Supports a wide range of colors; ideal for web images.
- PNG: Supports transparency with no quality loss.
- TIFF: Used for print and archiving.
- GIF: Supports simple graphics and animation.
- PSD: Photoshop’s native format with layers.
Vector images
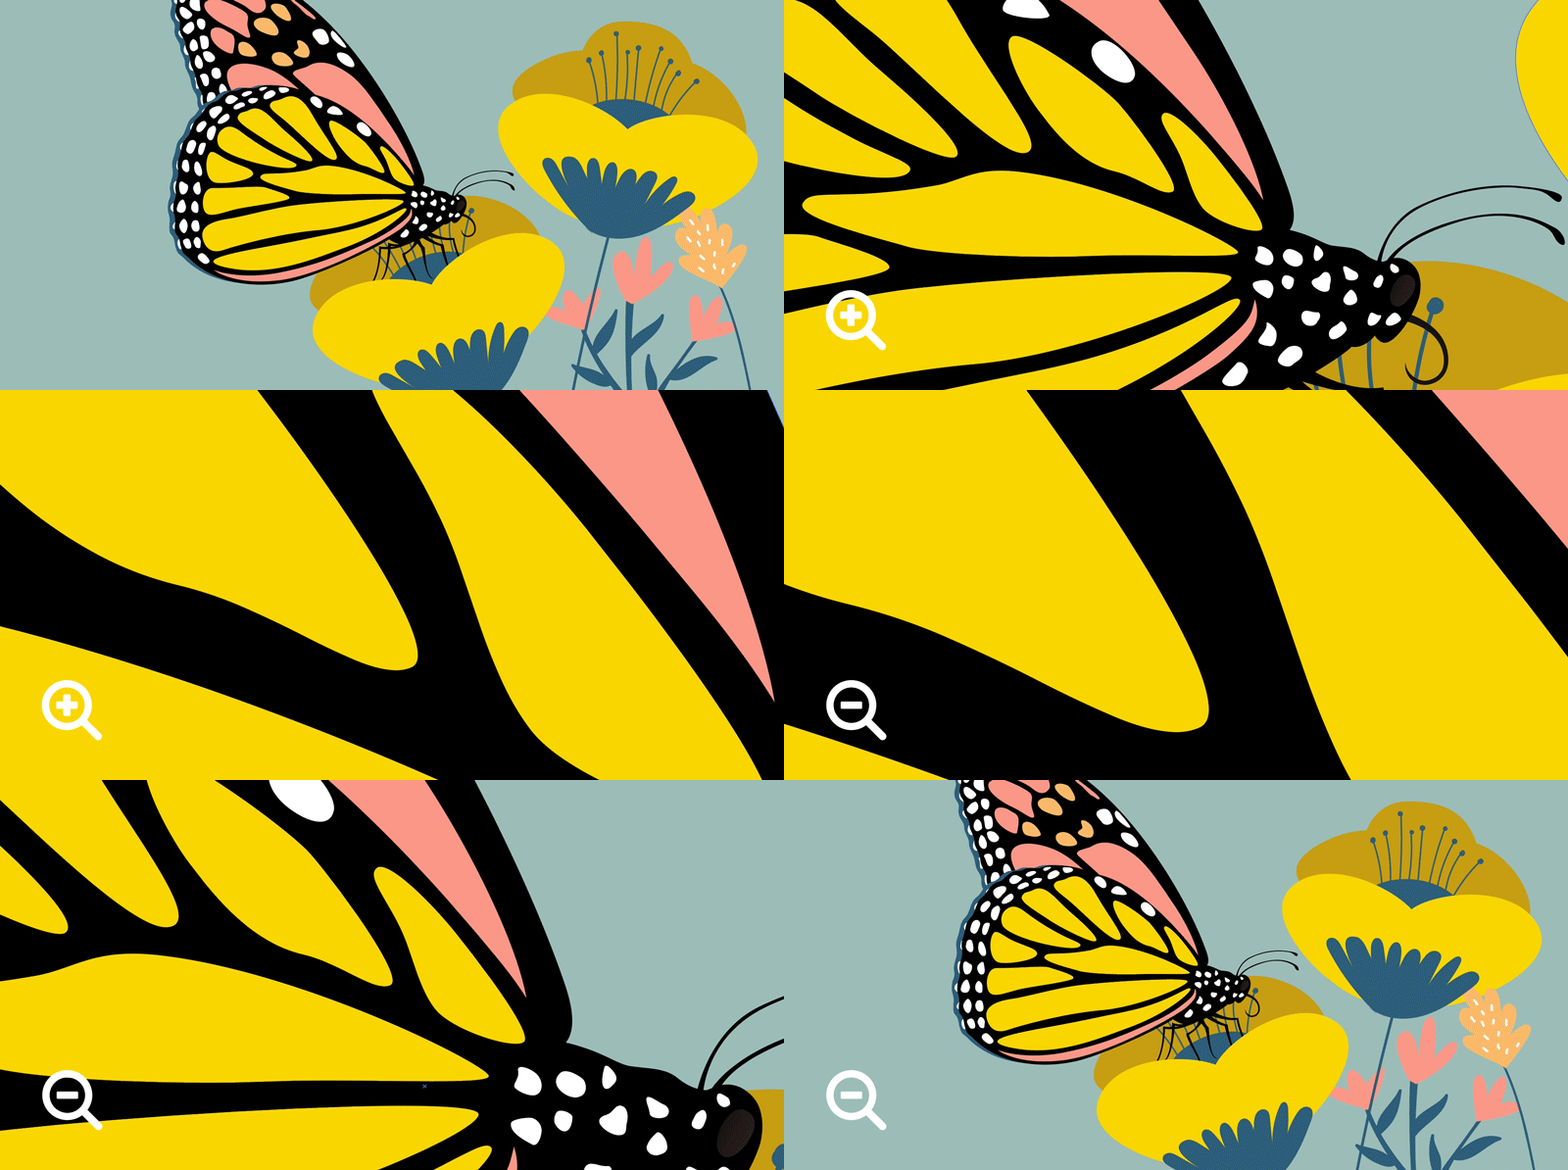
Vector images use shapes, lines, and curves instead of pixels. Mathematical definitions keep them sharp at any size.
They are used for logos, icons, text, and illustrations.
Resolution independence
Vector images do not rely on pixels.
You can scale them to any size without losing quality. This makes them ideal for designs used across multiple sizes and formats.
File size advantages
Vector files are smaller than raster files for simple graphics.
However, complex vector artwork can increase file size. Converting photos to vector formats can create large files.
Common vector formats
While Adobe Illustrator specializes in vector creation, Photoshop can work with these vector formats:
- AI: Adobe Illustrator format.
- EPS: Print-ready vector format.
- SVG: Web-friendly vector format.
- PDF: Supports both vector and raster content.
Working with both types in Photoshop
Photoshop creates raster images by default. You edit pixels when you paint, retouch, or apply filters.
You can also add vector elements:
- Use shape tools to create scalable vector layers.
- Use type layers to keep text sharp.
These elements work together in a single document.
Quality considerations for combined artwork
Combining vector and raster content affects output quality.
Transparency and flattening
Photoshop flattens artwork with transparency when printing or exporting.
Flattening merges layers into a single image.
Image resolution
Image resolution measures how many pixels fit into 1 inch. This value is called pixels per inch (PPI).
- Low PPI → pixelated images.
- High PPI → larger files with no visible benefit beyond limits.
Guidelines:
- Screen: 72–96 PPI.
- Desktop print: 150–300 PPI.
- Professional print: 300 PPI.
Printer resolution and screen frequency
- PPI (pixels per inch): Image resolution.
- DPI (dots per inch): Printer resolution.
- LPI (lines per inch): Print screen detail.
Use appropriate resolution settings based on your output.
Create stunning images with Photoshop
Edit, retouch, and transform photos with the industry-leading creative tools you know and love.